Fold cylinders, rocker arm and 3” rollers assembly – Great Plains 6548 Series VII Field Cultivator-Floating Hitch Operator Manual User Manual
Page 25
Great Plains Mfg., Inc.
Section 1: Assembly
1/22/2005
Series VII 6330-6548 Field Cultivator, Floating Hitch 560-205M
23
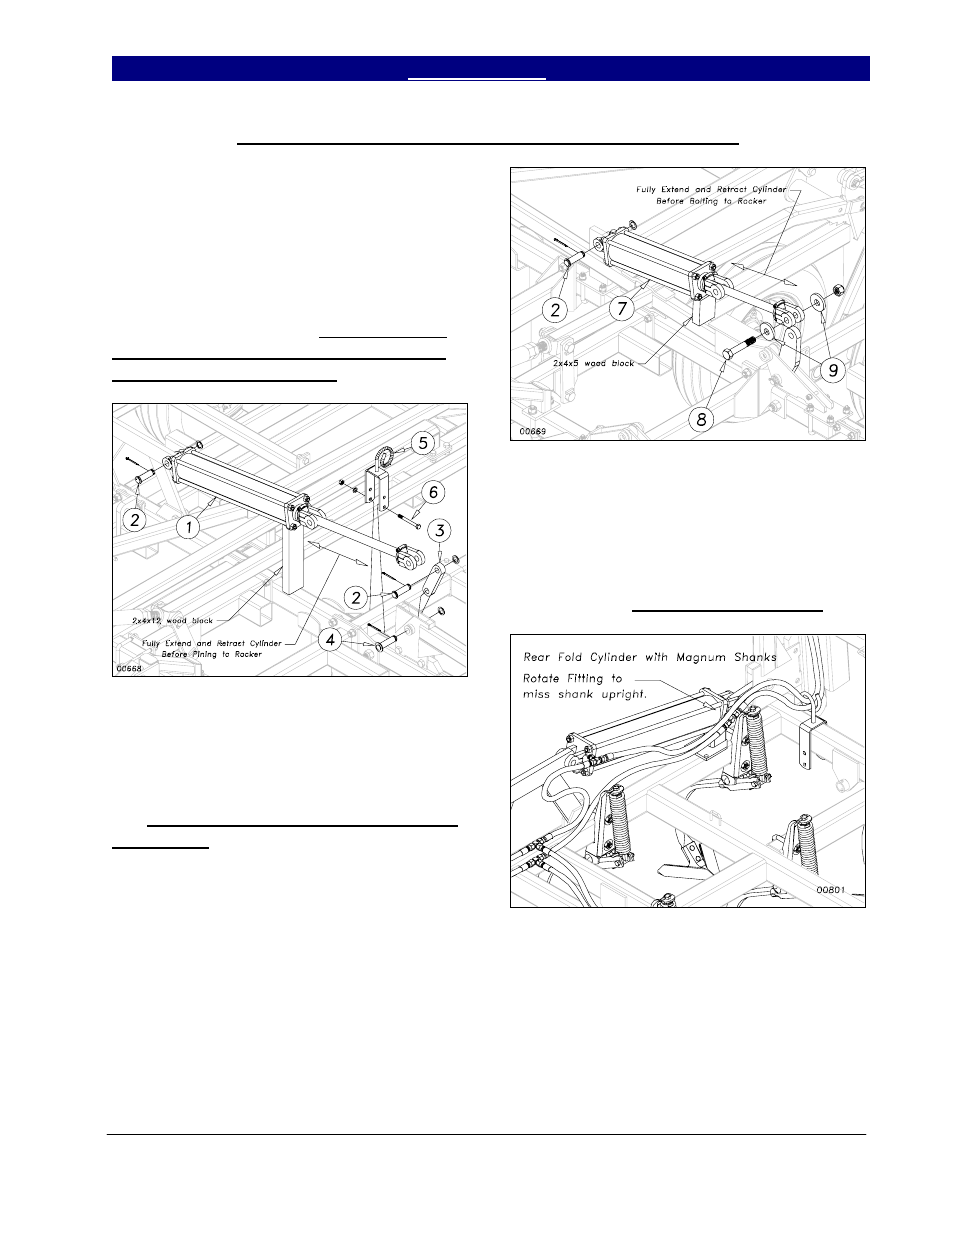
Fold Cylinders, Rocker Arm and 3” Rollers Assembly
Connect the center fold 4 x 24
cylinders (1) to the center fold bracket as
shown in Figure 10. Use the 1” x 3 1/2 clevis
pin (2) with 1” machine washer and 3/16 x 2
cotter pin. Attach the 5¾” (3-section) or 6
1/2” rocker (5-section) (3) to rocker bracket
with 1 x 3 Headed Pin (4) using 1” machine
washer and 3/16 x 2 cotter. Do Not Connect
Rod End Of Cylinders To Rockers Before
They Are Charged With Oil.
Figure 10
On 5-section models, connect the base
of the 4 x 16 fold cylinders (7) to the
Rocker/Fold bracket with 1 x 3 1/2 clevis pin
(2), 1” machine washer and cotter (see Figure
10). Do Not Connect Rod End Of Cylinders
To Rockers. Bolt the hose holders (5) to the
center frame with a 1/2 x 4 1/2 hex bolt (6),
using a lock washer and hex nut.
Place a support block of wood under
the cylinders, as shown, so they clear the
rockers in the extended position. You are now
ready to connect the hydraulic hoses to the
cylinders and charge the fold system (see
hydraulic layout).
Figure 11
Once the fold cylinders are fully
charged and free of air, connect them to the
rockers. Use a 1 x 5 1/2 bolt (8) to bolt two 3”
rollers (9), one on each side, to the 180 degree
rocker as shown in Figure 11. Secure with 1”
nylon lock nut. Rollers must turn freely!
Figure 12
On machines with rear fold cylinders
and Magnum Shanks, the hydraulic fittings
need to be rotated as shown in Figure 12 to
clear the Magnum shank upright when folded.
- 6546 Series VII Field Cultivator-Floating Hitch Operator Manual 6544 Series VII Field Cultivator-Floating Hitch Operator Manual 6541 Series VII Field Cultivator-Floating Hitch Operator Manual 6539 Series VII Field Cultivator-Floating Hitch Operator Manual 6537 Series VII Field Cultivator-Floating Hitch Operator Manual 6332 Series VII Field Cultivator-Floating Hitch Operator Manual 6330 Series VII Field Cultivator-Floating Hitch Operator Manual