Monarch Instrument Pocket-Tach Plus Kit h Plus Kit User Manual
Page 9
DO NOT ATTEMPT TO USE THE LINEAR SPEED
WHEEL IF THE SECURING SCREW IS NOT TIGHT.
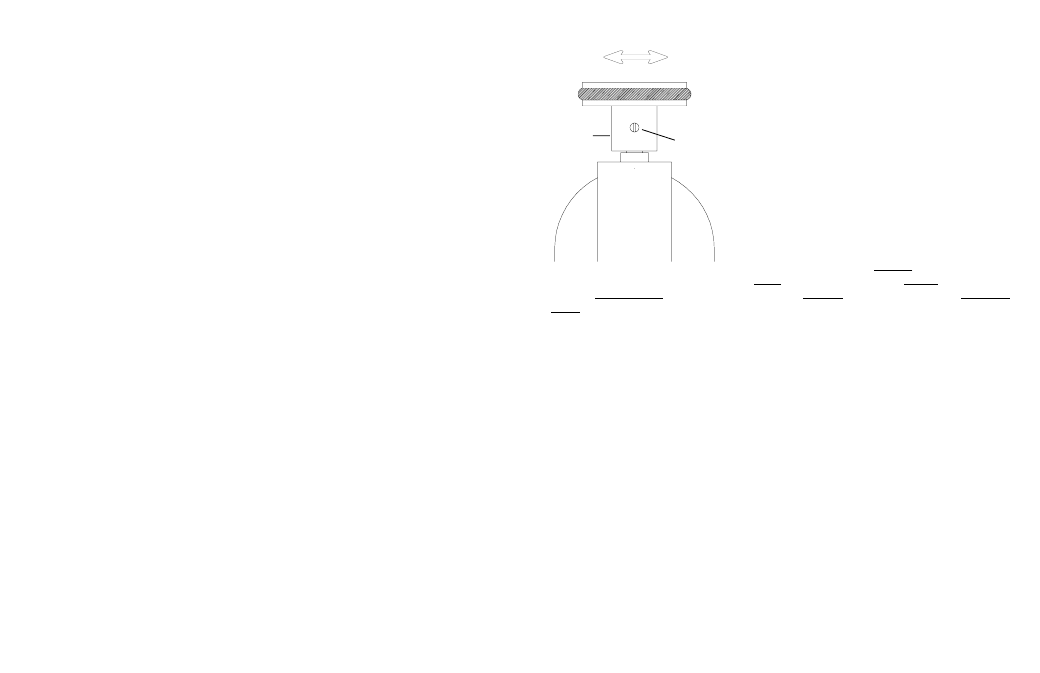
To measure a linear surface speed such as a moving
belt or web, hold the POCKET-TACH at a right angle
(90 degrees) to the direction of movement and
gently contact the side of the rubber tip against the
top surface of the object to be measured. For accurate
results, be sure that the tip is held flat against the
moving object. Only a very moderate amount of
pressure is required. Excess pressure can load the
CTA-2P shaft and distort the rubber tip causing an
erroneous reading and eventual wear in the bearings
of the Contact Tip Assembly. Linear speeds are read
out directly based on the operating mode previously
selected in the menu modes. The “Per Minute”
measurement ranges are: Inches, 10 to 40,000 Inch/
M; Feet, .84 to 3,900 Feet/M; Yards, .28 to 1,200
Yard/M; Centimeters, 25.0 to 120,000 Cm/Min; Meters, .250 to 1,200 M/Min; Miles per
Hour, 0 to 44 Mile/H.
NOTE: PLEASE READ AND HEED WARNINGS FOR CONTACT MEASUREMENTS
ABOVE.
6. OPERATION
The unit is started by pressing the middle button. The display will turn on with all
segments lit, the unit will then indicate what operating mode has been preset. The display
will then show
READY
and the display will go to 0 (zero). The unit will automatically shut
off after 90 seconds of inactivity.
TO SHUT THE UNIT OFF AT ANY TIME, PRESS THE R AND MIDDLE BUTTONS
SIMULTANEOUSLY.
SELECTING OPERATING MODES: See menu overview chart in back of manual.
To change the operating mode press the M button so that the display shows
MENU.
There are
a
number of Main Menu choices that can be selected by pressing the
M button. These are:
TYPE
Selects the primary operating mode - RPM, RATE, TOTAL, TIMER.
DEC PT
Decimal Point- select SET for a resolution of one, or AUTO for auto ranging
with moving decimal point (fractional resolution to 0.0001).
Direction Of Belt Movement
Securing
Screw
Linear
Contact
Wheel
one more time. The display will be RESET to zero by pressing the middle button. To shut
the unit off manually, press the middle and R buttons simultaneously.
Note that the total may have an uncertainty of ±0.5 revolution of the contact wheel
circumference (0.05m or 1.8”) depending on where the wheel starts or stops.
In TOTALIZER mode, the unit will shut off if no inputs are received or no buttons are
pressed in 90 seconds.
11. DECIMAL POINT (DEC PT)
The instrument can display measurements in a “set” range format - 1234 with a resolution
of 1 digit, or in an “auto” floating point format - 1234.56 for maximum resolution. It is not
applicable to the TIMING mode.
The decimal point operation is selected by pressing the M (menu) button until the display
shows
DEC PT.
Press the
R button to select either
SET
or
AUTO
modes then press the
middle button to return to the measurement.
12. TEST
The TEST mode is used to check the instrument calibration against a known standard, the
AC mains frequency. The Contact Wheel Assembly or Remote Sensors must not be
attached to the instrument. To enter the TEST mode turn the unit on and press the M
button until the unit shows
TEST.
Press the
R button. The display will show all segments
on and then enter the RPM mode. To test the unit, aim it at an old style fluorescent light.
The display should show
7200
±
2 counts
for countries with 60 cycle AC mains and
6000
±
2 counts
for countries with 50 cycle AC mains. To exit the TEST mode press the M
button then the middle button. The unit will remember the previous mode of operation.
Note that this test does not check the internal lamp. This can be accomplished during the
RPM mode by looking into the lens hole on the underside of the unit and pressing the
middle button. Check to see that the lamp comes on and is bright white not yellow in
color.
13. USING THE OPTIONAL ROS-9P REMOTE OPTICAL SENSOR
The optional ROS-9P Remote Optical Sensor can be plugged into the side of the
instrument housing. The green LED on the ROS-9P is the on-target indicator. Operation
in all modes is the same as using the internal optics of the instrument. The ROS-9P
should be plugged into the POCKET-TACH Plus while the power is off.