Quoizel QMC1199FR Quoizel Mini Chandelier User Manual
Page 8
8of8
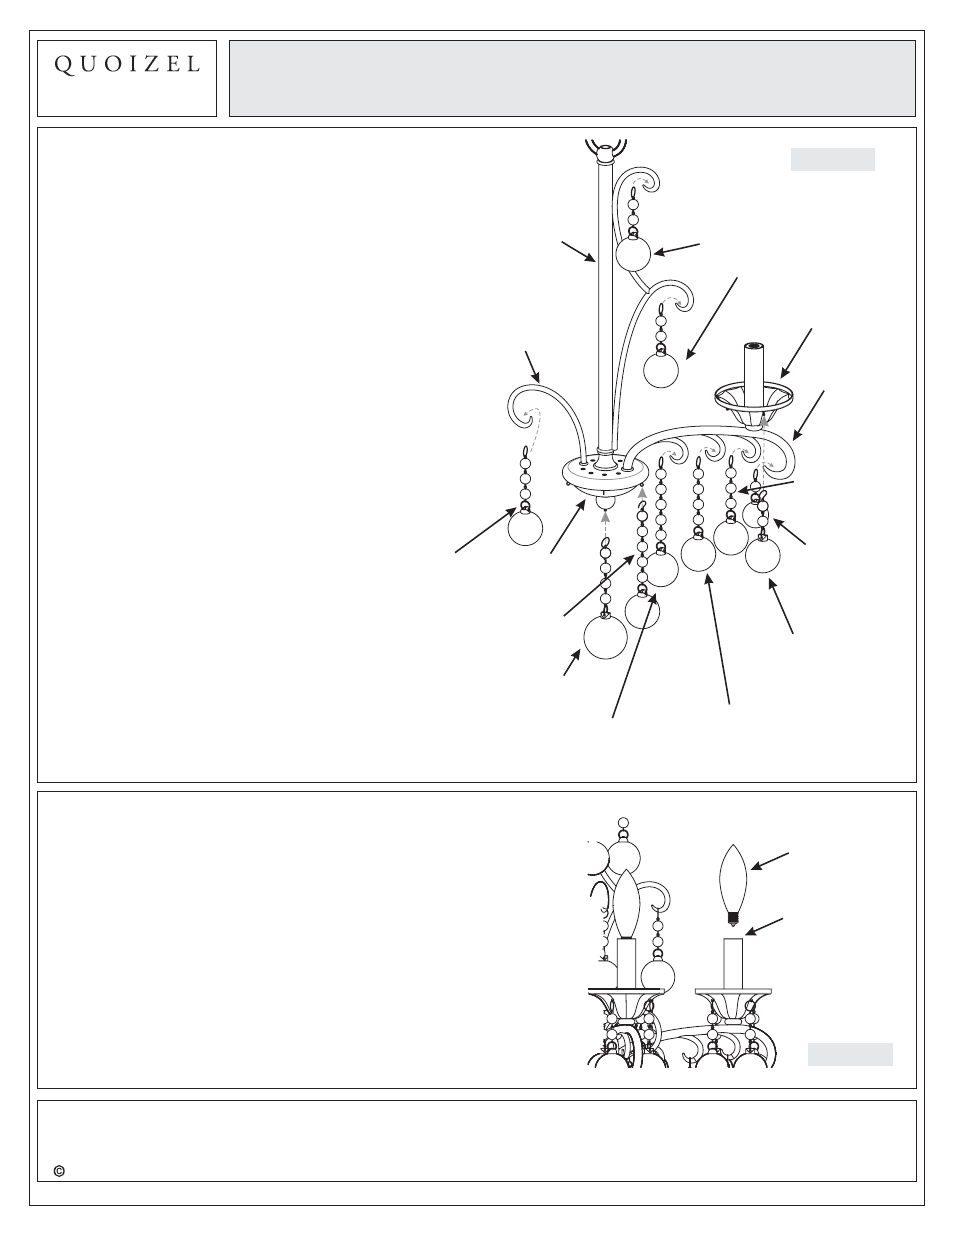
STEP 10
Attach Glass Beads
-
A. Attach (1) 40mm Ball + (4) 12mm Balls with Hook
(L) to the hanger on the bottom center of the
fixture.
B. Attach (1) 36mm ball + (5) 12mm Balls with Hook
(M) to the hangers on the side of the Junction Box.
C. Place (1) 36mm Ball + (5) 12mm Balls with Ring
Clip (N), (1) 36mm Ball + (4) 12mm Balls with Ring
Clip (O), (1) 30mm Ball + (3) 12mm Balls with Ring
Clip (R) and (1) 30mm Ball + (1) 12mm Ball with
Ring Clip (T) to the scrolls on the Support Arm as
shown.
D. Attach (1) 30mm Ball + (2) 12mm Balls with Hook
(S) to hangers on the side of the Cup.
E. Place (1) 36mm Ball + (3) 12mm Balls with Ring
Clip (P) to the scroll end of the Side Arms on the
Junction Box.
F. Place (1) 36mm Ball + (2) 12mm Balls with Ring
Clip (Q) to the scroll ends of Side Arms on the side
of the Center Rod Assembly.
Assembly Instruction Sheet #IS-QMC1199FR
For Style QMC1199FR
Figure 11
(1) 36mm ball +
(2) 12mm balls with
ring clip
Center Rod
Assembly
Side Arm
(1) 36mm ball +
(3) 12mm balls with
ring clip
(1) 40mm ball +
(4) 12mm balls
with hook
(1) 36mm ball + (5) 12mm
balls with ring clip
(1) 30mm ball +
(2) 12mm balls
with hook
(1) 30mm ball
+ (1) 12mm ball
with ring clip
(1) 36mm ball +
(4) 12mm balls
with ring clip
(1) 30mm ball
+ (3) 12mm
balls with ring
clip
(1) 36mm ball +
(5) 12mm balls
with hook
Support Arm
Cup
Junction Box
STEP 11
Install Bulb
-
A. This fixture uses candelabra bulb with candelabra screw
base. Maximum 60 watts.
B. Insert bulb and screw properly into place.
Your lamp chandelier fixture is now assembled and ready
to use. Enjoy!
Bulb
Socket
Figure 12
6 CORPORATE PARKWAY
GOOSE CREEK SC 29445
www quoizel com
,
.
.
.
Thank you for purchasing a Quoizel product.
Need assistance with parts or assembly? Call Quoizel customer service at 1-631-273-2700
or visit us on-line at www.quoizel.com
2012 QuoizelInc.
May2012