Standard mode/ g.eq operations, Standard mode/dsf operations – Clarion DRX9675z User Manual
Page 13
DRX9675z
25
24
DRX9675z
Selecting the standard mode or the
professional mode
∗
The factory default setting is “PRO”.
1. Press MODE button
&
four times to switch
to the adjustment selection display.
2. Press VOLUME buttons
2
up (
w
) or down
(
z
) to select “AC-PROCSSR”.
3. Press the right side of SEARCH button
4
to
move the cursor.
4. Press VOLUME buttons
2
up (
w
) or down
(
z
) to set the mode to “STD” or “PRO”.
5. Press MODE button
&
or press and hold ENT
button
$
for 1 second or longer to return to
the previous mode.
Entering titiles
You can give a title to the user memory of the
G.EQ, VSE and P.EQ that you have adjusted
yourself.
1. Press MODE button
&
to select the adjust-
ment mode in which you want to give a title.
2. Press BAND button
8
to select the “User”.
3. Press one of Direct buttons
"
to select the
user memory to which you want to give a title.
4. Press and hold TITLE button
#
for 1 second
or longer.
5. Press the right or left side of SEARCH button
4
to move the cursor.
6. Press numbers “1” to “4” of Direct buttons
"
to select the character you want to enter.
When you press numbers “1” to “5” of Direct
buttons
"
, the following title characters can
be entered.
1 ... Capital letters
2 ... Small letters
3 ... Numbers and symbols
4 ... Umlauts
5 ... Title clear
∗
The title clear font is used to delete a title. To
delete the title, perform the title clear operation
first and then put it into memory.
7. Press VOLUME buttons
2
up (
w
) or down
(
z
) to select the character you want to input.
8. Repeat steps 5 to 7 to input the title.
9. Press and hold ENT button
$
for 2 seconds
or longer to put the title into memory. The title
input mode is canceled.
AC PROCESSOR operations
Standard mode/ G.EQ
operations
Note:
• The adjustment made in standard mode is not
reflected in the adjustment in professional mode. On
the contrary, the adjustment made in professional
mode is not reflected in the adjustment in standard
mode.
G.EQ effect ON/OFF
∗
The factory default setting is “ON”.
1. Press MODE button
&
two times and select
“G.EQ”.
2. Press the Shift button
!
. While the “ON” is lit
in the display, the G.EQ effect is set to “ON”.
3. Press MODE button
&
three times or press
and hold ENT button
$
for 1 second or longer
to return to the previous mode.
Note:
• If the G.EQ effect is set to OFF, the adjustment
made in “G.EQ operations” is not reflected in the
music source.
Selecting a G.EQ menu
1. Press MODE button
&
two times and select
“G.EQ”.
2. Press BAND button
8
to select “G.EQ Basic”.
3. Press one of Direct buttons
"
and select the
desired G.EQ menu.
The basic G.EQ menus are as follows:
1) BASS BOOST:
Low frequencies emphasized.
2) HIGH BOOST:
Medium and high frequencies emphasized.
3) ACOUSTICAL:
Medium frequencies (vocals) emphasized.
4) IMPACT:
Low and high frequencies emphasized.
5) SMOOTH:
Medium and high frequencies reduced.
6) FLAT:
Flat sound.
AC PROCESSOR operations
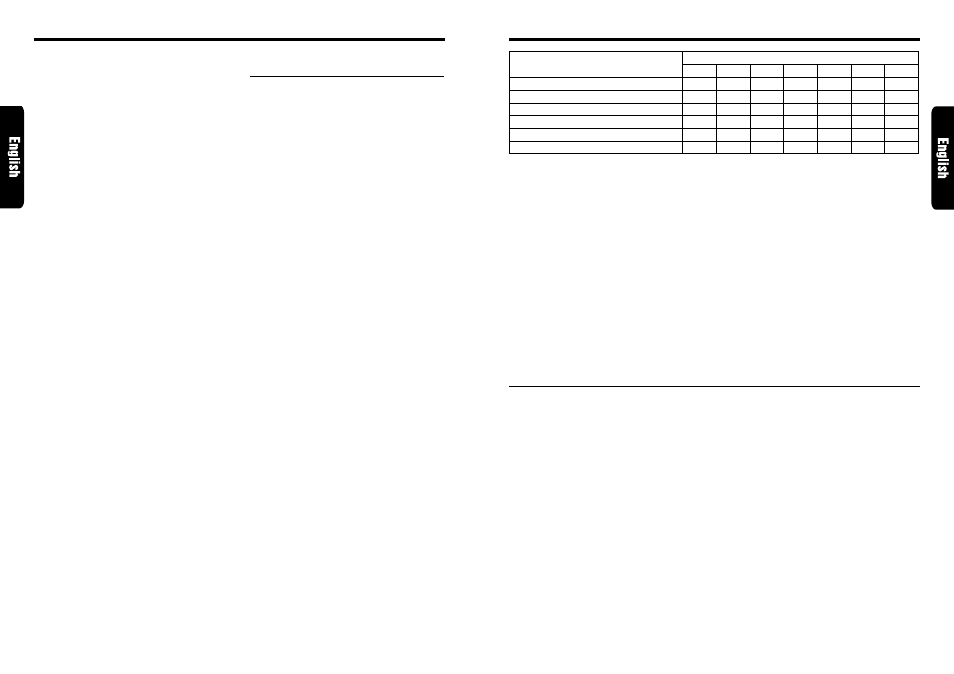
Graphic equalizer parameter (dB)
Equalizer setting
50Hz
+5
0
0
+4
+2
0
100Hz
+6
0
+2
+4
+2
0
200Hz
-4
0
+1
+3
0
0
400Hz
+2
-2
+4
+1
-2
0
1kHz
0
+4
+6
+3
-4
0
3kHz
0
+3
+5
+5
-4
0
12kHz
0
+4
+1
+5
-2
0
1) BASS BOOST
2) HIGH BOOST
3) ACOUSTICAL
4) IMPACT
5) SMOOTH
6) FLAT
∗
To select the user memory, press BAND but-
ton
8
to select “G.EQ User” and press one of
Direct buttons
"
.
4. Press MODE button
&
three times or press
and hold ENT button
$
for 1 second or longer
to return to the previous mode.
Editing/storing a G.EQ menu (User
memory)
1. Select a G.EQ menu which you want to edit
on the basis of.
2. Press ENT button
$
.
3. Press the right or left side of SEARCH button
4
to select the frequency to be adjusted.
There are 50Hz, 100Hz, 200Hz, 400Hz, 1kHz,
3kHz and 12kHz available for the adjustment
frequency.
4. Press VOLUME buttons
2
up (
w
) or down
(
z
) to make the adjustment. The adjustment
range is from –12dB to +12dB.
5. Repeat steps 3 to 4 to complete the
adjustment and press ENT button
$
.
6. Press and hold one of Direct buttons
"
for 2
seconds or longer to store the edited contents.
∗
You can give a title to the user memory. For
the inputting method of titles, refer to the
section “Entering titles” in “Operations
common to each mode”.
7. Press MODE button
&
three times or press
and hold ENT button
$
for 1 second or longer
to return to the previous mode.
Standard mode/DSF operations
DSF effect ON/OFF
∗
The factory default setting is “ON”.
1. Press MODE button
&
to select “DSF”.
2. Press the Shift button
!
. When the “ON” is lit
in the display, the DSF effect is set to “ON”.
3. Press MODE button
&
four times or press
and hold ENT button
$
for 1 second or longer
to return to the previous mode.
Note:
• If the DSF effect is set to OFF, the adjustment made
in “DSF operations” is not reflected in the music
source.
Setting the listening position
1. Press MODE button
&
and select “DSF”.
2. Press the right or left side of SEARCH button
4
to set the listening position type.
There are FULL SEAT, FRONT-R (only right
seat), FRONT-L (only left seat), FRONT (only
front seats), REAR (only rear seats) and PASS
available for the listening position types.
∗
The factory default setting is “FRONT”.
Selecting a DSF menu
1. Press MODE button
&
to select “DSF”.
2. Press one of Direct buttons
"
and select the
desired a DSF menu.
The basic DSF menus are as follows:
BASIC
1) HALL:
Large concert hall.
2) LIVEHOUSE: Live performance hall,
larger than a jazz club.
3) CLUB:
Club with strong bass.
4) JAZZCLUB:
Jazz club with a low ceiling.
5) STUDIO:
Listening room in a home.
3. Press MODE button
&
four times or press
and hold ENT button
$
for 1 second or longer
to return to the previous mode.