Starlight Xpress SXVR-H814C User Manual
Page 11
Handbook for the SXVR-H814C
Issue 1 February 2013
11
If the colour is roughly correct, then all is well. However, the colour decoding is
reliant on the filter pattern being properly registered with the processing software and
this can vary. Colour conversion involves running a software routine which uses the
brightness data from each pixel to generate colour values. As the brightness of each
pixel is related to the colour of light falling on it and the colour filter integrated onto
the pixel during CCD manufacture, we can translate this into true colour data. It is
very important that the software knows the colour filter positions, or the colours will
be translated incorrectly, so the software allows the user to define X (pixel) and Y
(line) offsets to correct this. If the colour is badly wrong, try opening the ‘Set program
defaults’ dialog box and altering the ‘Pixel’ and ‘Line’ offsets. Reload the raw file
and try synthesis again. If it’s still not right, experiment with just a pixel offset or just
a line offset until the colour is good.
There is every reason to expect that the image will be reasonably well colour
balanced, but if it is not, you can adjust the colour in the ‘Set Colour Balance’ dialog
box (Under ‘Colour’ in the main menu).
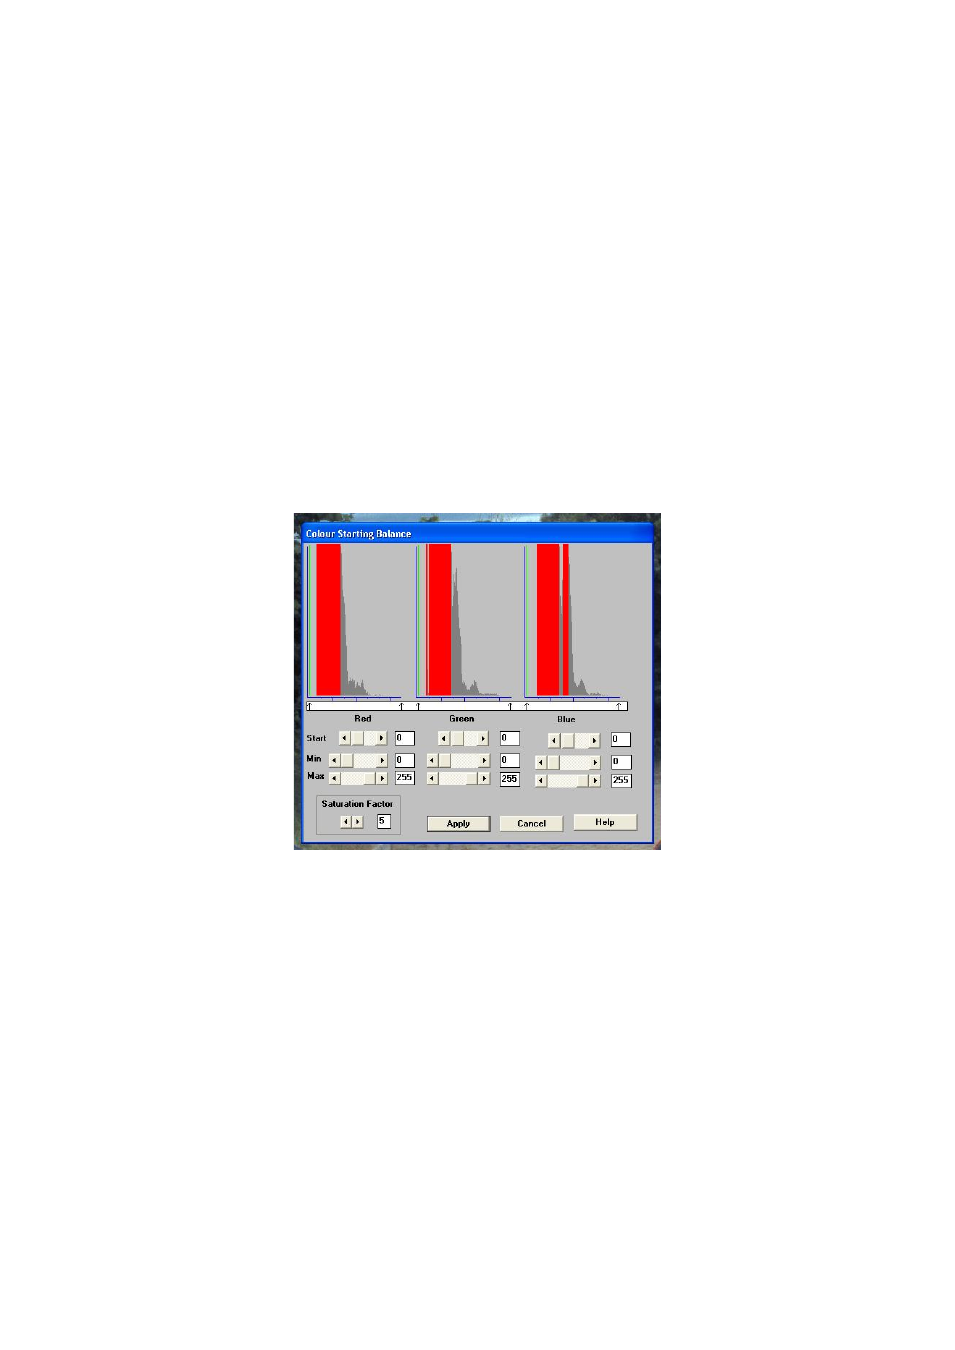
The colour balance controls seem complex, but are really quite easy to use. The most
useful controls are the ‘Start’ and ‘Saturation Factor’ settings. Saturation factor will
simply vary the colour intensity, without any alteration of the colour balance, but the
‘Start’ settings for each colour will alter the colour rendering of the dimmer parts of
the image. As most astronomical images are badly affected by light pollution, which
affects the dimmer background colours in particular, the start point settings are
particularly helpful for correcting this. If you move the start point of the Red
histogram a few points to the right and click on ‘Apply’, the new image will have
LESS red in the background and will appear more Cyan. Similarly, if you move the
Green start point to the right, the image will appear more Magenta and moving the
blue start point will turn it more Yellow. Do not move the start points beyond the start
of the main burst of histogram data, or you will introduce colour errors into low
saturation parts of the image. Just move the sliders by small amounts in the clear area
below the main peak, until the background is nicely balanced.
In some cases, the histograms may all start a long way above zero (usually in astro.
images with a lot of light pollution). In this case, slide the start point settings for all