Important, Step 1—prepare the vehicle, Step 3—air spring installation – Rite-Ride 2550 User Manual
Page 5
STEP 1—PREPARE THE VEHICLE
Place the truck on a solid level surface. Remove the negative
battery cable. Take necessary safety precautions such as using
wheel chocks when working on your truck.
On some 2008 and newer trucks some lines must be reposi-
tioned on the left side of the vehicle. Remove the nut holding the
fuel line retaining clip. Rotate the retaining clip 90 degrees with
the stud facing down. Install the relocation bracket with the nut
previously removed. Next fasten the retaining clip to the reloca-
tion bracket using a 5/16"-24 x ¾" bolt and 5/16"-24 flange nut.
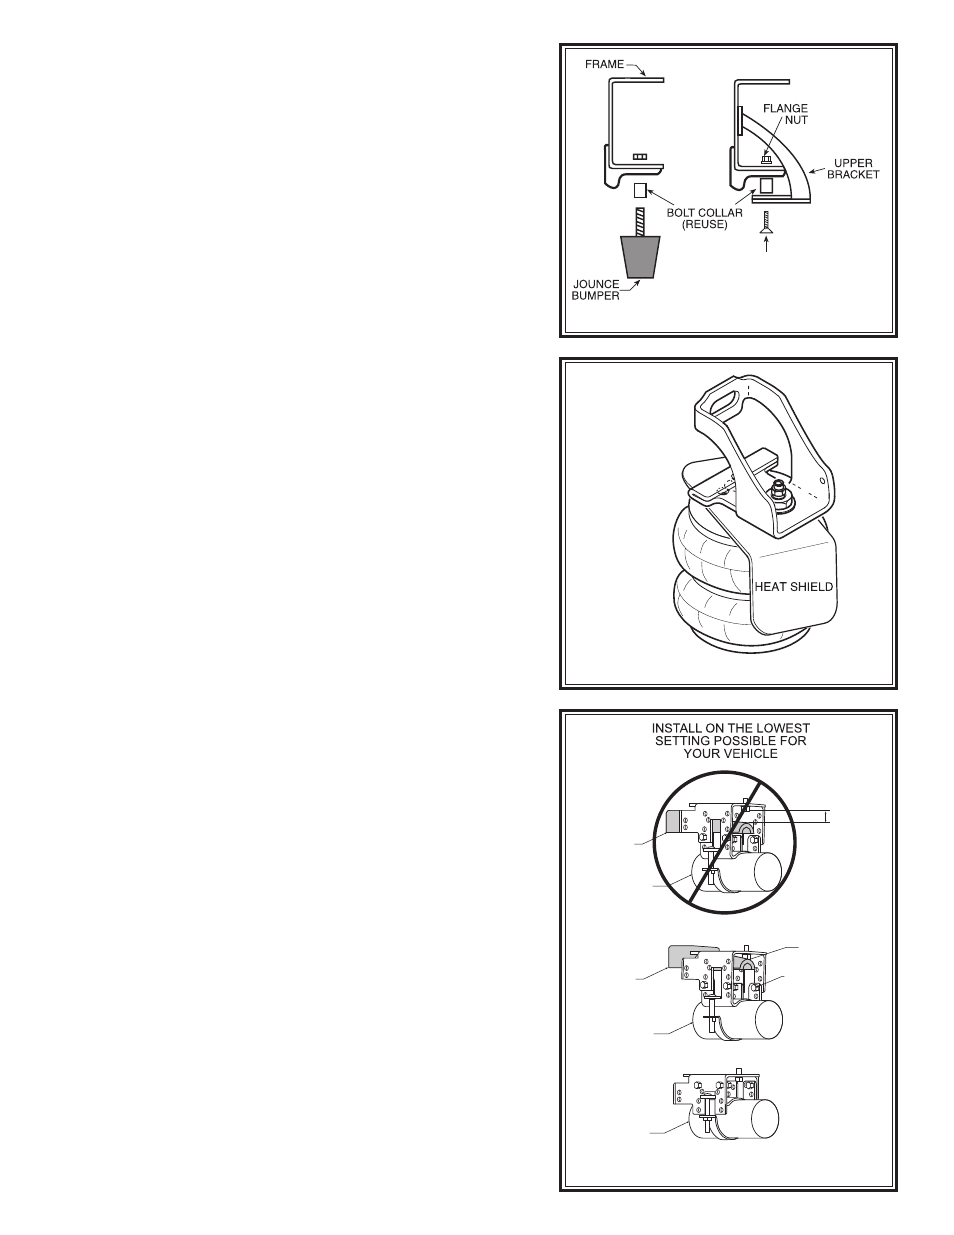
Your truck is equipped with jounce bumpers attached to
the frame directly above the axle. Remove these bumpers by
unbolting from the inside of the frame flange. These bumpers
will not be re-used with this kit. For vehicles from 1999 to 2004
please save the collar as it will be re-used in Step 2B.
STEP 2A—UPPER BRACKET INSTALLATION FOR
2008 AND UP TRUCKS
Insert the 3/8"-16 x 2-1/2" flat head bolt into the upper bracket
and then slide the spacer over the bolt. Install the upper bracket
onto the frame. Make sure that no part of the vehicle’s wiring
will be pinched between the upper bracket and the frame.
Tighten the 3/8"-16 flat head bolt with a 3/8" large flat washer
and 3/8"-16 flange nut. The emergency brake cable will have
to be tie-wrapped out of the way using the hole provided in the
upper bracket. See Figure “A”.
On trucks without factory installed in-bed hitch, install the
¾"-16 x 3" hex bolt through the existing hole in the frame rail and
upper bracket. Secure the ¾"-16 x 3" bolt with a ¾" flat washer,
¾" lock washer and a ¾"-16 hex nut.
On truck with a factory installed in-bed hitch, install the ¾"-16
x 1-3/4" hex bolt through the existing hole in the frame rail and
upper bracket. Secure the ¾"-16 x 1-34" bolt with a ¾" thick flat
washer, ¾" lock washer and a ¾"-16 fame nut.
STEP 2B—UPPER BRACKET INSTALLATION FOR
1999 TO 2004 TRUCKS
Make sure that no part of the vehicle’s wiring will be pinched
between the upper bracket and the frame. At this time, the collar
that was on the jounce bumper will be reused. Insert the collar
into the original hole on the frame. Put the upper bracket in place
(to hold the collar) while you insert the 3/8"-16 x 2-1/2" flat head
bolt into the upper bracket and collar. See Figure “B”. Secure
the 3/8"-16 flat head bolt with a 3/8” large flat washer and 3/8"-
16 flange nut finger tight.
Hold the upper bracket tight against the bottom of the frame.
If the bracket appears to be level win the upper part of the
bracket rests against the inside of the frame, install the ¾"-16
x 3" bolt through the frame rail and upper bracket. If the top of
the bracket does not set level, install some of the large ¾" flat
washers between the bracket and the inside of the frame rail.
If you have existing hitch hardware, the ¾" bolt should be long
enough to extend through the upper bracket, truck frame and
hitch brackets. Be sure to install at least one of the large flat
washers and the ¾" lock washer before installing the ¾"-16 hex
nut onto the bolt. After you have installed the upper bracket as
level as possible, tighten the 3/8"-16 x 2 1/2" flat head bolt in the
bottom of the frame, then tighten the ¾"-16 x 3" bolt through the
side of the frame. The emergency brake cable will have to be
tie-wrapped out of the way using the hole provided in the upper
bracket. See Figure “A”.
STEP 3—AIR SPRING INSTALLATION
The heat shield will be used on the exhaust side of the truck
only. It is placed between the upper bracket and the top of the
air spring.
See Figure “B”. The alignment pin on top of the
air spring must be aligned with the hole in the upper bracket
Figure “C”
3/8ʺ-16 X 2-1/2ʺ
FLAT HEAD
BOLT
IMPORTANT!
Figure “B”
For 1999–2004 Trucks
INCORRECT!
TOO TALL!
CORRECT
FOUR WHEEL DRIVE
USE HOLES TO LOCATE
THE BRACKET
AS LOW AS POSSIBLE
AXLE
JOUNCE STOP
FOUR WHEEL DRIVE
AXLE
JOUNCE STOP
ALL TWO WHEEL DRIVE
AXLE
SOME
AIR SPRING
BOLT
MOST
AIR SPRING
BOLT
AIR SPRING
BOLT
AIR SPRING
BOLT
JOUNCE
STOP
INCORRECT!
TOO TALL!
JOUNCE
STOP
JOUNCE
STOP
Figure “D”