Instructions for replacing expansion tank bladder, Models et-ra 35 and et-ra 50 – Watts DETA User Manual
Page 2
IS-ETA/DETA 0845
EDP# 1915260
© Watts, 2008
USA: 815 Chestnut St., No. Andover, MA 01845-6098; www.watts.com
Canada: 5435 North Service Rd., Burlington, ONT. L7L 5H7; www.wattscanada.ca
W a t e r S a f e t y & F l o w C o n t r o l P r o d u c t s
Limited Warranty: Watts Regulator Co. (the “Company”) warrants each product to be free from defects in material and workmanship under normal usage for a period of one year from the date of
original shipment. In the event of such defects within the warranty period, the Company will, at its option, replace or recondition the product without charge.
THE WARRANTY SET FORTH HEREIN IS GIVEN EXPRESSLY AND IS THE ONLY WARRANTY GIVEN BY THE COMPANY WITH RESPECT TO THE PRODUCT. THE COMPANY MAKES NO OTHER
WARRANTIES, EXPRESS OR IMPLIED. THE COMPANY HEREBY SPECIFICALLY DISCLAIMS ALL OTHER WARRANTIES, EXPRESS OR IMPLIED, INCLUDING BUT NOT LIMITED TO THE IMPLIED
WARRANTIES OF MERCHANTABILITY AND FITNESS FOR A PARTICULAR PURPOSE.
The remedy described in the first paragraph of this warranty shall constitute the sole and exclusive remedy for breach of warranty, and the Company shall not be responsible for any incidental, special
or consequential damages, including without limitation, lost profits or the cost of repairing or replacing other property which is damaged if this product does not work properly, other costs resulting
from labor charges, delays, vandalism, negligence, fouling caused by foreign material, damage from adverse water conditions, chemical, or any other circumstances over which the Company has no
control. This warranty shall be invalidated by any abuse, misuse, misapplication, improper installation or improper maintenance or alteration of the product.
Some States do not allow limitations on how long an implied warranty lasts, and some States do not allow the exclusion or limitation of incidental or consequential damages. Therefore the above
limitations may not apply to you. This Limited Warranty gives you specific legal rights, and you may have other rights that vary from State to State. You should consult applicable state laws to
determine your rights.
SO FAR AS IS CONSISTENT WITH APPLICABLE STATE LAW, ANY IMPLIED WARRANTIES THAT MAY NOT BE DISCLAIMED, INCLUDING THE IMPLIED WARRANTIES OF
MERCHANTABILITY AND FITNESS FOR A PARTICULAR PURPOSE, ARE LIMITED IN DURATION TO ONE YEAR FROM THE DATE OF ORIGINAL SHIPMENT.
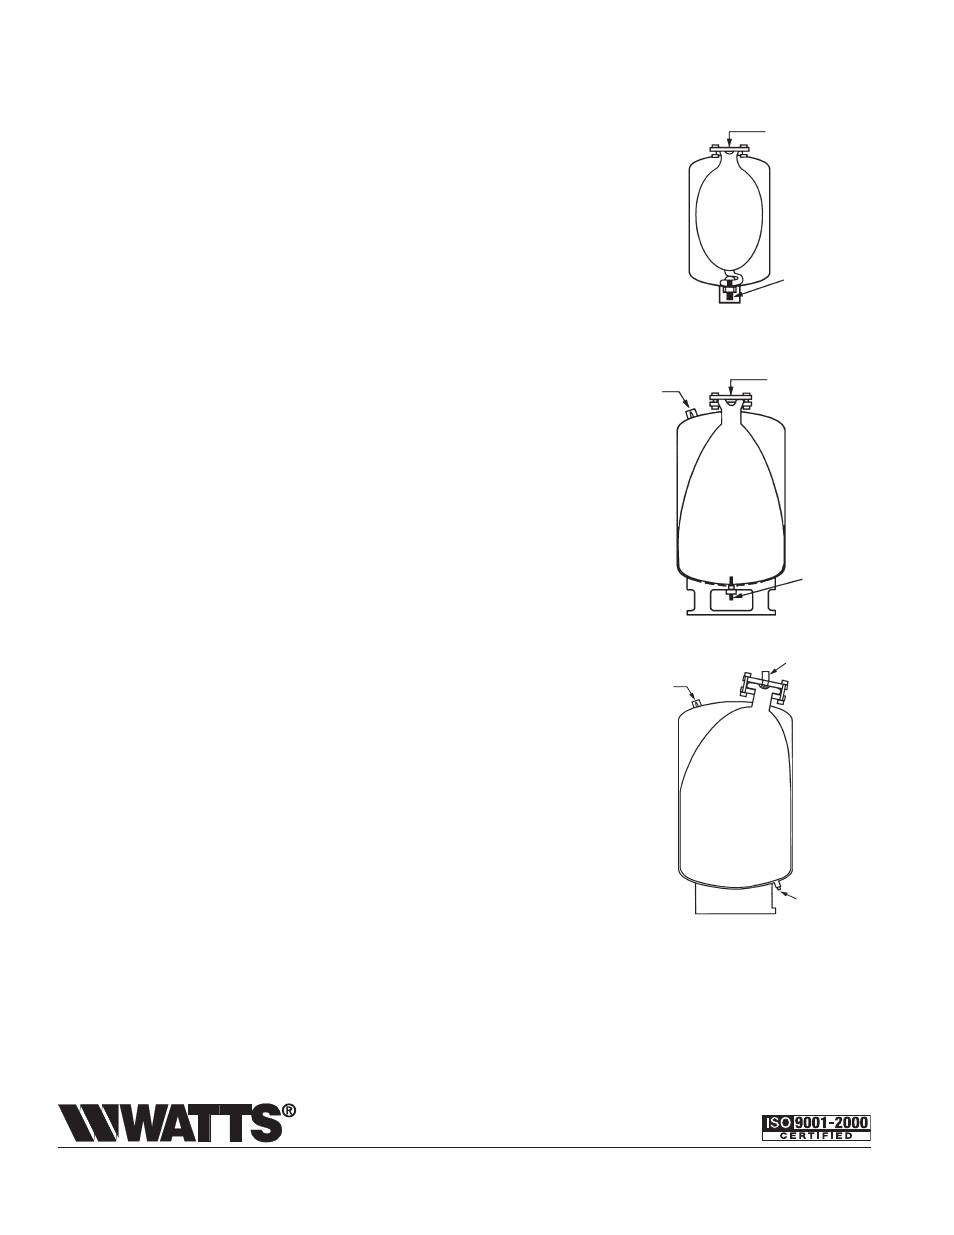
Models ET-RA 35 and ET-RA 50
1. Tank must be drained and all pressure released.
2. Bladder is attached to tank at both ends. To remove bladder from tank remove all
bolts from cover plate and take off plate.
3. You will now be able to push bladder to side wall of tank. Reach into tank at far end
and you will note that the bladder has a tab at this end which has been slipped over
extension of Schrader valve and held in place with a threaded washer. Unscrew
washer (counter- clockwise) and this will release bladder from tank.
4. Pull out bladder and install new bladder by reattaching to Schrader valve.
5. To complete bladder attachment, you will note that the bladder has gasket molded
right with the bag. Make sure the bladder is not twisted on the interior of the tank.
6. Reattach cover plate to make an air and water tight seal.
7. Recharge tank.
Models ET-RA 85 and ET-RA 800
1. Tank must be drained and all pressure released.
2. Bladder is attached to tank at both ends. To release bladder remove jam nut hold-
ing bottom fitting. This fitting can now be pushed up inside the tank and bladder.
To release bladder from opposite end, remove all nuts from flange and then take off
cover plate.
3. You will now be able to reach in and remove bladder. Remove strainer assembly
from inside bladder.
4. To install new bladder, insert strainer assembly into bladder and then carefully
position new bladder into tank so that strainer assembly allows nipple to protrude
through hole in bottom of tank (base ring end).
5. Install jam nut to a snug fit.
6. To complete bladder attachment, you will note that the bladder has a gasket molded
right with the bag. Make sure the bladder is not twisted on the interior of the tank.
7. Reattach cover plate to make an air and water tight seal.
8. Recharge tank.
Models ET-RA 1000 and ET-RA 2000
1. Tank must be drained and all pressure released.
2. Bladder is attached to only top of tank.
3. Remove all nuts and bolts from cover plate and take off plate.
4. You will now be able to pull out old bladder.
5. Take the new bladder and roll lengthwise into tube shape.
6. Place bladder into flanged opening.
7. To complete bladder attachment, you will note that the bladder has the basket
molded right with the bag. Make sure the bladder is not twisted on the interior of
the tank.
8. Reattach cover plate to make an air and water tight seal.
9. Recharge tank.
Instructions for replacing Expansion Tank Bladder
Air Charg-
ing Valve
System
Connection
Air Charg-
ing Valve
System
Connection
System
Connection
Air
Charging
Valve
System
Connection
System
Connection
BLADDER
BLADDER
BLADDER