Iii. installation (cont.) – Watts PWBWIRON User Manual
Page 6
6
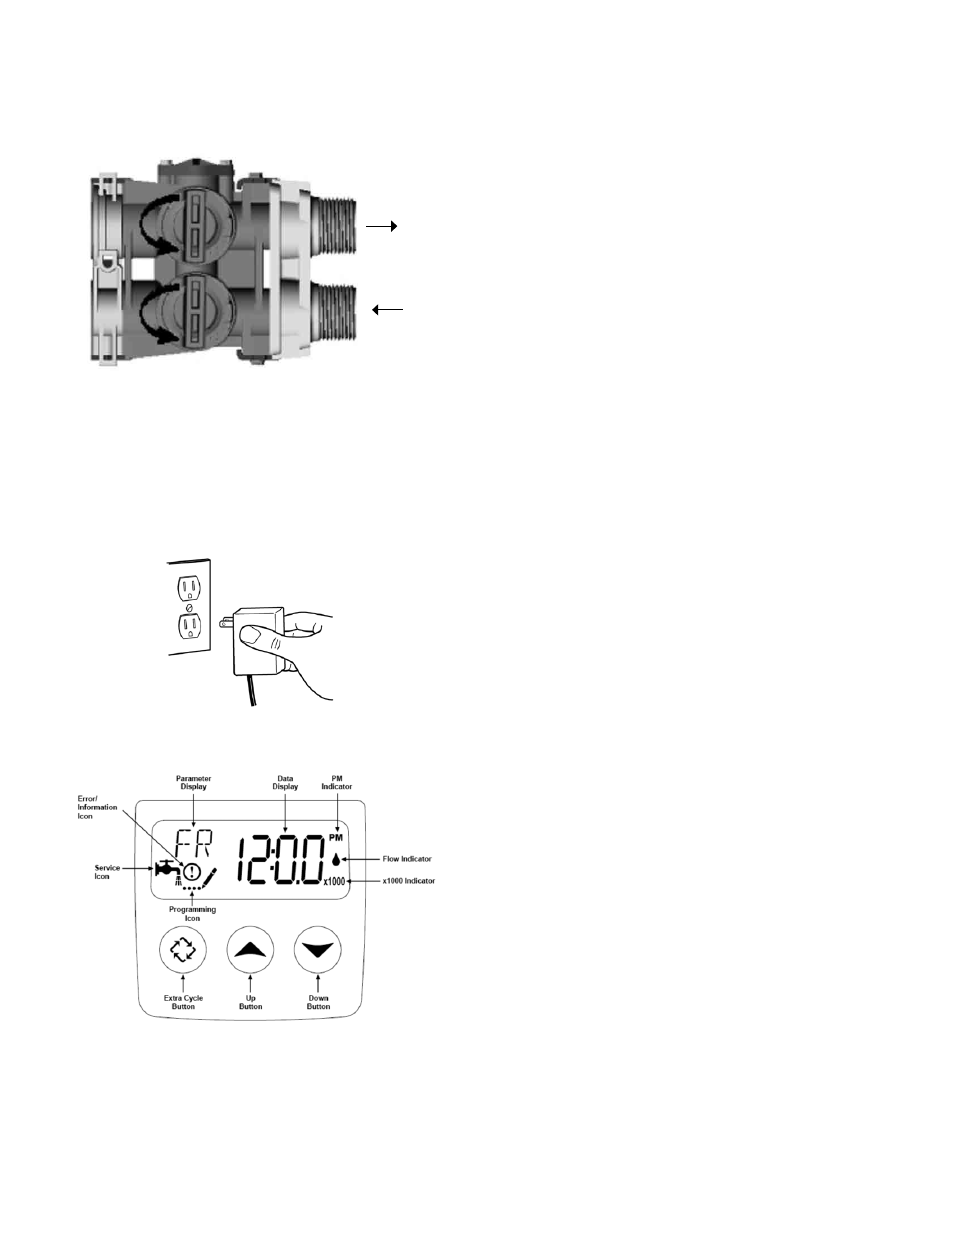
Figure 5
16. Open the outlet bypass valve fully.
17. Open the inlet bypass valve slightly. Open the valve just until
you hear water flowing.
18. Observe the drain flow. It may take several minutes for the
filter vessel to fill up with water and begin to flow water to
drain.
19. After all the air is purged from the vessel and a steady drain
flow is observed, allow the unit to backwash for 10 minutes
with the inlet valve open slightly.
20. After the 10 minutes of backwashing is complete, fully open
the inlet bypass valve and allow the unit to backwash for 90
minutes.
21. After 90 minutes, observe the drain flow. If the drain flow is
clear proceed to the next step. If the drain flow is still cloudy,
allow the system to continue to backwash until it is clear. Do
not capture the drain water in a container to evaluate its clar-
ity. Oxidized impurities in the water will give the drain water
a cloudy appearance if it is caught and viewed in volume.
Evaluate its clarity as it flows out of the open end of the drain
pipe or hose to avoid unnecessary backwashing time.
22. Plug the unit back in to the electrical outlet and allow it to fin-
ish backwash, draw, and rinse cycles. This will take approxi-
mately 60 minutes.
23. Set the time of day. Press and hold either the Up or Down
buttons until the programming icon replaces the service icon
and the parameter display reads TD. Adjust the displayed
time with the Up and Down buttons. When the desired
time is set, press the Extra Cycle button to resume normal
operation. The unit will also return to normal operation after 5
seconds if no buttons are pressed.
24. Turn on the gas or electric supply to the water heater after
all air has been purged from the house's plumbing system
and water heaters. Flush water heaters and plumbing system
with filtered water to help clear the lines of any residual iron
content.
The system is now ready to be programmed.
III. Installation (cont.)
7. Place the bypass valves into the "bypass" position as shown
below in Figure 5 by rotating the bypass handles. The handles
will point to each other when they are placed into the bypass
position.
8. Fully open two (2) cold water faucets near the water filter.
9. Fully open the main feed water valve described in step 2.
Observe a steady flow from both faucets.
10. Close all faucets at this time.
11. Check plumbing work for leaks and fix immediately if any are
found.
12. Connect electrical power by plugging the transformer into a
(120 VAC) outlet.
13. Open the valve cover to access the timer. Press and hold the
“Extra Cycle” button until the flashing “BW” symbol appears
in the Parameter Display.
14. Slowly, turn the bypass valve back to the "service" position.
In the service position both handles of the bypass valve will
point to the control valve. Then close the inlet bypass valve.
15. Unplug the valve when the “BW” symbol stops flashing and
the countdown timer appears. This keeps the valve in an
extended backwash for the initial startup.
Outlet
Inlet