Installation – Bendix Commercial Vehicle Systems VERSAJUST AUTOMATIC SLACK ADJUSTER User Manual
Page 4
4
environmental conditions, an application of anti-seize
compound to both the camshaft and worm gear spline
may facilitate later slack removal.
INSTALLATION
1. Select the proper Bendix
®
Versajust
™
slack adjuster.
2. Install the Versajust slack adjuster on the brake
camshaft.
3. If the Versajust slack adjuster has the easy-on yoke
(see Figure 3), position the brake actuator push rod
jam nut approximately 1
5
/
16
inches from the end of
the brake actuator push rod. Thread the easy-on
yoke adapter on the brake actuator push rod until it is
approximately
3
/
8
inch from the end of the brake actuator
push rod end. Turn the Versajust slack adjuster manual
adjustment hex clockwise until the adapter extends into
the threaded bore of the yoke approximately
1
/
8
inch.
Thread the adapter into the yoke and tighten to 10 foot
pounds.
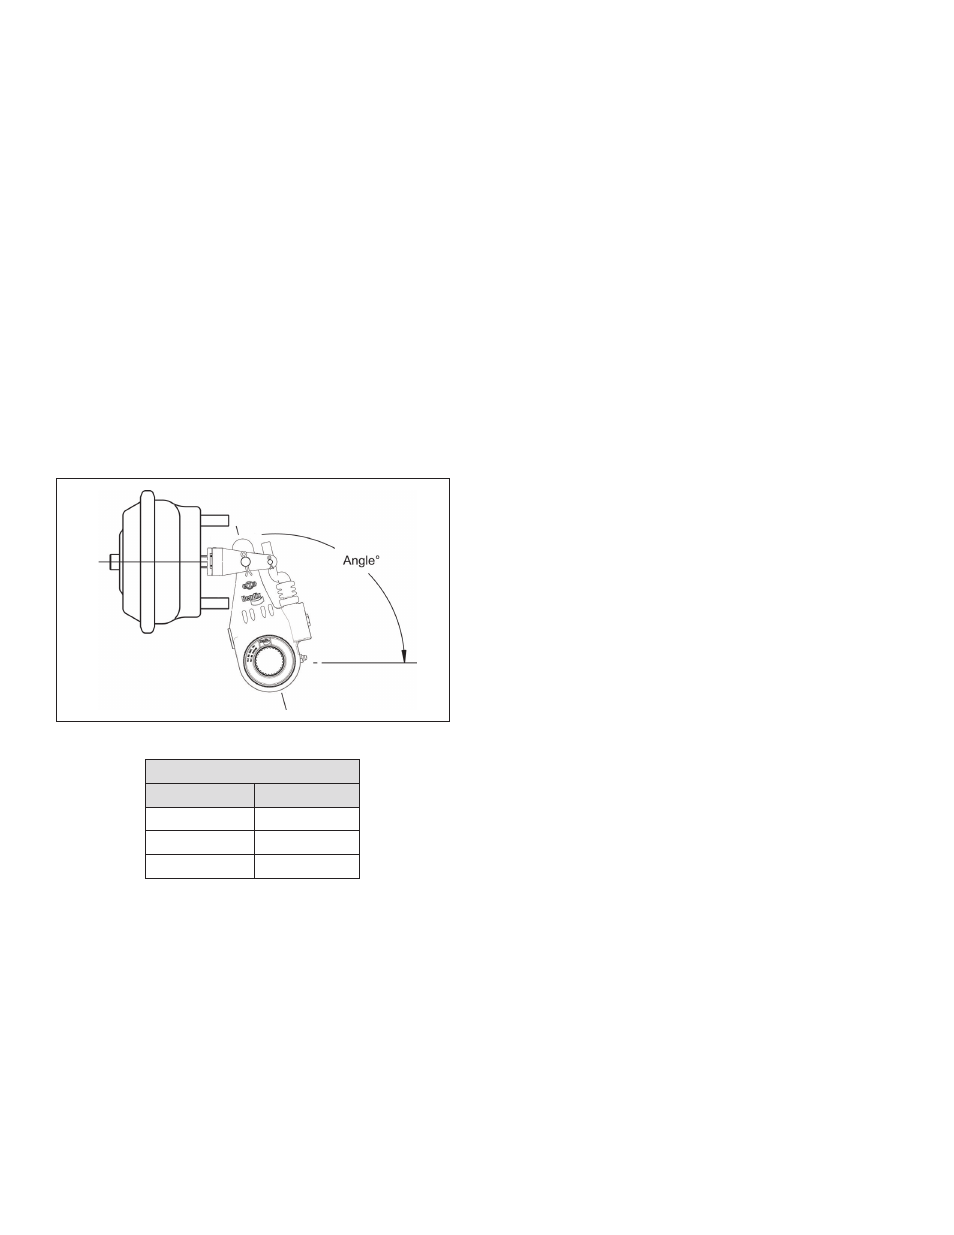
The installation below depicts the angle of a properly
installed Versajust slack adjuster:
FIGURE 5 - INSTALLATION ANGLE
Slack Adjuster
Arm Length
Angle
5"
99°-113°
5
1
/
2
"
98°-111°
6"
90°-109°
CHART 1 - SLACK ADJUSTER ARM LENGTH/ANGLE
4. If the Versajust slack adjuster has the quick connect
yoke (see Figure 4), position the brake actuator push rod
jam nut approximately 1 inch from the end of the brake
actuator push rod. Thread the quick connect adapter
bushing on the brake actuator push rod until it is flush
with the end of the brake actuator push rod. Install the
retaining ring on the adapter bushing, making certain
it is in the adapter bushing groove. Turn the Versajust
slack adjuster manual adjustment hex clockwise until
the adapter bushing begins to enter the yoke. Fully
compress the retaining ring “legs” and continue turning
the Versajust slack adjuster manual adjustment hex
until the adapter bushing is completely in the yoke.
Allow the retaining ring to expand into the corresponding
groove in the yoke. Make certain the retaining ring is
seated in both the yoke and the adapter bushing groove
by manually pulling the Versajust slack adjuster arm,
attempting to separate the adapter bushing and yoke.
5. Run the brake actuator push rod jam nut down against
the adapter or adapter bushing. Hold the adapter or
adapter bushing hex with a wrench and tighten the jam
nut to 300-400 inch pounds for the
1
/
2
"-20 thread and
400-600 inch pounds for the
5
/
8
"-18 thread.
6. Manually adjust the brakes.
Note: The vehicle brakes should be adjusted using either
the vehicle or brake manufacturer’s recommendation.
If these are not available, the following procedure can
be used: Rotate the manual adjustment hex clockwise
until the linings are snug against the drum. Turn the
adjustment hex counterclockwise
1
/
2
turn. Pull the
actuator push rod to confirm that approximately
1
/
2
inch
of push rod free stroke exists. Apply 85 psi and check
that the push rod stroke is below the readjustment limit.
If the stroke exceeds the readjustment limit, check the
condition of the foundation brake. Refer to the Brake
Maintenance Inspection in this document.
7. Manually uncage the spring brakes before returning
the vehicle to service.
8. With the Versajust slack adjuster installed, check to
ensure clearance requirements with the brake fully
released and at the actuator’s maximum stroke. Also,
consider clearances with the vehicle suspension
springs depressed to the jounce bumpers, as well as
in rebound.
PREVENTIVE MAINTENANCE
Important: Always review the Bendix Warranty Policy
before performing any intrusive maintenance procedures.
A warranty may be voided if intrusive maintenance is
performed during the warranty period.
No two vehicles operate under identical conditions. As a
result, maintenance intervals may vary. Experience is a
valuable guide in determining the best maintenance interval
for air brake system components. (Also observe any more
frequent brake adjustment inspections or maintenance
intervals specified by the vehicle manufacturer)
At a minimum, the Versajust slack adjuster should
be inspected every 3 months or 500 operating hours,
whichever comes first, for proper operation. Should
the Versajust slack adjuster not meet the elements of
the operational tests noted in this document, further
investigation and service of the adjuster may be
required.
Every 25,000 miles/3 months/ or 500 operating hours – or
at the time of routine vehicle chassis lubrication – whichever
occurs first, the following steps should be followed:
1. Visually check for physical damage, such as broken air
lines and broken or missing parts.