Bally Refrigerated Boxes Duro-Last Membrane Roof User Manual
Page 3
REV: 10/2014
IM-338-91 2014 © Bally Refrigerated Boxes, Inc. 3
1. Prep roof of walk-in.
A. Remove any foreign material.
B. Sweep roof if necessary.
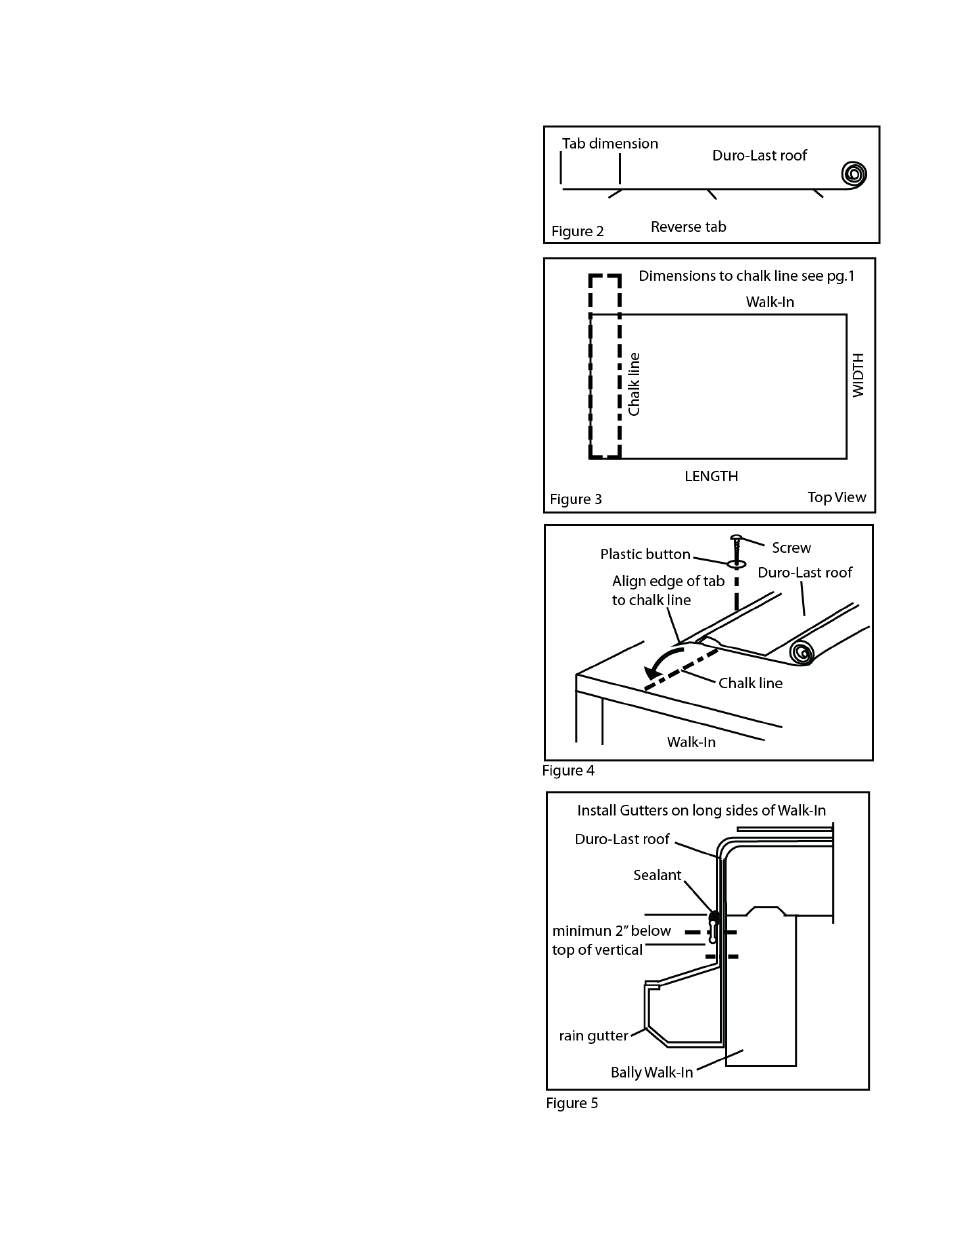
2. Check roof cap material for length and width.
A. Length (see chart page and Figure 1.)
B. Width (see chart page 1 and Figure 1.)
Tabs should run this dimension.
C. Orient tabs and roll tightly (tab side down) so that
reverse tab can be attached first. See Figures 2 and 4.
D. Check dimension from end of roof material to 1st tab
(at welded seam). See Figure 1.
E. Find the chalk line dimension on the chart on page 1
corresponding to the length of your walk-in.
F. Apply chalk line to the top of the walk-in parallel to
either short side. See Figure 3.
3. Align reverse tab with chalk line. Tab should point
toward closest short side of walk-in. See Figure 4.
A. Make sure tab is aligned with chalk line from end to
end of walk-in.
B. Check for approximate overhang as shown on chart,
page 1. Membrane roof must be centered with equal
overhang on either side.
C. Find the center point of the walk-in along the chalk line
and mark a point every 8" (every 6” in high wind areas) to
each end.
D. Install plastic hold down buttons on the first tab on 8"
centers (every 6” in high wind areas) with fasteners
provided. Start installing fasteners in center of roof and
work toward each end.
1. Do not pre-drill.
2. Tighten snugly - DO NOT OVERTIGHTEN as you may
strip the metal screws.
3. If you strip a metal screw, remove and relocate plate
1" to left or right of original position.
E. Unroll roof cap to next tab and fasten as described in
steps D, D1, D2 and D3 above. Keep roof material snug.
(Do not stretch.)
F. Use same procedure for all additional tabs.
4. After installing roof material, fasten edges using termination
bars and fasteners provided. See Figure 5. NOTE: Fasten
both short edges first. Fold corners and fasten roof
edges on long sides last. See Figure 6.
A. Trim excess material below bars. See Figure 5.
B. Caulk top edge of bars with caulking furnished.
See Figure 6.