WarmlyYours Lava User Manual
Page 5
INSTALLATION AND USAGE INSTRUCTION FOR
THE ELECTRICIAN
IMPORTANT NOTES:
• Installation and service work must be carried out by a
licensed professional or a qualified person. Verify that the
electrical installation complies with the applicable local
codes. The responsibility of the manufacturer is limited to
the supply of the device.
• The devices are designed for wall mounting (vertical or
horizontal)
• Wall mounting of the glass radiators corresponds IP24
Protection.
• When installing the unit in a bathroom, follow local
building and electric code regulations.
• Specified minimum distances must be respected.
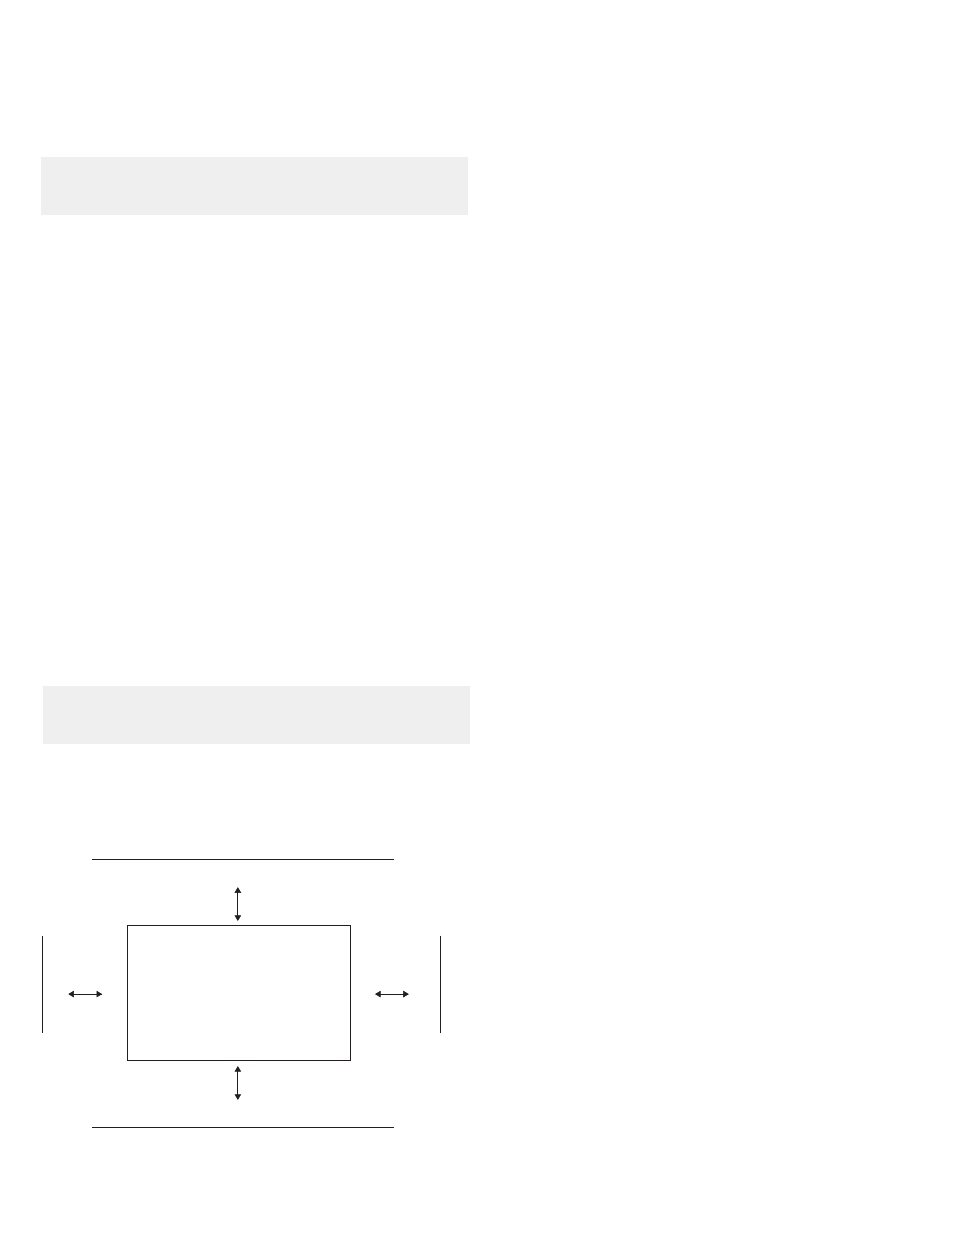
INSTALLATION AND MINIMUM DISTANCES:
LAVA® glass heaters may be mounted horizontally or
vertically on the wall. They must be positioned so that
flammable items can not be ignited. Ensure that the
required minimum distances, particularly to flammable
objects like curtains, and upholstered furniture are correct.
Please make sure that the glass radiator can radiate freely
into open space. (See Fig. 2)
ATTENTION: Don’t lean items against the glass or lean the
radiator against other objects.
ASSEMBLY OF THE RADIATOR:
Please verify that no shipping or handling damage occured
before installing the power cable to the radiator.
WALL MOUNTING:
The mounting brackets (supplied) have 3 groups of 2 holes
spaced at 8” on center. This spacing allows the installer
flexibility when choosing a mounting location. Please note
the required minimum clearance distances from flammable
materials (SEE Fig 2) when choosing your mounting
location. Ideally, if the studs in the room are 16” on center,
this bracket will allow the unit to be attached to at least one
stud and optimally 2 studs. This bracket design also allows
for the Lava to be mounted horizontally or vertically.
At this time, gather any needed items including a pencil,
screw driver, screws, washers, hammer, tape measure,
stud finder, wall anchors, and an assistant. Verify correct
number of supplied parts are present.
Choose a location desired for mounting. Choose an area in
compliance with local building and electrical codes.
Use a stud finder to locate the studs present in the area. If
possible, choose a location where 4 screws on each bracket
will land in studs. If this is not possible, we suggest at
least 2 of the screws on each bracket land in a stud. Use
Heavy-duty anchors rated to 50 lbs. for this application. If
mounting into concrete or other materials, use appropriate
anchors suitable for that application. We require using
at least 4 (six is even better!) screws in each mounting
bracket. PLEASE VERIFY ACCESS TO ELECTRICAL BOX IS
NOT BLOCKED BY INSTALLED MOUNTING BRACKET.
Use a level and a pencil to mark the location of the first
bracket on the wall. Using the bracket, mark the hole
locations. Drill and install the appropriate screws and/or
anchors. We recommend Cobra, TripleGrip #8, p/n: 178S
(available at Home Depot) or similar type anchors. We
recommend using a #8 screw with washer (if needed),
minimum, for mounting the mounting brackets.
Make corresponding marks 17 9/16” below the installed
bracket for the lower bracket. ALWAYS INSTALL 2
BRACKETS per LAVA unit! Follow above instructions for
this bracket.
Once the brackets are installed on the wall, install the 4, M8
x 16 hex mounting bolts loosely (at least 3 revolutions) into
the Lava.
With the assistance of a helper, lift the Lava and make
your electrical connections. Place the mounted bolts into
the slots of the mounting brackets. If the unit is placed
satisfactorily, use an open-ended wrench to fully snug the
bolts, securing the Lava to the mounting products.
Installation and Usage Instruction | LAVA® Design Glass Radiator
Fig. 2: Minimum mounting distances
4
11.8” / 300mm
7.8” / 200mm
11.8” / 300mm
11.8” / 300mm
18.9”/ 48cm
18.9”/ 48cm
13.8”/ 35cm
29.5”/ 74.9cm
45.2”/ 114.8cm
57”/ 144.7cm
18.9”/ 48cm
18.9”/ 48cm
LAVA 250
LAVA 500
LAVA 750
LAVA 1000