Settings, P.10, A (p.10) – SPYPOINT BF-10HD User Manual User Manual
Page 10
10
Settings
Use the ◄, ►, ▲ or ▼ buttons to navigate in the interface and change
options. Use the OK button to confirm and the BACK button to return to the
previous menu.
PHOTO
Allows the user to take photos. When the PHOTO mode is selected,
the test light in front of the camera will flash for 60 seconds to allow
the user to leave the area without being photographed.
VIDEO
Allows the user to take videos. When the VIDEO mode is selected,
the test light in front of the camera will flash for 60 seconds to allow
the user to leave the area without being recorded.
TEST
Allows the user to test the detection system of the camera. When
the TEST mode is selected, no photo or video is recorded. Pass in
front of the camera from left to right. When the camera detects a motion,
the test light blinks to indicate that the camera would normally have saved
a photo or video. If the system does not detect the movement, increase
the detection distance using the DISTANCE wheel or realign the system
differently. In TEST mode, it is possible to take a photo by pressing the OK
button. The photo is saved and appears in the VIEW mode.
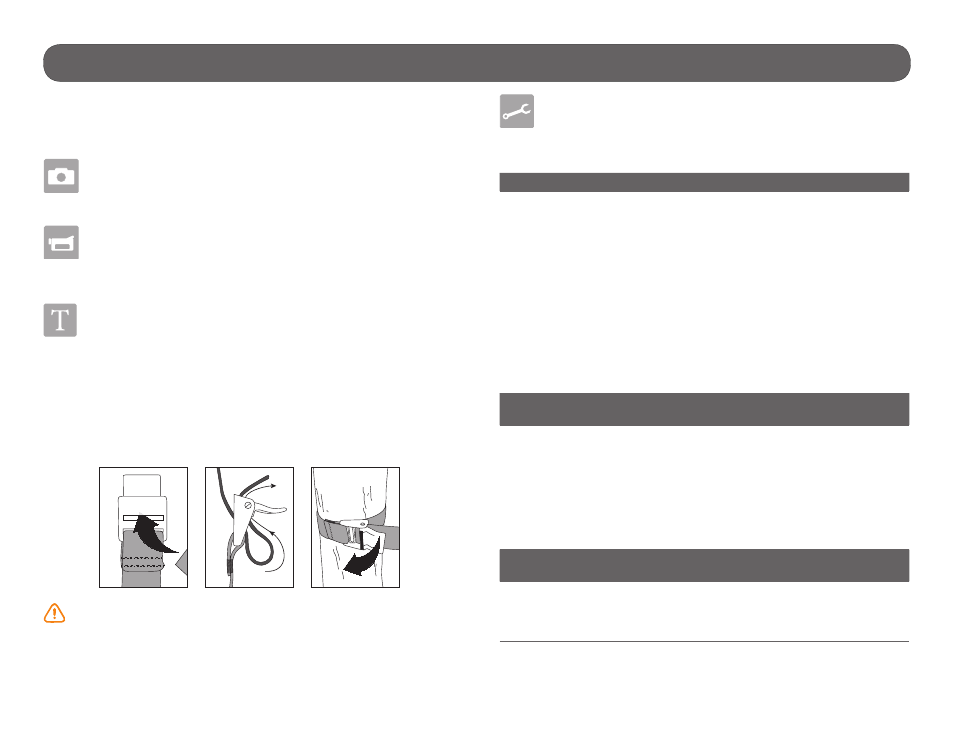
INSTALLATION WITH THE SUPPLIED STRAP
Recommended installation height: about 3 feet above the ground.
Do not place the camera facing the sun.
SETTINGS
Allows the user to change the different settings. To set the system in
English, hold the button ▼ until "Language" is highlighted. Press OK,
select "English" with the button ▲ or ▼ and confirm the choice with OK. The
system will then change the menus to English.
Start time/Stop time:
Allows the user to set the operation period of the camera. The start and
stop time progammed hours are the hours during which the camera is in
action and records photos or videos. Example: If the user selects "15:00"
start time and "19:00" stop time, the camera will only detect for that
period of time and will stay inactive for the remaining hours. Press OK
and use ▲ or ▼ to adjust the hours. Press OK again to set the minutes.
When the time is properly set, press OK.
For a 24 hour activation, the same start and stop times must be entered
(example: 00:00 as start time and 00:00 as stop time. These hours are
the basic settings of the camera.
Note: The hours are recorded over a 24-hour period. For example, 5pm
is 17:00 (00:00 means midnight).
Delay:
(10s/30s/1m/5m/15m/30m)
Allows the user to choose the time interval between each detection before
the camera records the next photo or video. A longer delay minimize the
number of photos taken and maximize the battery life. A shorter delay
maximize the number of photos taken but requires more battery power.
The shorter times interval are recommended when the cameras is used
for security purposes.
Note: A shorter detection delay results in a shorter battery life.
Multi-shot:
(1/2/3/4/5/6 consecutive shots)
Takes up to 6 consecutive shots at each detection, with a 10-second delay
between each photo. This option allows the user to get up to 6 photos
from different angles when the camera is in PHOTO mode.
1. Insérez l’extrémité de la courroie dans la fente
qui se trouve au dos du mécanisme.
2. Insérez la courroie dans la fente sous le levier
et faites-la ressortir en arrière.
3. Créer une tension sur la courroie en la tirant vers
la droite, puis rabattez vers la gauche le levier pour
maintenir la position.