SPYPOINT S-TINY-4G User Manual
Quick start guide, Guide de démarrage rapide, Schnellstartanleitung
Models:
TINY-PLUS
TINY-W
BF
TINY-W
3
TINY
4G
Quick start guide
v1.3
P INT
SPY
INT
P
SPY
Surveillance camera
TINY series
Adventure
series · série
expedition
series · série
summit pro
series · série
smart
series · série
TINY
series · série
LIVE
series · série
Getting started
Error messages
Settings
1
2
3
4
Complete instructions
www.spypoint.com
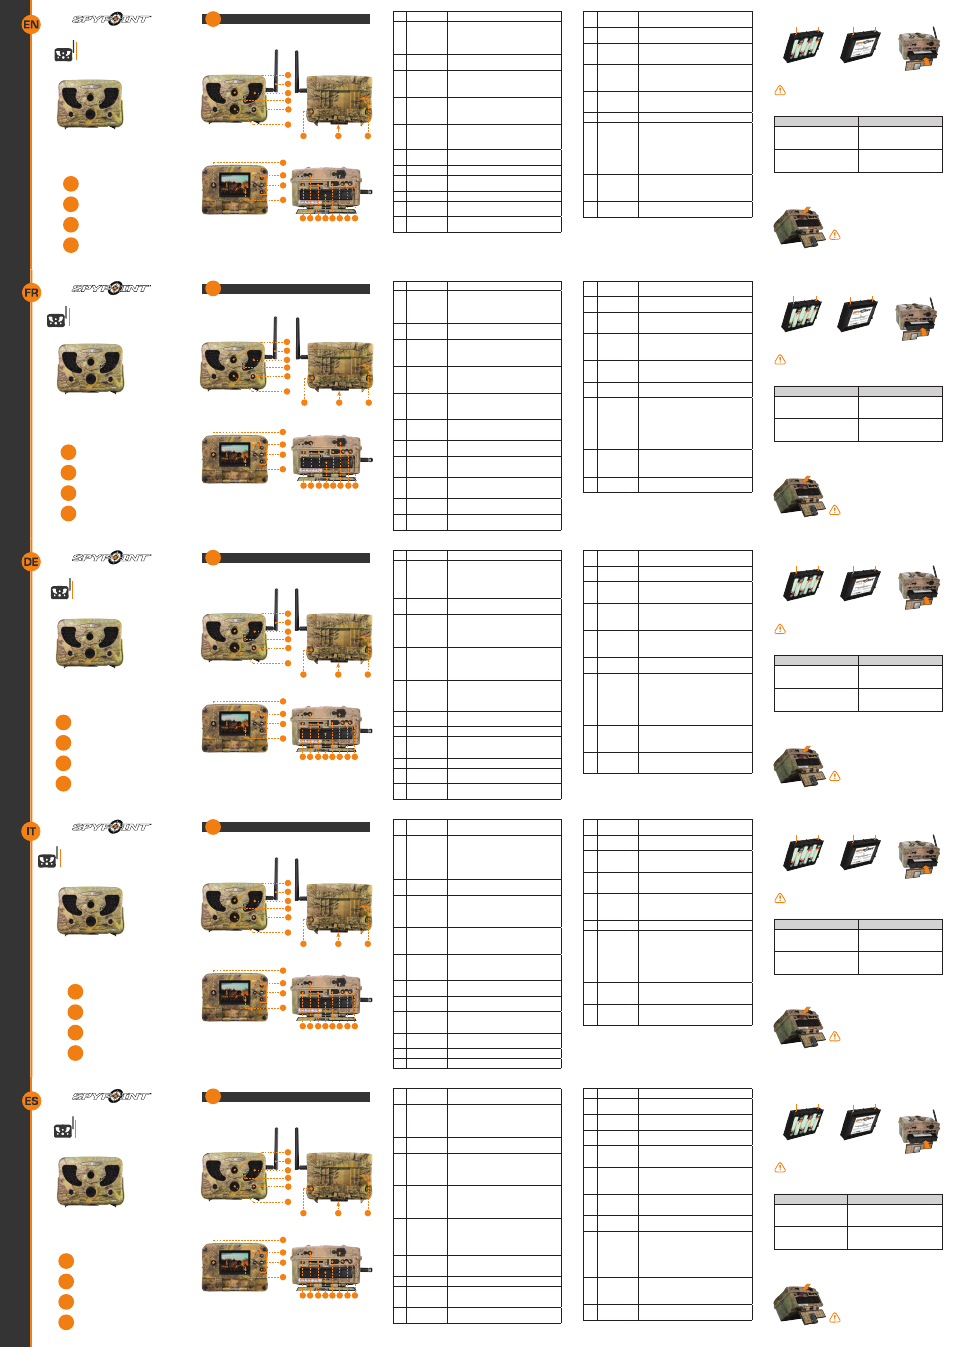
COMPONENTS
3
4
5
6
1
2
19
14
16 17
15
18
20 21
8
7
9
11
12
13
10
Getting started
1
1
Photo lens
Image sensor and infrared filter.
2
Antenna
(if applicable)
Allows wireless communication between
the camera and a BLACKBOX
(receiver/
controller). For installation (if applicable),
remove the cap and screw the antenna on the
left side of the camera.
3
Invisible LEDs
Night lighting to obtain black and white
photos and videos.
4
Test light
Flashes in TEST mode when there is detec-
tion and flashes 60 seconds in PHOTO/VIDEO
mode to allow the user to leave without being
photographed or recorded.
5
Side sensors
(2)
Allows to prepare the camera so when the
target passes through the central sensor, the
system is already pre triggered. When acti-
vated, the detection area is expanded.
6
Fresnel lens
(in front of
the central
sensor)
Expands the detection area and increases the
sensitivity of the camera’s motion sensor.
7
Cable lock
hole
Allows the user to install a cable lock (CL-6FT,
sold separately).
8
Tripod mount
Standard ¼-20” tripod mount.
9
Slot for instal-
lation strap
Allows the user to install the camera using
the installation strap included.
10
Power button
Allows the user to turn on/off the camera.
11
BUSY LED
Lights up when the camera is recording.
12
Navigation
buttons
Buttons to set the camera.
13
Viewing
screen
To access the main menu and view photos/
videos.
14
Battery switch
Allows the user to select the power source
according to the type of batteries used.
15
Microphone
To record sound, lift the rubber cap and turn
it slightly to completely clear the microphone
receiver.
16
SD card slot
An SD card is required to record photos/
videos. The camera is compatible with SD/
SDHC memory card, up to 32 GB capacity
(not included).
17
Removable
battery holder
Insert 6 AA batteries (alkaline or lithium) or
a rechargeable lithium battery pack (LIT-09/
LIT-C-8, sold separately).
18
USB port
To transfer photos/videos to a computer.
19
1)12V power
jack
2)Solar panel
jack
1)This camera can be powered from an
external 12-volt DC input such as a 12V
battery or a 12V adapter, each sold
separately.
2)Allows the user to connect a solar panel
(SP-12V) to maintain the charge of the
lithium battery pack (LIT-09/LIT-C-8), sold
separately.
20
External
trigger jack
1/8” port which triggers the taking of pho-
tos or videos using a normally open contact.
(Example: using a magnetic door contact
connected to an alarm system).
21
TV OUT
To view or delete photos/videos directly on
TV.
BATTERY INSTALLATION
We recommend the use of new batteries to ensure a maximum
performance of the camera. Rechargeable AA batteries are not
recommended.
Battery switch position (depending on the power source)
Power source
Battery switch position
• 6 AA
• 12V
• 12V + 6 AA
ALK
• LIT-09
*
• 12V + LIT-09
*
• Solar panel + LIT-09
*
RECH
*
Rechargeable lithium battery pack, sold separately (LIT-09) or with
a charger (LIT-C-8).
INSTERTING THE MEMORY CARD
Insert an SD/SDHC memory card (up to 32 GB
capacity) in the card slot, gold contacts facing
up. The card is inserted correctly when a click
is heard.
Before inserting or removing a memory
card, always turn off the camera to
prevent loss or damage of the photos already
recorded.
6 alkaline AA batteries
Lithium battery pack
LIT-09/LIT-C-8
Connectors
Connectors
Insert connectors
first
Modèles:
TINY-PLUS
TINY-W
BF
TINY-W
3
TINY
4G
Guide de
démarrage rapide
v1.3
P INT
SPY
INT
P
SPY
Caméra de surveillance
Série TINY
Mise en route
Messages d’erreur
Menu principal
1
2
3
4
Instructions complètes
www.spypoint.com
COMPOSANTS
3
4
5
6
1
2
19
14
16 17
15
18
20 21
8
7
9
11
12
13
10
Mise en route
1
1
Lentille photo
Capteur d’image et filtre infrarouge.
2
Antenne
(si applicable)
Permet la communication sans fil entre
la caméra et un BLACKBOX
(récepteur/
contrôleur). Pour l’installation (si applicable),
retirer le bouchon et visser l’antenne sur le
côté gauche de la caméra.
3
DEL invisibles
Éclairage de nuit pour obtenir des photos et
vidéos en noir et blanc.
4
Lumière de
test
Clignote en mode TEST lors d’une détection
et clignote 60 secondes en mode PHOTO/
VIDÉO pour permettre à l’utilisateur de quitter
les lieux sans être photographié ou filmé.
5
Détecteurs de
côté (2)
Permettent de réveiller la caméra et la
prépare au passage de la cible. Lorsqu’ils
sont activés, la zone de détection est alors
élargie.
6
Lentille fresnel
(situé devant
le détecteur
central)
Permet d’élargir la zone de détection et
d’augmenter la sensibilité du détecteur de
mouvement de la caméra.
7
Ouverture
pour câble
cadenas
Permet d’installer un câble cadenas (CL-6FT,
vendu séparément).
8
Support pour
trépied
Fixation pour trépied standard de ¼-20”.
9
Fente pour
courroie
d’installation
Permet d’installer la caméra à l’aide de la
courroie d’installation incluse.
10
Bouton de
mise sous
tension
Permet d’allumer ou d’éteindre la caméra.
11
Lumière BUSY
S’allume lorsque la caméra enregistre un
fichier.
12
Boutons de
navigation
Boutons pour programmer la caméra.
13
Écran de
visionnement
Permet d’accéder au menu principal et de
visionner les photos/vidéos.
14
Commutateur
Permet de sélectionner la source
d’alimentation selon le type de piles utilisées.
15
Microphone
Pour enregistrer le son, soulever le capuchon
et le tourner légèrement pour que le trou du
microphone soit complètement dégagé.
16
Fente pour
carte SD
Carte SD nécessaire pour enregistrer des
photos/vidéos. La caméra accepte les cartes
mémoires de type SD/SDHC jusqu’à une
capacité de 32 Go.
17
Support
amovible pour
piles
Insérer 6 piles AA (alcalines ou lithium) ou un
bloc pile lithium rechargeable (LIT-09/LIT-C-8,
vendus séparément).
18
Port USB
Pour transférer les photos/vidéos à un ordi-
nateur.
19
1)Prise 12V
2)Prise
panneau
solaire
1)La caméra peut être alimentée au moyen
d’une source externe de 12V telle qu’une
batterie 12V ou un adaptateur 12V(AD-
12V), tous vendus séparément.
2)Permet également de brancher un panneau
solaire (SP-12V) qui maintient la charge
du bloc pile lithium (LIT-09/LIT-C-8),
vendus séparément.
20
Prise
déclenche-
ment externe
Port 3,5 mm qui permet de déclencher la
prise de photos/vidéos à l’aide d’un contact
normalement ouvert. (Ex:contact de porte
magnétique relié à un système d’alarme).
21
Sortie TV
Pour visionner ou supprimer les photos/
vidéos directement à l’écran d’un téléviseur.
INSTALLATION DES PILES
Nous recommandons l’utilisation de piles neuves afin d’assurer
un rendement maximal de la caméra. Les piles AA rechargeables
sont déconseillées.
Position du commutateur (selon la source d’alimentation)
Source d'alimentation
Position du commutateur
• 6 AA
• 12V
• 12V + 6 AA
ALK
• LIT-09
*
• 12V + LIT-09
*
• Panneau solaire + LIT-09
*
RECH
*
Bloc pile lithium rechargeable, vendu séparément (LIT-09) ou avec
un chargeur (LIT-C-8).
INSERTION DE LA CARTE MÉMOIRE
Insérer une carte mémoire de type SD/SDHC
(jusqu’à une capacité de 32 Go) dans la fente
pour carte SD, contacts dorés vers le haut. La
carte est correctement insérée lorsqu’un clic se
fait entendre.
Avant d’insérer ou de retirer une carte
mémoire, toujours mettre la caméra à
OFF pour éviter que les images présentes sur
la carte soient supprimées ou endommagées.
6 piles AA alcalines
Bloc pile lithium
LIT-09/LIT-C-8
Connecteurs
Connecteurs
Insérer connecteurs
en premier
Modelle:
TINY-PLUS
TINY-W
BF
TINY-W
3
TINY
4G
Schnellstartanleitung
v1.3
P INT
SPY
INT
P
SPY
Überwachungskamera
TINY series
Starten
Fehlermeldungen
Einstellungen
1
2
3
4
Vollständige Instruktionen
www.spypoint.com
www.spypoint.info
KOMPONENTEN
3
4
5
6
1
2
19
14
16 17
15
18
20 21
8
7
9
11
12
13
10
Starten
1
1
Fotolinse
Bildsensor und Infrarot-Filter.
2
Antenne
(falls zutref-
fend)
Ermöglicht die drahtlose Kommunikation
zwischen der Kamera und der BLACKBOX
(Empfänger/Steuergerät). Für die Installation
(falls zutreffend), entfernen Sie die Kappe
und schrauben Sie die Antenne an der Seite
der Kamera fest.
3
Unsichtbare
LEDs
Nachtbeleuchtung für Schwarz/weiß Fotos
und Videos.
4
Test-LED
Blinkt im TEST Modus, wenn die Kamera eine
Bewegung erfasst hat. Im PHOTO/VIDEO
Modus blinkt die LED 60 Sekunden, um dem
Anwender zu ermöglichen sich zu entfernen,
ohne fotografiert zu werden.
5
Seitliche
Bewegung-
smelder (2)
Bereitet die Kamera vor, wenn das Ziel den
zentralen Bewegungsmelder ist die Kamera
bereits in Bereitschaft. Wenn die seitlichen
Bewegungsmelder aktiviert sind, ist der
Erfassungsbereich erweitet.
6
Fresnel-Linse
(vor dem
zentralen
Bewegung-
smelder)
Erweitert den Erfassungsbereich und macht
den Beweungsmelder der Kamera emfpindli-
cher.
7
Löcher für das
Kabelschloss
Ermöglicht es ein Kabelschloss (CL-6FT,
separat erhältlich) zu installieren.
8
Stativgewinde
Standart ¼-20” Gewindeeinsatz
9
Löcher für
den Befesti-
gungsgurt
Ermöglicht es die Kamera mit dem mitgelief-
erten Befestingungsgurt zu montieren.
10
Power-Taste
Ermöglicht das Ein/Ausschalten der Kamera
11
BUSY-LED
Leuchtet auf, wenn die Kamera aufnimmt.
12
Bedienschalt-
fläche
Tasten zum bedienen der Kamera.
13
Betrachtungs-
Bildschirm
Ermöglicht den Zugriff auf Fotos/Videos über
das Hauptmenü.
14
Batterieschal-
ter
Wählen Sie die Energiequelle, bezüglich der
verwendeten Art von Batterien.
15
Mikrofon
Für Tonaufnahmen, heben Sie die Gummia
beckung an und drehen diese zur Seite,
damit das Mikrofon frei liegt.
16
SD-Kartens-
teckplatz
Für Foto/Video-Aufnahmen wird eine SD-
Karte benötigt. Die Kamera ist kompatibel
mit SD/SDHC Speicherkarten, bis zu 32GB
(nicht enthalten).
17
Herausnehm-
barer
Batteriehalter
Verwenden Sie 6 AA-Batterien (Alkaline oder
Lithium) (LR6) oder einen wiederaufladbaren
Lithium-Akku-Pack (LIT-09/LIT-C-8, separate
erhältlich).
18
USB-
Anschluss
Um Fotos/Videos auf Ihren Computer zu
übertragen.
19
1)12V
2)Solar-Panel-
Anschluss
1)Diese Kamera kann über den externen
12-Vold-DC-Eingang betrieben werden,
z.B. mit einer 12V Batterie oder einem 12V
Adapter (separat erhältlich).
2)Ermöglicht ein Solarpanel (SP-12V) anzus
chließen, um die Ladung des Lithium-
Akku-Pack (LIT-09/LIT-C-8) aufrechtzuer
halten (separate erhältlich).
20
Externe
Auslöser-
Buchse
1/8” –Eingang der Kamera über einen
Schließerkontakt auslöst. (Beispiel: Ver-
wendung eines magnetischen Türschalters
an ein Alarmsystem angeschlossen)
21
TV-Ausgang
Ermöglicht das Betrachten und Löschen von
aufgenommenen Bildern und Videos über
über ein TV-Gerät.
EINSETZEN DER BATTERIEN
Wir empfehlen, neue Batterien zu verwenden, um die maximale
Leistung aus Ihrer Kamera herauszuholen. Weiterhin wird die
Verwendung von wiederaufladbaren AA-Batterien nicht empfohlen.
Schalterstellung abhängig (von der Energiequelle)
Energiequelle
Schalterstellung
• 6 AA
• 12V
• 12V + 6 AA
ALK
• LIT-09
*
• 12V + LIT-09
*
• Solarpanel + LIT-09
*
RECH
*
Wiederaufladbarer Lithium-Akku-Pack (LIT-09) oder mit Ladegerät
(LIT-C-8), separat erhältlich.
LEGEN SIE EINE SPEICHERKARTE EIN
Legen Sie eine SD/SDHC Speicherkarte (bis zu
32 GB) in den Kartenleser der Kamera, goldene
Kontakte nach oben. Wenn ein klicken zu hören
ist, wurde die Karte korrekt eingelegt.
Vor dem Einsetzen oder Entfernen einer
Speicherkarte, schalten Sie die Kamera
immer vorher aus, um einen Verlust oder eine
Beschädigung von den bereits vorhandenen
Aufnahmen zu verhindern.
6 Alkaline AA-Batterien
Lithium-Akku-Pack
LIT-09/LIT-C-8
Kontakte
Kontakte
Mit den Kontakten
zuerst einlegen
Modelli:
TINY-PLUS
TINY-W
BF
TINY-W
3
TINY
4G
Manuale d’istruzione
per avvio veloce
v1.3
P INT
SPY
INT
P
SPY
Telecamera per sorveglianza
TINY series
Avvio
Messaggi d’errore
Impostazioni
1
2
3
4
Istruzioni complete
www.spypoint.com
www.spypoint.info
COMPONENTI
3
4
5
6
1
2
19
14
16 17
15
18
20 21
8
7
9
11
12
13
10
Avvio
1
1
Lente
fotografica
Sensore d’immagine e filtro infrarossi.
2
Antenna (se
corrisponde)
Permette la comunicazione priva di fili tra
l’apparecchio e la BLACKBOX (Ricevitore/Dis-
positivo di controllo) Ermöglicht die drahtlose
Kommunikation zwischen der Kamera und der
BLACKBOX. Per l’installazione (se corripson-
dente), rimuovere il coperchio ed avvitare
l’antenna.
3
LED invisibili
Illuminazione notturna per immagini e video
in bianco/nero.
4
LED test
Lampeggia nella modalità TEST, se la tele-
camera rileva un movimento. Nella modalità
Photo/Video il LED lampeggia 60 secondi,
per permettere all’utilizzatore di allontanarsi
senza essere ripreso.
5
Rilevatore
movimento
laterale (2)
Prepara l’apparecchio affinchè il movimento
viene rilevato dal sensore centrale già attivo.
In caso di accensione dei rilevatori laterali il
campo d’azione viene ampliato.
6
Lente Fresnel
(davanti al
rilevatore
centrale)
Amplia il campo d’azione e rende il sensore
più sensibile.
7
Fori per il
cavo lucchetto
Permette l’installazione di un cavo con
luccehtto (CL-6FT, acquistabile a parte).
8
Filettatura per
treppiede
Inserto filettato ¼-20” standard
9
Fori per il
nastro di po-
sizionamento
Permetto il posizionamento dell’apparecchio
con il nastro incluso nella confezione.
10
Tasto Power
Interruttore per accensione/spegnimento
della telecamera.
11
BUSY-LED
Si accende, quando la telecamera riprende.
12
Telecomando
Tasti per impostare la telecamera.
13
Diplay per
visualizzazione
Permette l’accesso alle immagini/video tra-
mite menu principale.
14
Interruttore
batteria
Selezionate la fonte d’energia riferita al tipo
di batteria.
15
Microfono
Per riprese audio, alzate la protezione in
gomma e ruotatela sul lato per liberare il
microfono.
16
Lettore SD
Per registrazioni foto/video si necessita di
scheda SD. La telecamera è compatibile con
SD/SDHC fino a 32 GB (non compresa).
17
Contenitore
batterie
amovibile
Utilizzate 6 batterie AA (alcaline oppure al
litio) (LR6) oppure un pacco batteria ricarica-
bile al litio (LIT-09/LIT-C-8, ottenibile sepa-
ratamente).
18
Presa USB
Per inviare foto/video sul suo computer.
19
1)Connes-
sione 12V
2)Connessio-
ne pannello
solare
1)Questa telecamera può essere alimentata
dall’entrata esterna 12-V-DC, ad esempio
con batteria 12V o adattatore 12V (otteni
bile separatamente).
2)Permette di attaccare un pannello solare
(SP-12V), per mantenere la carica del
pacco batteria al lithio (LIT-09/LIT-C-8)
(ottenibile separatamente).
20
Presa per
sistemi di
scatto esterni
Entrata 1/8” (esempio: Utilizzo di un inter-
rutore magnetico apriporta in combinazione
con sistema d’alarme.
21
Uscita TV
Permette di visualizzare e cancellare le im-
magini ed i video registrati tramite display
tramite televisore.
INSERIMENTO DELLE BATTERIE
Consigliamo di utilizzare batterie nuove, per avere il Massimo
della telecamera. Inoltre si sconsiglia l’uso di batterie ricaricabili.
Posizione interruttore batteria (dipendente dalla fonte d’energia)
Fonte d’energia
Posizione interrutore batteria
• 6 AA
• 12V
• 12V + 6 AA
ALK
• LIT-09
*
• 12V + LIT-09
*
• Pannello solare + LIT-09
*
RECH
*
Pacco batteria ricaricabile al litio (LIT-09) o con caricabatteria
(LIT-C-8), ottenibili separatamente.
INSERIRE LA SCHEDA DI MEMORIA
Inserite una scheda SD/SDHC (fino a 32 GB)
nell’apposita fessura, I contatti riversi verso
l’alto. Se è udibile un click la scheda è stata
inserita correttamente.
Prima di inserire o di togliere una sche-
da memoria, spegnete sempre la tele-
camera, per evitare il danneggiamento o la
perdita di dati registrati.
6 pile alcaline AA
Pacco pile Lithio
LIT-09/LIT-C-8
Contatti
Contatti
Inserire con i contatti
in avanti
Modelos:
TINY-PLUS
TINY-W
BF
TINY-W
3
TINY
4G
Guía de inicio rápido
v1.3
P INT
SPY
INT
P
SPY
Cámara de vigilancia
TINY series
Para empezar
Mensajes de error
Ajustes
1
2
3
4
Instrucciones completas
www.spypoint.com
www.spypoint.info
COMPONENTES
3
4
5
6
1
2
19
14
16 17
15
18
20 21
8
7
9
11
12
13
10
Para empezar
1
1
Lentes
fotográficas
Sensor de imágenes y filtro de infrarrojos.
2
Antena
(si está
disponible)
Permite la comunicación inalámbrica entre la
cámara y la BLACKBOX
(Receptor/Dispositivo
de mando). Para la instalación (si está dis-
ponible), quite el tapón y atornille la antena
al lado de la cámara.
3
LED invisibles
Iluminación nocturna para fotos y vídeos en
blanco y negro.
4
Luz de prueba
Parpadea en el modo PRUEBA cuando la
cámara ha detectado un movimiento. En el
modo PHOTO/VIDEO la luz LED parpadea
durante 60 segundos para permitir al usuario
retirarse sin ser fotografiado.
5
Sensores de
movimiento
laterales (2)
Prepara la cámara cuando está el objetivo del
detector central de movimientos, la cámara
ya se está preparando. Si los detectores de
movimientos laterales están activados, se
amplía el área de registro.
6
Lente de
Fresnel
(delante del
sensor de
movimientos
central)
Amplía el área de registro y hace que el
detector de movimientos de la cámara sea
más sensible.
7
Orificios para
el candado del
cable
Permite instalar un candado para el cable
(CL-6FT, se puede adquirir por separado).
8
Trípode
Inserto roscado estándar ¼-20”
9
Orificios para
la cinta de
fijación
Permite montar la cámara con la cinta de
fijación incluida.
10
Tecla de
alimentación
Permite apagar y encender la cámara.
11
BUSY-LED
Se ilumina cuando la cámara graba.
12
Botones de
ajustes
Botones para utilizar la cámara.
13
Pantalla de
visualización
Permite el acceso a fotografías y vídeos a
través del menú principal.
14
Interruptor de
la batería
Seleccione la fuente de energía dependiendo
del tipo de baterías empleadas.
15
Micrófono
Para realizar grabaciones de audio levante la
funda de plástico y dele la vuelta ligeramente
para dejar el micrófono libre.
16
Ranura de la
tarjeta SD
Para realizar grabaciones de vídeo o foto-
grafías es necesaria una tarjeta SD. La
cámara es compatible con tarjetas de memo-
ria SD/SDHC de hasta 32GB (no incluidas).
17
Soporte de
baterías
extraíble
Utilice 6 pilas AA (alcalinas o de litio) (LR6)
o una batería de litio recargable (LIT-09/
LIT-C-8, disponibles por separado).
18
Conexión USB
Para poder transferir fotos y vídeos a su
ordenador.
19
1)Conexión
12V
2)Conexión al
panel solar
1)Esta cámara puede ser alimentada por la
entrada externa de 12 voltios DC, por
ejemplo con baterías de 12V o un adapta
dor de 12V (disponible por separado).
2)Permite instalar un panel solar (SP-12V),
para mantener la carga de la batería de litio
(LIT-09/LIT-C-8) (disponible por separado).
20
Casquillo de
activación
externo
1/8” –Entrada de la cámara activada a través
de un contacto de cierre (ejemplo: uso de un
interruptor de puertas magnético conectado
a un sistema de alarma).
21
Salida de TV
Permite al usuario visualizar o borrar foto-
grafías y vídeos en un televisor.
COLOCACIÓN DE LAS BATERÍAS
Le recomendamos emplear nuevas pilas para obtener los
mejores resultados de su cámara. Además, no se recomienda el
uso de baterías AA recargables.
Posición del interruptor de la batería (en función de la fuente de energía)
Fuente de energía
Posición del interruptor de la batería
• 6 AA
• 12V
• 12V + 6 AA
ALK
• LIT-09
*
• 12V + LIT-09
*
• Panel solar + LIT-09
*
RECH
*
Batería de litio recargable (LIT-09) o mediante cargador (LIT-C-8),
disponibles por separado.
INTRODUZCA UNA TARJETA DE MEMORIA
Inserte una tarjeta de memoria SD/SDHC (de
hasta 32 GB) en el lector de tarjetas de la
cámara con los contactos dorados hacia arriba.
Cuando oiga clic esto significará que la tarjeta
ha sido correctamente colocada.
Antes de insertar o retirar la tarjeta de
memoria, apague la cámara para prevenir
que las imágenes ya tomadas sean dañadas o
borradas.
6 pilas alcalinas AA
Una batería de litio
LIT-09/LIT-C-8
Contactos
Contactos
Colocar primero
con los contactos
Adventure
series · série
expedition
series · série
summit pro
series · série
smart
series · série
TINY
series · série
LIVE
series · série
Adventure
series · série
expedition
series · série
summit pro
series · série
smart
series · série
TINY
series · série
LIVE
series · série
Adventure
series · série
expedition
series · série
summit pro
series · série
smart
series · série
TINY
series · série
LIVE
series · série
Adventure
series · série
expedition
series · série
summit pro
series · série
smart
series · série
TINY
series · série
LIVE
series · série