Caution – S&S Cycle Gear Drive Cams for Harley-Davidson Twin Cam 88 Engines User Manual
Page 7
7
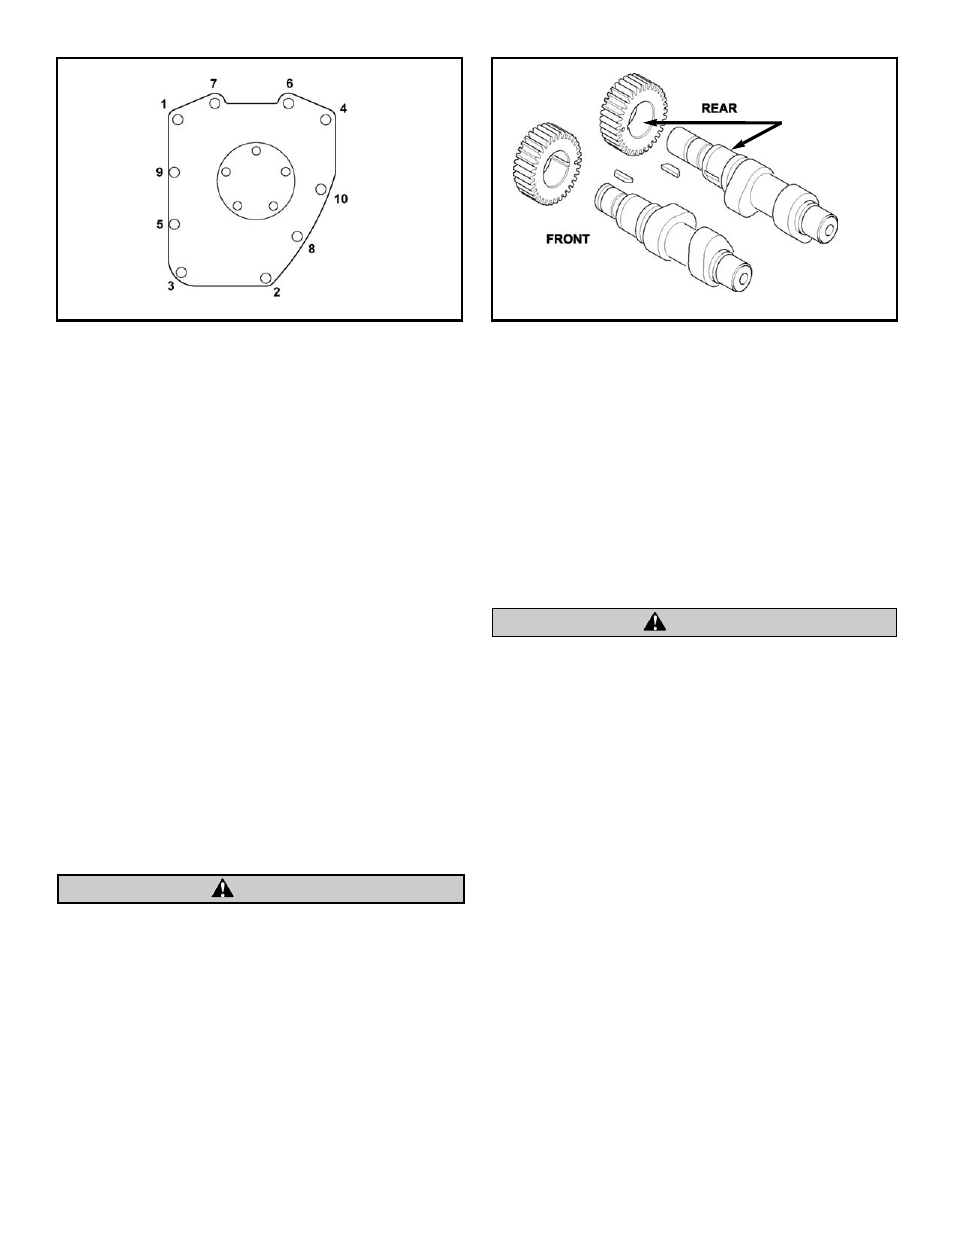
Figure 6
Figure 7
6oq
Green Loctite
®
R.
Loosen locknuts on adjustable pushrods and turn
adjusters to make all rods as short as possible.
S.
Longer S&S
®
pushrods are for exhaust valves, and
shorter ones are for intake. Pass one long and one short
pushrod through assembled pushrod covers. Place
pushrod and cover assemblies through lifter cover. Inner
tappet hole is for intake pushrod, and outer tappet hole
is for exhaust pushrod. While holding a new gasket
under lifter cover, install push rod, pushrod cover, lifter
cover, and gasket as an assembly on crankcase. Tighten
lifter cover screws to 95 in-lbs. torque.
NOTE: Pushrod adjustment. If using unmodified original
tappets perform steps 3-A thru 3-D to adjust pushrods. (See
below.) If S&S HL
2
T kit has been installed in tappets, proceed to
steps 4-A thru 4-F. (See next page.)
3. Pushrod Adjustment Procedure
For Unmodified Stock Tappets
A.
Turn adjuster screw to lengthen exhaust pushrod until
pushrod has no vertical movement but still rotates with
light finger pressure. Extend pushrod by rotating
adjuster screw an additional 20 flats (3
1
⁄
3
revolutions) and
secure adjuster screw with locknut.
B.
Repeat step 2-S for intake pushrod.
C.
Front lifters should bleed down in 5-10 minutes,
allowing pushrods to be rotated with light finger
pressure. Extend pushrod covers and install cover clips.
Rotating engine before lifters have bled down may damage
pushrods and other components not covered under warranty.
E.
Rotate engine until both lifters for rear cylinder are at
lowest point on camshaft (TDC of compression stroke
for rear piston). Repeat steps R-T for rear pushrods.
4.
Pushrod Adjustment Procedure - for Tappets With HL
2
T
Kit Installed
A.
Bring piston to TDC on compression stroke in cylinder to
be adjusted. Normally both tappets will be at their
lowest point of travel.
B.
Extend pushrod adjustment, collapsing lifter until piston
assembly is in contact with HL
2
T spacer and pushrod is
tight. If tappets contain oil, as when pushrods are
readjusted after engine has been run, or if all oil was not
removed during HL
2
T installation, extend pushrod
adjustment until valve is open (about five additional
turns of adjusting screw). Allow 5 minutes for hydraulic
unit to bleed down. If pushrod can be turned with
fingers after bleeding down, lifter is not completely
collapsed, and this step must be repeated.
NOTE: Perform this operation on one cylinder at a time. Do not
turn engine until pushrod adjustment is complete.
Turning engine while valve is held off the seat could result in
valve to valve or valve to piston contact and serious valve
train damage.
C.
Loosen pushrod adjustment until pushrod can be
rotated with the fingers with slight drag. Pushrod
now has zero lash.
NOTES:
G Shortening pushrod adjuster an additional six flats or one
full turn from zero lash often results in quieter pushrod
operation. This provides additional travel for the
hydraulic piston assembly, which can improve the ability
of the hydraulic unit to maintain zero lash under normal
operating conditions.
G Harley-Davidson Twin Cam 88 lifters require HL
2
T Kit 33-
5339 for 1986 and later engines.
D.
Tighten lock nut and recheck pushrod adjustment to
insure that it is still correct.
E.
Follow the same procedure for all four push rods.
NOTES:
G After a few hundred miles it is a good idea to recheck
pushrod adjustment in a new engine as valve train may
tighten up due to gasket compression and valve seat wear.
G Upon initial start up after modification, HL
2
T equipped lifters
may be somewhat noisy for 10-20 miles. If lifters are still
noisy after 20 miles it is recommended that pushrods be
adjusted
1
⁄
2
turn looser.
CAUTION
CAUTION