Post service – S&S Cycle Shift Collar Replacement for S&S Transmission User Manual
Page 7
7
6- Thread the silver main shaft retaining nuts onto the shaft, but do not tighten them yet. This will draw the main shafts the rest of the way into the
trap door bearings.
7- Install the shift forks and shift shaft on the cassette assembly. For questions on this procedure, see instruction sheet 51-1232.
8- Install the 5-6 shift collar on the main shaft.
9- Slide the cassette assembly into the transmission case—be sure to use a new gasket on the trapdoor. Tap the cassette into place with a soft-
faced hammer.
Note: Verify that the transmission rotates freely between each step of the assembly before going further.
10- Apply blue threadlock to the six fasteners for the trap door. Tighten the 5/16” fasteners to 13-16 ft-lbs and the ¼” fasteners to 7-10 ft-lbs.
11- Use the S&S tool, P/N 53-0223 to tighten the black trapdoor retaining nuts to 70-80 ft-lbs. Be sure to use the supplied 262 threadlock
on the nuts.
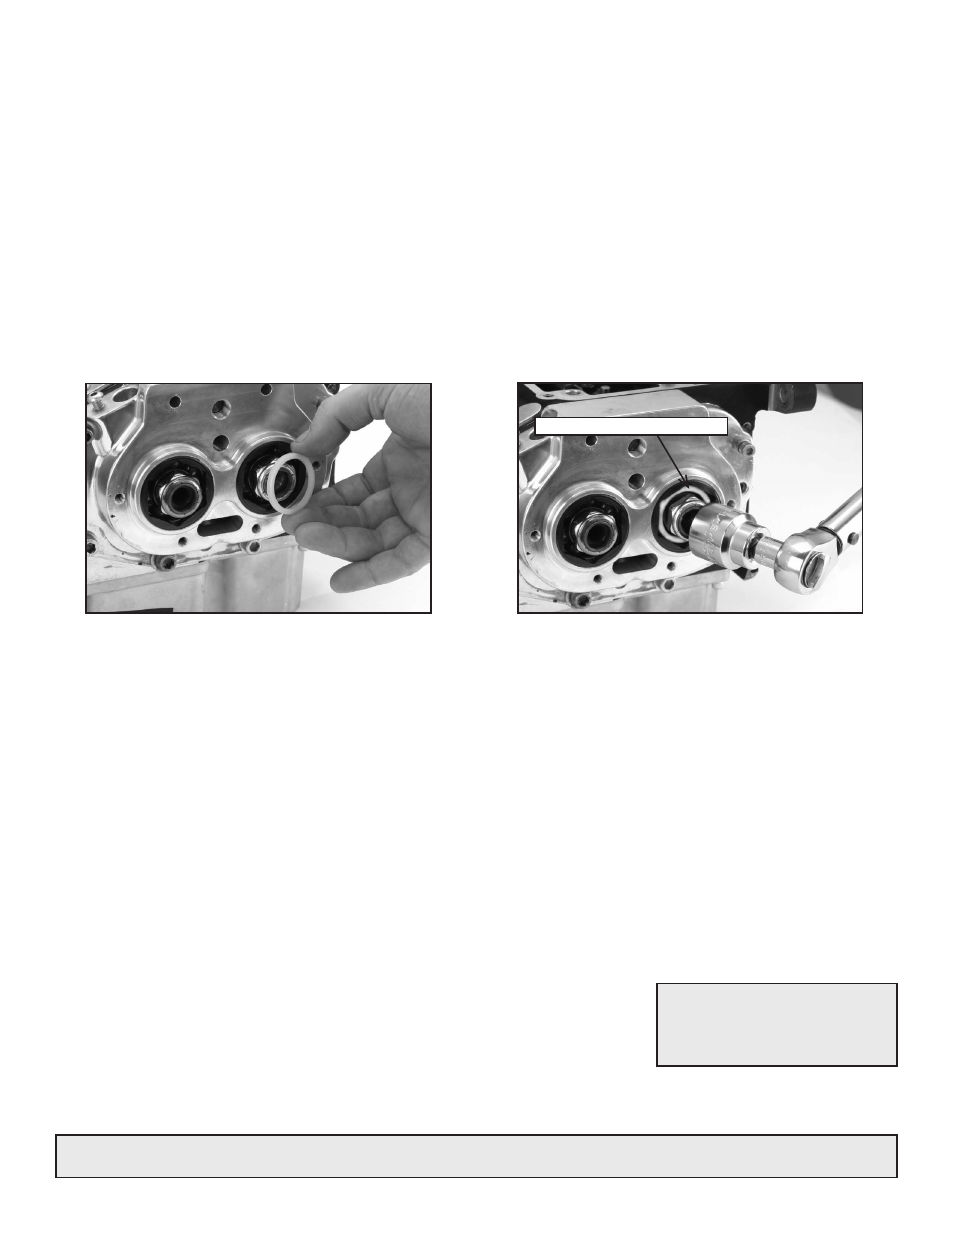
12- Lock the transmission by engaging two gears.
13- Use the supplied plastic washer on both mainshafts as shown in Picture 17 & 18. Apply 262 threadlock and then tighten the silver mainshaft
nuts to 45-55 ft-lbs using a 11/16" socket.
Note: The plastic washer is required to prevent the socket from damaging the trap door bearing cage.
14- Remove plastic washer when done tightening both main shaft nuts.
15- Unlock the gears, return them to their original position and verify that the transmission rotates freely.
16- Install both of the actuation pushrods.
17- Use a new gasket and then install the transmission side cover. Treat the threads with blue threadlock and then tighten to 7-9 ft-lbs. FLT models
should install the oil-filler dipstick at this time.
18- Now install the shift drum (per instructions 51-1232) and apply blue threadlock to ¼” fasteners and tighten to 7-9 ft-lbs. Shift through all of the
gears to verify proper adjustment.
19- Select third gear and verify shift pawl adjustment/centering. If any adjustments are required, the steps are outlined in instruction sheet 51-1232.
20- Place a new gasket under the transmission top cover, apply blue threadlock to fasteners and tighten to 7-9 ft-lbs.
21- Connect the neutral switch wiring.
22- Install the inner primary bearing race per manufacturers instructions.
23- Next, install the inner and outer primary assembly per the manufacturers instructions including filling primary fluid.
24- Now put the exhaust system back on the bike.
25- Fill the transmission with 24 ounces of 90-weight gear oil or equivalent.
26- Connect the battery, clean any components that were touched during the above procedures and then test ride the motorcycle.
Picture 17
Picture 18
Plastic washer temporarily installed.
S&S Cycle Return Address:
235 Causeway Blvd.
La Crosse, Wisconsin 54603
IMPoRtANt: Serial number information is required to complete the return authorization. A credit will be issued to your account once the
parts are sent back to S&S.
POST SERVICE
1- Return the three used collars to S&S®.
2- Include RA#. This should have been provided at the time the kit was shipped out.
If you do not have this number contact S&S at 608-627-8324.
3- Include serial number of complete transmission or cassette:
-Cassette location (See Picture 8)
-Complete transmission location (See Picture 9)
4- Upon receipt of replaced components, S&S will reimburse dealers for labor and materials at S&S discretion. This will be done as a product credit
to your dealer account.