Mayline Mobile Lite User Manual
Page 6
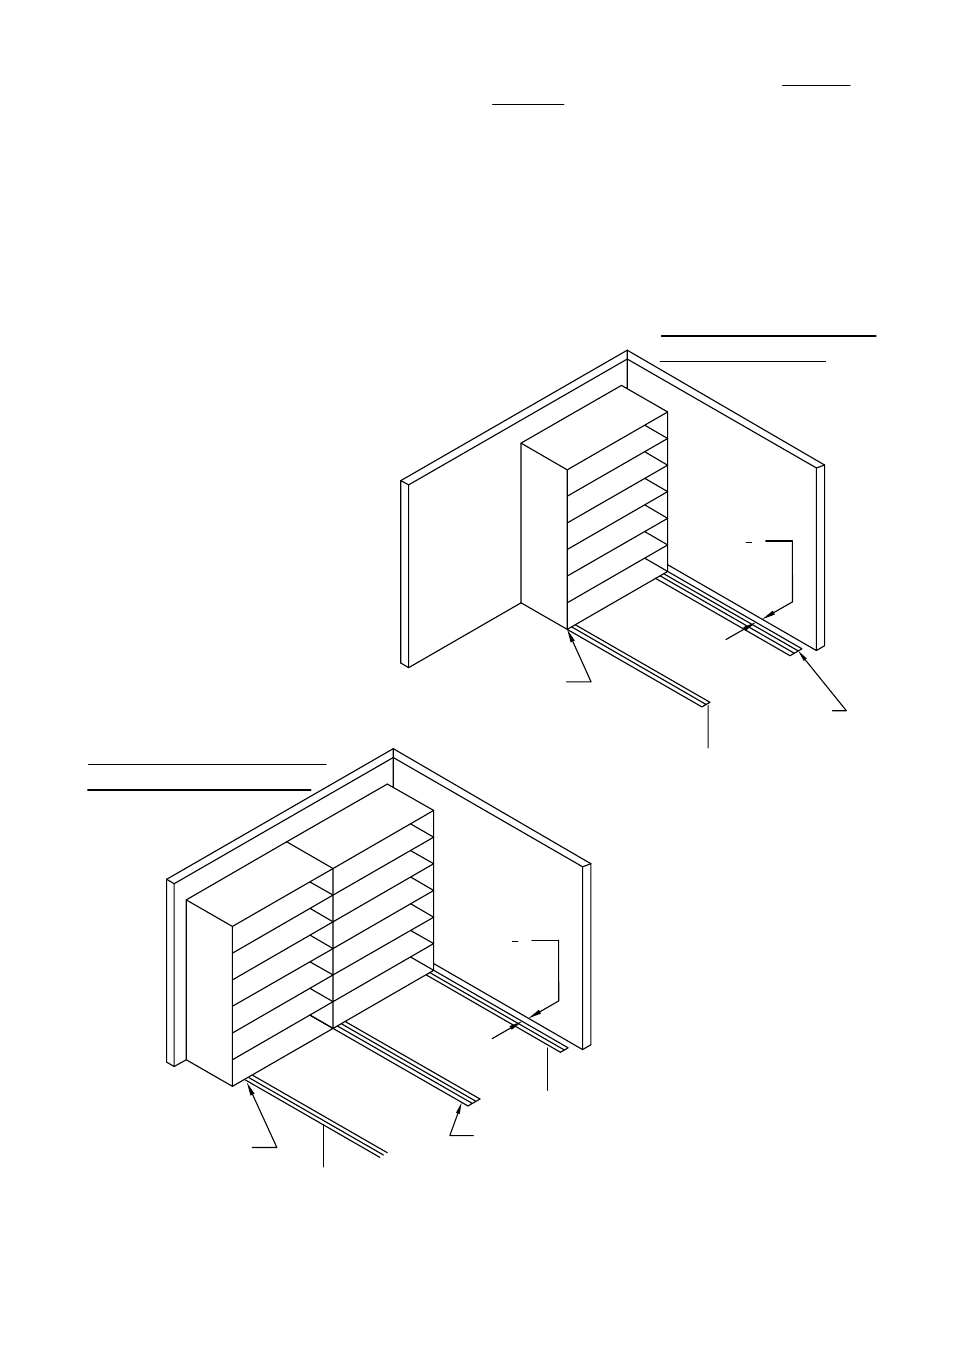
STEP 9.
Once first track (the Anti-Tip track) is secure,
the remaining tracks may be set into place.
Use carriages as a guide for track placement.
Measure to ensure tracks are truly parallel and
square.
Note: Wheel channel closest to the anti-tip
tab is a non-floating wheel channel.
STEP 10.
Slide one carriage on the track to determine
spacing. Verify carriage wheels are centered
in the channels and in the track.
STEP 11.
The tracks must be parallel and square to each
other to ensure proper operation. Measure
each set of tracks and the entire system,
corner to corner, to verify that each distance is
the same.
(6)
Anti-Tip Track
Spacing From
Wall 1
1
2
"
STEP 12.
Install all end stops nearest the stationary shelving
and install the balance of the carriages. Shelving
end only.
STEP 13.
Install remaining track anchors.
STEP 14.
Slide the remaining carriages on the track, verify
smooth operation. Install the remaining end stops
Track placed touching
stationary shelving
Track placed touching
stationary shelving
Track
Anti−Tip Track
Track
Track
Spacing From
Wall 1
1
2
"
Anti-Tip Track location
in 2 Track Layout
Anti-Tip Track location in
3 or more Track Layout
- 5 Shelf Bookcase Aberdeen Series (5 pages)
- Bowfront Desk Aberdeen Series (3 pages)
- Contour Bridge Aberdeen Series (3 pages)
- Conference Front Desk Aberdeen Series (3 pages)
- Credenza Aberdeen Series (3 pages)
- Desk Mount Hutch - Glass Doors Aberdeen Series (5 pages)
- Desk Mount Hutch - Wood Doors Aberdeen Series (5 pages)
- Desk-Mounted 20" 4-drawer Pedestal Aberdeen Series (2 pages)
- Extended Corner, Left Aberdeen Series (3 pages)
- Extended Corner, Right Aberdeen Series (3 pages)
- Peninsula Return 60 x 30 Aberdeen Series (3 pages)
- Peninsula Return 72 x 36 Aberdeen Series (4 pages)
- Return Aberdeen Series (4 pages)
- Straight Front Desk Aberdeen Series (3 pages)
- Suspended Pedestal for Credenza - 20" Aberdeen Series (4 pages)
- Suspended Pedestal for Desk - 26" Aberdeen Series (4 pages)
- Reception Counter Aberdeen Series (3 pages)
- Reception Return Screen Aberdeen Series (3 pages)
- 2 Shelf Bookcase Aberdeen Series (5 pages)
- 3 Shelf Bookcase Aberdeen Series (5 pages)
- Boat-Shaped Table – 72" x 36 Boat Aberdeen Series" (3 pages)
- Boat-Shaped Table – 96" x 48 Boat Aberdeen Series" (3 pages)
- Boat-Shaped Table – 120" x 48 Boat Aberdeen Series" (4 pages)
- Boat-Shaped Table – 144" x 48 Boat Aberdeen Series" (4 pages)
- Boat-Shaped Table -- 216" x 48 Boat Aberdeen Series" (5 pages)
- Presentation Cabinet Aberdeen Series (3 pages)
- Bowfront Desk Corsica Series (3 pages)
- Bridge Return Corsica Series (3 pages)
- Center Drawer Corsica Series (2 pages)
- Credenza Corsica Series (4 pages)
- Lateral File Corsica Series (3 pages)
- Pedestal for Credenza - BBF Corsica Series (2 pages)
- Pedestal for Credenza - FF Corsica Series (2 pages)
- Pedestal for Desk - BBF Corsica Series (2 pages)
- Pedestal for Desk - FF Corsica Series (2 pages)
- Peninsula Desk Corsica Series (2 pages)
- Return, Left Corsica Series (4 pages)
- Return, Right Corsica Series (4 pages)
- Straight Front Desk Corsica Series (3 pages)
- 72" Conference Table Corsica Series (3 pages)
- 84"/96 Conference Table Corsica Series" (3 pages)
- 120" Conference Table Corsica Series (4 pages)
- Presentation Board Corsica Series (3 pages)
- Round Table Corsica Series (3 pages)
- Top, Modesty Panel, and Base Leg - Adder Corsica Series (5 pages)