Mark Feldstein & Associates Fire Winder Wind Light - Medium User Manual
Page 2
If in doubt, take a photo of the place where you want to install your
Firewinder and take the Mounting Brackets with you to a local hardware
store and ask a friendly member of staff to recommend what type of
fixtures you should use for a secure installation.
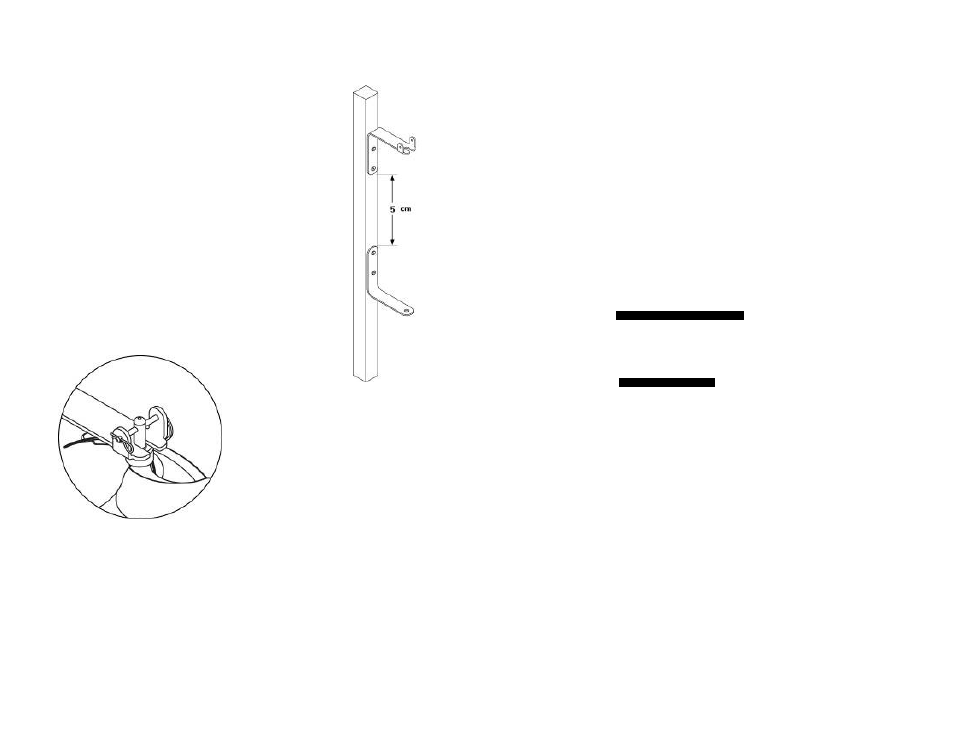
4. Position mounting brackets
Great care needs to be taken to ensure the Mounting Brackets are the
right distance apart and are correctly aligned. Note the correct
orientation for the Mounting Brackets in the illustration.
Step 1
Hold the Top Mounting Bracket against the surface you wish to
install it onto. Mark the centers of the two holes, taking great
care to ensure the bracket is vertical. Drill if required. Screw or
bolt the Top Mounting Bracket into position.
Step 2
Measure and mark precisely 5cm below the bottom edge of the
Top Mounting Bracket - this will be where the top edge of the
Bottom Mounting Bracket will sit. Mark the position of the
holes, taking great care to ensure the bracket is vertical. Drill if
required. Screw or bolt the Bottom Mounting Bracket securely
into position.
5. Install Firewinder
Once the Mounting Brackets are secure, Firewinder can be easily installed
and secured using the Pins to lock it in position.
First, insert the Bottom
Fixing
Point
of
your
Firewinder
into
the
protruding hole in the Bottom Mounting Bracket. Then
offer up the Top Fixing Point of your Firewinder into the
groove at the front of the protruding part of the Top
Mounting Bracket.
Carefully slide the Big Pin through the two holes on
either side of the Top Mounting Bracket making sure
the Big Pin passes through the hole in the tip of the Top
Fixing Point, trapping the Top Fixing Point in position.
Finally, insert the Little Pin into the eyehole at the tip of
the Big Pin as illustrated, securing your Firewinder
ready for operation.
6. Sit back and enjoy
Now your Firewinder is ready for you to enjoy… just wait for the wind to blow!
Whenever the wind blows faster than 3-4 mph Firewinder will create its spiralling light effect and in
high winds Firewinder creates a pulsating pillar of light.
Sometimes it is possible for Firewinder to rotate in an anticlockwise direction, creating a downward
spiral effect. This is generally caused by an object (e.g. a building, wall, fence or tree) obstructing the
direction of air flow directly around the Firewinder. If this is not desired then seek an alternative
place for installation.
If really severe weather is forecast, take down your Firewinder. Debris carried by high winds can
damage Firewinder.
7. Alternative installations
As you have read, we only recommend installation using the Mounting Brackets provided, however, it
is perfectly possible to install your Firewinder in a variety of interesting locations with suitable rope or
wire using the holes in the Top and Bottom Fixing Points.
Mark Feldstein & Associates, inc. and The Firewinder Company will not accept any
responsibility for your actions.
We recommend using a 4mm diameter double braid polyester rope suitable for marine use, which
should be checked regularly for any signs of wear.
In order to stabilize
your Firewinder in high winds we do recommend tethering the base fixing point.
8. Disposal of unit
All plastic and metal parts should be recycled or disposed of in an environmentally friendly way. The
unit can be disassembled by opening the base using commonly available tools. Firewinder must be
disassembled under the supervision of an adult
.
VISIT US ONLINE AT
WWW.MARKFELDSTEIN.COM
FOR FURTHER INFORMATION.
IMPORTANT NOTE: Any pursuit that involves attempting to harness the elements has the potential to
be dangerous. Please install your Firewinder correctly according to these instructions and be careful
and sensible during operation.
Mark Feldstein & Associates, inc.
www.markfeldstein.com