Reassembly, Ij a – Katun Sharp DM 2015 Drum Unit Cartridges User Manual
Page 2
©2001 Katun Corporation
01-05-3137
Reassembly:
9.
Apply a light dusting of Kynar powder to the new Katun drum cleaning blade.
10. Install the new Katun drum cleaning blade by placing it in the unit, then reinstalling the three screws removed in step 5.
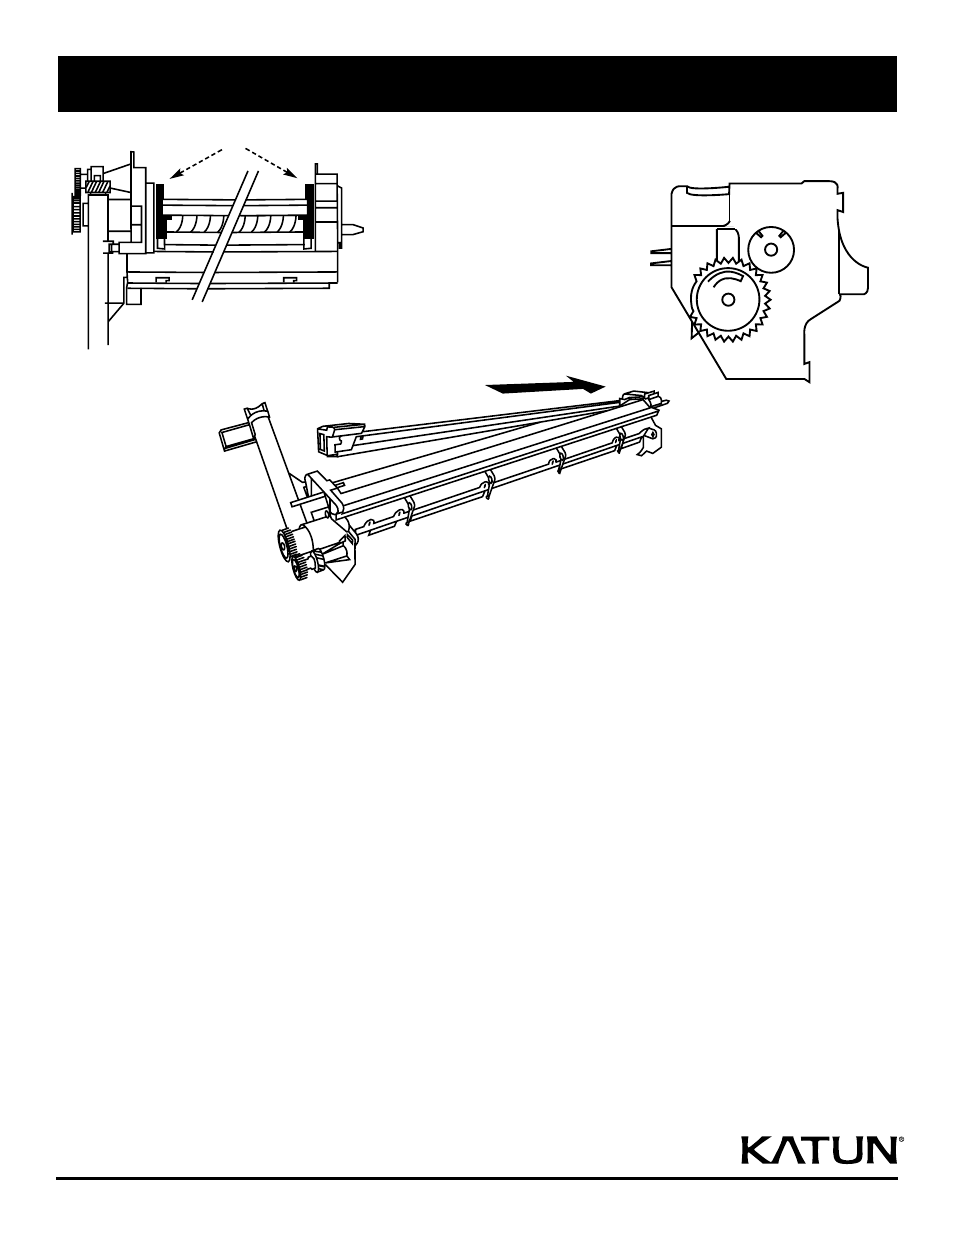
11. Install the new Katun cleaning blade side seals (see figure 3). NOTE: Do not touch the surface of the drum cleaning blade when
installing the seals.
12. Reinstall the charge corona assembly (D) by inserting the right end into the unit first (see figure 4). Align the two plastic end tabs
and the center metal tab with their appropriate slots, and slide the unit to the right to engage the tabs. Reinstall the two screws
removed in step 4.
13. Apply a light coating of grease to the tip of the new Katun drum fixing plate. Install the new Katun OPC drum by inserting it gear-
end into the unit, then setting the OPC into place. Secure the OPC drum by installing the drum fixing plate and turning it counter-
clockwise until it locks in place.
14. Turn the OPC drum counter-clockwise one full rotation to evenly distribute the Kynar.
15. Reposition the drum counter reset gear (I) by removing the small coupler gear (J), then lifting and rotating the drum counter reset
gear clockwise until the detection arm is in the 12:00 position (see figure 5). Reinstall the coupler gear. NOTE: The drum counter
reset gear and small coupler gear are not included in original drum cartridges provided with these machines. The drum counter can
also be reset by performing simulation 24-07.
16. Reinstall the drum cover (A)—using caution not to disrupt the gears within—by gently pushing the unit down into it until all four
of its plastic hook clips snap in place.
17. Mark the unit with a spot of white paint to indicate it has been rebuilt.
NOTE: Do not rotate the drum or make a copy after assembly, as this will cause the drum counter reset gear to rotate.
Figure 3.
Figure 4.
Figure 5.
I
J
A
D
A
J
I
G
- Sharp DM 2010 Drum Unit Cartridges Sharp DM 2005 Drum Unit Cartridges Sharp DM 2000 Drum Unit Cartridges Sharp AR 207 Drum Unit Cartridges Sharp AR 206 Drum Unit Cartridges Sharp AR 205 Drum Unit Cartridges Sharp AR F201 Drum Unit Cartridges Sharp AR 201 Drum Unit Cartridges Sharp AR 200SE Drum Unit Cartridges Sharp AR 200S Drum Unit Cartridges Sharp AR 200 Drum Unit Cartridges Sharp AR 163 Drum Unit Cartridges Sharp AR 162 Drum Unit Cartridges Sharp AR 161 Drum Unit Cartridges Sharp AR 160 Drum Unit Cartridges Sharp AL 1670 Drum Unit Cartridges Sharp AL 1650 Drum Unit Cartridges Sharp AL 1640 Drum Unit Cartridges Sharp AL 1621 Drum Unit Cartridges Sharp AL 1620 Drum Unit Cartridges Sharp AL 1610 Drum Unit Cartridges Sharp AL 1600 Drum Unit Cartridges Sharp AR 160-series (PN 19524) Drum Unit Cartridges Sharp DM 1505 Drum Unit Cartridges Sharp DM 1500 Drum Unit Cartridges Sharp AR 155N Drum Unit Cartridges Sharp AR 155 Drum Unit Cartridges Sharp AR 150N Drum Unit Cartridges Sharp AR 150E Drum Unit Cartridges Sharp AR 150 Drum Unit Cartridges Sharp AR 120E Drum Unit Cartridges Sharp AR F151 Drum Unit Cartridges Sharp AL 1251 Drum Unit Cartridges Sharp AL 1250 Drum Unit Cartridges Sharp AL 1220 Drum Unit Cartridges Sharp AL 1200 Drum Unit Cartridges Sharp AL 1041 Drum Unit Cartridges Sharp AL 1020 Drum Unit Cartridges Sharp AL 1010 Drum Unit Cartridges Sharp AL 1001 Drum Unit Cartridges Sharp AL 1000 Drum Unit Cartridges Sharp AR-150-series (PN 19844) Drum Unit Cartridges