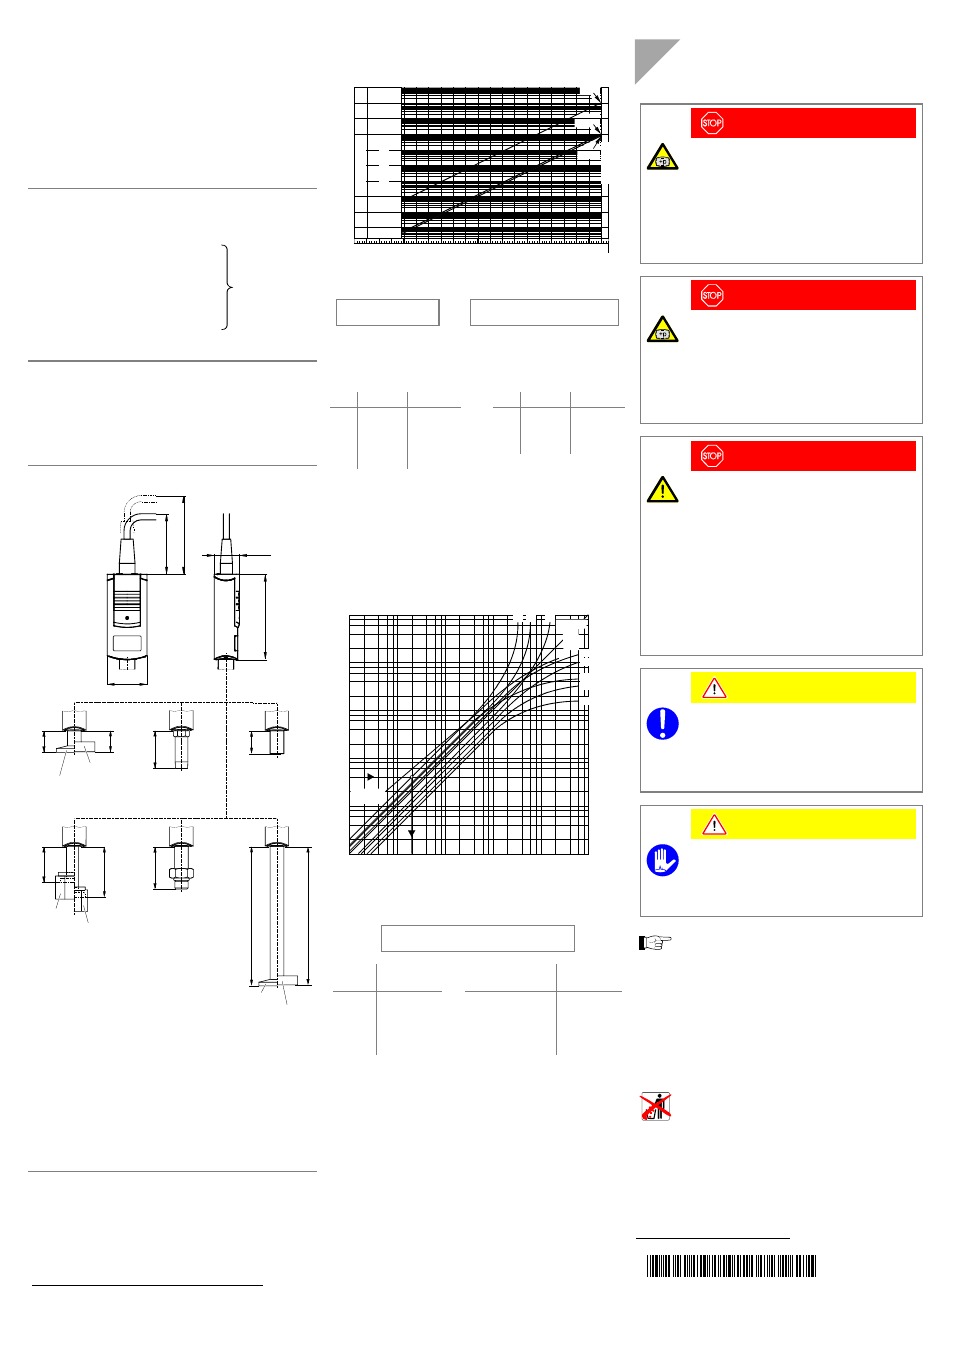
Installation, Measurement signal vs. pressure, Gas type dependence – INFICON PSG512-S Pirani Standard Gauge User Manual
Page 2: Vacuum connection, P = 10, U = c + 1.286 × log, C × pressure reading

Internal volume
DN 16 ISO-KF
DN 16 CF-R
1/8" NPT
8 VCR
®
4 VCR
®
½"-Rohr
7/16-20 UNF
cm
3
cm
3
cm
3
cm
3
cm
3
cm
3
cm
3
≈1.5
≈1.5
≈2
≈2
≈2
≈2
≈1.5
DN 16 ISO-KF long tube
DN 16 CF-R
long tube
cm
3
cm
3
≈10
≈10
Admissible pressure
bar
(abs.)
10, limited to inert
gases
Admissible temperatures
Operation °C
+5 … +60
Vacuum connection
DN 16 ISO-KF
DN 16 CF-R
1/8" NPT
8 VCR
®
4 VCR
®
½"-Rohr
7/16-20 UNF
°C
°C
°C
°C
°C
°C
°C
80
2)
80
2)
80
80
80
80
80
in horizontal
mounting ori-
entation
Filament °C
110
Storage
°C
–20 … +65
Relative humidity
%
≤80 at temperatures up to
≤+31 °C, decreasing to 50
at +40 °C
Use
indoors only, altitude up to
2000 m NN
Mounting orientation
any
Protection category
IP40
Dimensions mm
70.
3
20.9
19
tube ½"
7/16-20 UNF
24
8 VCR
31.
5
41.
5
4 VCR
1/8" NPT
29
DN 16 ISO-KF
DN 16 CF-R
115
116
14
15
*
)
DN 16 ISO-KF
DN 16 CF-R
*
)
PSG51x-S: 20 mm
50
65
32.8
Weight
DN 16 ISO-KF
DN 16 CF-R
1/8" NPT
8 VCR
®
4 VCR
®
½"-Rohr
7/16-20 UNF
g
g
g
g
g
g
g
80
100
70
130
100
70
80
DN 16 ISO-KF long tube
DN 16 CF-R
long tube
g
g
130
140
2)
250 °C with long tube.
Measurement Signal vs. Pressure
1E+6
1E+4
1E+3
1E+2
1E+1
1E+0
1E–1
1E–2
1E–3
1E–4
0.0 0.5 1.0 1.5
2.5
3.5
4.5
5.5
6.5
7.5
8.5
9.5
10.3
2.0
3.0
4.0
5.0
6.0
7.0
8.0
9.0
10.0
mbar
Pa
1E+5
Torr
U
n
d
e
rr
ang
e
S
ens
o
r er
ror
Pressure p
[mbar]
Measurement signal U[V]
Over
ran
ge
p = 10
((U-c)/1.286)
⇔
U = c + 1.286 × log
10
p
valid in the range 5×10
-4
mbar 3.75×10 -4 Torr 5×10 -2 Pa 5 Pa U p c U p c [V] [mbar] 6.143 [V] [micron] 2.448 [V] [µbar] 2.287 [V] [Pa] 3.572 [V] [Torr] 6.304 [V] [kPa] 7.429 [V] [mTorr] 2.448 where p pressure U measurement signal Gas Type Dependence Pressure reading (gauge adjusted for air) 10 2 8 6 2 10 1 8 2 10 0 8 6 2 10 –1 8 6 2 10 –2 8 2 10 –3 10 –3 2 4 6 10 –2 2 4 6 10 –1 2 4 6 10 0 2 4 6 10 1 2 4 6 10 2 H 2 He Ne Xe Kr Ar CO 2 Freon 12 Air O 2 CO N 2 p (mbar) p eff (mbar) Water vapor Calibration factors for the pressure range below 1 mbar p eff = C × pressure reading Gas Calibration factor C Gas type Calibration factor C He Ar Xe 0.8 H 2 air, O 2 , CO, N 2 CO 2 water vapor freon 12 0.5 Installation Vacuum Connection DANGER DANGER: overpressure in the vacuum system DANGER DANGER: overpressure in the vacuum system DANGER DANGER: protective ground ® and UNF connections fulfill this requirement. • For gauges with a KF connection, use a con- ductive metallic clamping ring. • If a ½" tube is used, take appropriate meas- ures for this requirement to be fulfilled. Caution Caution: vacuum component Caution Caution: dirt sensitive area The gauge may be mounted in any orientation. To keep condensates and particles from getting into the → "Adjusting the Gauge"). Remove the protective lid and install the product to the vac- Keep the protective lid. t i na44e1- g (2010-06) Original: German tina44d1-g (2010-06)
c constant (depending on pressure unit)
4
6
4
4
4
6
4
type
Ne
Kr
1.4
1.7
2.4
3.0
1.0
0.9
0.5
0.7
>1 bar
Injury caused by released parts and harm
caused by escaping process gases can result if
clamps are opened while the vacuum system is
pressurized.
Do not open any clamps while the vacuum sys-
tem is pressurized. Use the type of clamps which
are suited to overpressure.
>2.5 bar
KF connections with elastomer seals (e.g.
O-rings) cannot withstand such pressures. Pro-
cess media can thus leak and possibly damage
your health.
Use O-rings provided with an outer centering
ring.
Incorrectly grounded products can be extremely
hazardous in the event of a fault.
The gauge must be electrically connected to the
grounded vacuum chamber. This connection
must conform to the requirements of a protective
connection according to EN 61010:
• CF, NPT, VCR
Dirt and damages impair the function of the vac-
uum component.
When handling vacuum components, take ap-
propriate measures to ensure cleanliness and
prevent damages.
Touching the product or parts thereof with bare
hands increases the desorption rate.
Always wear clean, lint-free gloves and use
clean tools when working in this area.
measuring chamber preferably choose a horizontal
to upright position and possibly use a seal with a
centering ring and filter. If adjustment should be pos-
sible after the gauge has been installed, be sure to
install it so that the button can be accessed with a
pin (
uum system.
