Flex retrofit drain pvc coated flange model – Flex Retrofit Drain PVC Coated Flange User Manual
Page 2
Flex Retrofit Drain
PVC Coated Flange Model
FOR USE WITH
Flex PVC membrane roof systems.
JOB PREPARATION
The existing leader pipe shall be cleaned
of excess bitumen build-up, dirt and debris.
Remove the clamping ring assembly and bolts
from the existing drain and discard. If required,
comply with roof manufacturer’s directions for
additional cleaning or detailing.
STEP 1
Important – The aluminum activation cone
may have settled into the backflow seal during
shipping which may partially activate the seal.
To deactivate the seal, simply push down on the
top of the two backflow bolts.
Note: The top
of the tapered metal cone should remain inside
the bottom of the urethane seal. Do not fully
disengage cone from urethane seal.
STEP 2
Install the Flex PVC membrane over the existing
drain location. Cut a hole in the membrane the
same diameter as existing leader pipe. The
hole should be centered over the existing pipe
opening and accommodate the O.D. of RAC
drain pipe to be installed.
STEP 3
Lower the RAC PVC Drain Assembly into the
existing drain leader pipe until the underside
of the drain flange sits flat on the roof. Using
the pre-punched holes in the perimeter of the
flange, secure the drain flange to the substrate
with appropriate fasteners.
STEP 4
Hand tighten the
7
/
16
-in. bolts on the backflow
rods to activate the seal.
Alternate tightening
between the bolts for an even seal. Rods should
be snug when fully activated. Do not over tighten.
STEP 5
Clean membrane and drain flange surfaces. Hot
air weld the flashing membrane to the coated
drain flange and to the surrounding field sheet.
Flashing membrane should extend onto field
sheet a minimum of 4 inches.
STEP 6
Place the drain strainer over the two strainer
securement brackets, lining the brackets up
with the two 5-in. long slots in the top of the
strainer. Install stainless steel bolts and washers
(provided) into the securement brackets with a
7
/
16
-in. wrench. Tighten nuts snugly into position.
For technical assistance contact
Flex at 800.969.0108 or fax 610.916.9501.
I N S T A l l A T I O N P R O C E D U R E
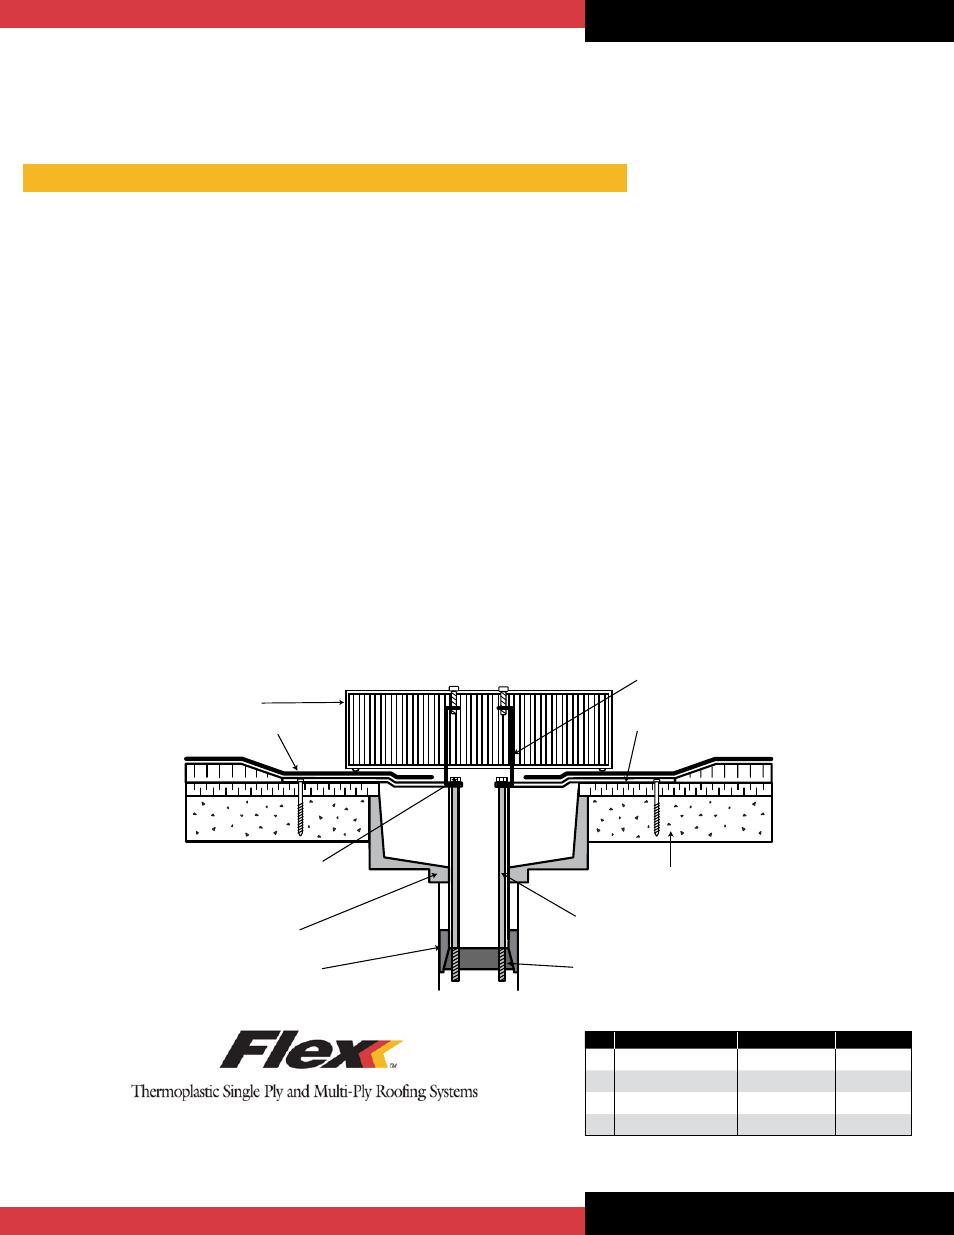
Drain Strainer
Strainer Securement Brackets
Roof Decking
Roofing System
Cast Aluminum Activation Cone
Stainless Steel Rods for
Backflow Seal Activation
Compressible Urethane
Backflow Seal
7
/
16
" Stainless Steel Bolt
Heads for Activation of
the Backflow Seal
Existing Drain Bowl
PVC Coated Pre-Punched
Drain Flange
SEAl EXPANSION CAPACITY
SIzE
O.D. OF PRE-EXPANDED SEAL FIT INTO MIN. PIPE I.D. FULLY EXPANDED
3"
2.75"
2.77"
3.12"
4"
3.85"
3.87"
4.20"
5"
4.81"
4.83"
5.12"
6"
5.85"
5.87"
6.30"
O.D. = Outside Diameter I.D. = Inside Diameter
Due to manufacturing variances and job site inconsistencies, these figures
are guidelines and are not guaranteed.
800-969-0108 • 610-916-9501 (Fax)
2670 Leiscz’s Bridge Road, Suite 400, Leesport, PA 19533
e-mail: [email protected] • www.flexroofingsystems.com
As with all building materials, it is the responsibility of the installer to review its usage with a design professional to
confirm safety, compatibility and acceptance with the Flex Membrane roof system as well as local building codes.