Aquascape PRO-Fit Signature Series Skimmer (09019 & 29349) User Manual
Page 6
6
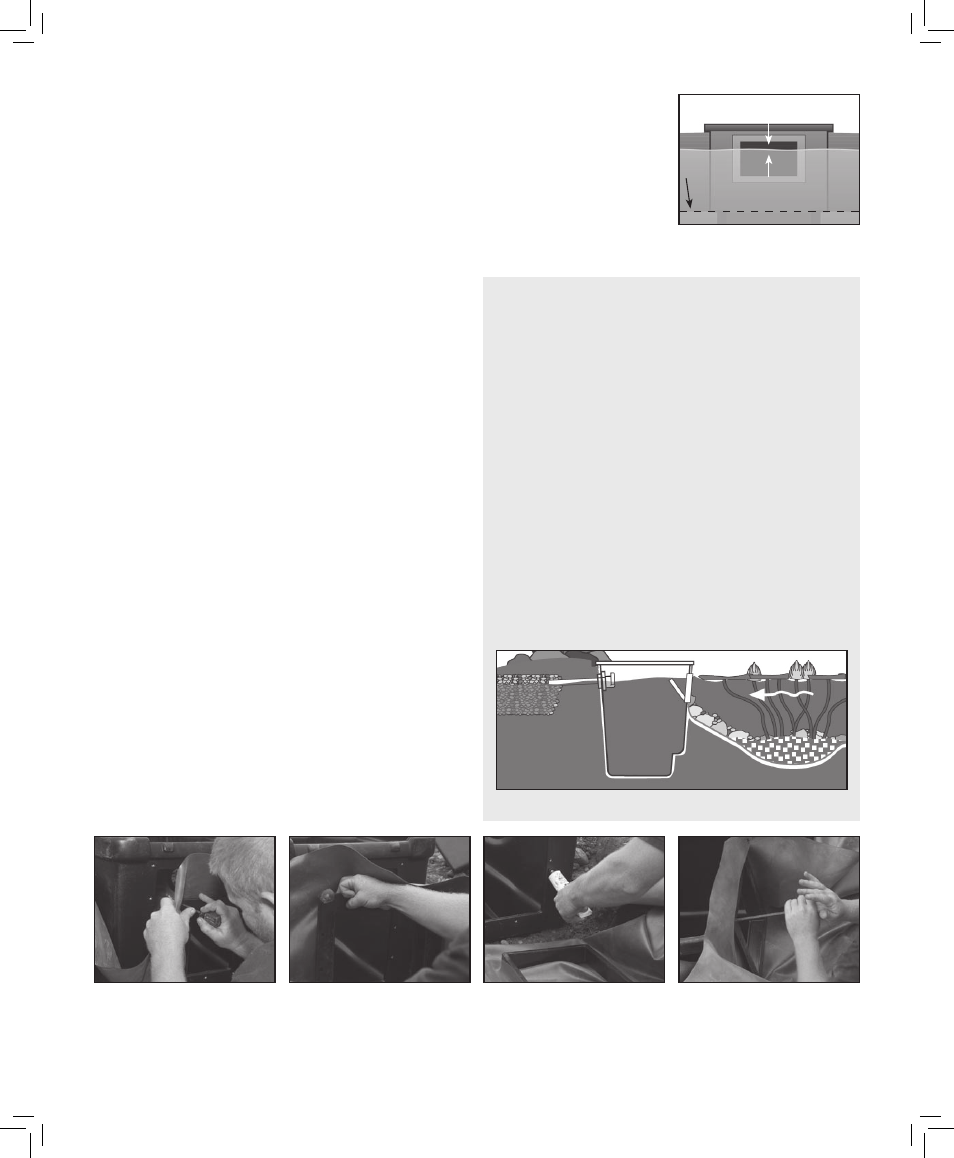
Ideal Water Level
3/4" Below
Front of Skimmer
Soil Level
on 1st Shelf
• Use some of the silicone sealant or
teflon tape (not included) to coat
the threads of the fitting, in order to
help provide a watertight seal.
Set up and Level the Skimmer
• You’ve already roughed out a hole
for the skimmer during the excava-
tion phase. Use a 2' bubble level in
order to make sure your Skimmer
is properly set into position. Your
Skimmer should be level from side-
to-side and front to back.
• Once level, glue the flexible PVC
pipe from the BIOFALLS
®
filter
into the desired fitting. Follow the
same priming and gluing steps
used when installing the PVC
Flex into the BIOFALLS
®
filter
(see BIOFALLS
®
manual).
• Follow instructions for
Overflow Installation.
Attaching the
Skimmer Liner Plate
• Position the liner against the
Skimmer opening, making sure
there is slack below the open-
ing. This will help reduce tension
on the liner plate when placing
boulders in front of the unit.
• Mark the outer perimeter of the
Skimmer opening on the liner;
then mark a second box 1.5"
inside of it. This ensures that you
don’t cut too much of the liner,
which would result in a possible
leak.
(See fig. 1)
• Cut the inner box using a pair of
scissors, and insert the skimmer
liner plate into the hole.
• Temporarily install the liner plate
and liner to the skimmer using
two screws in the upper corners.
Using an awl or nail, poke the
first hole in the liner. Be careful
not to damage the threads on the
nut inserts when punching the
holes with the awl! Remove the
awl or nail while holding the liner
plate and liner in place and begin
threading one of the screws into
the filter. Repeat this process
for the other screw.
(See fig. 14)
Note: Power tools are not recom-
mended for installing the screws
and may strip the nut inserts.
• Now remove the liner plate from
the skimmer, keeping the screws
installed through the liner plate
and liner.
• Pre-installing the two screws in
the earlier steps will make it easy
to line up the skimmer faceplate
after the silicone is applied and
will keep the silicone in as thick
of a bead as possible. Apply a
bead of fish-safe silicone sealant
around the skimmer opening, over
the nut inserts.
(See fig. 15)
• Replace the skimmer liner plate
and the two corner screws, and
then proceed with the bottom two
corners
(See fig. 16). Make sure
the holes in the liner plate that
the weir flap clicks into are on
the bottom.
• With the 4 corners secured, you
may now punch the remaining
holes with your awl and thread in
Installing the Skimmer and Overflow Installation cont …
Fig. 17 Overflow diagram.
Overflow Installation
• The built in overflow will allow
the water in an overflow situ-
ation to flow through the pipe
and drain away from the pond.
Use a pvc plug (not included)
to plug the bulkhead if you do
not want the overflow option.
• Excavate a trench for a section
of PVC Flex pipe to come off the
back of the desired bulkhead.
The trench should be no less
than 5 ft from the back of the
skimmer and be graded away
from the pond
(See fig. 17).
• Create a drainage area at the
end of the pipe by excavating
a small pit, roughly 16 inches
in diameter and at least 12
inches deep. Fill the pit with
excess gravel
• Prime and glue the section of
PVC Flex pipe into the bulkhead
and run it to the top of the
gravel pit. Cover the gravel pit
with a small section of under-
layment and top with soil.
Note: Install the “dial-in”
overflow adjustment arm into the
corresponding bulkhead on the
inside of the skimmer. Use silicon
or Teflon tape (not included) on
the threads prior to installing the
fitting. Tighten the fitting in the
bulkhead as far as possible with
the overflow arm in the high-
est position. The final overflow
adjustment can be made once the
final water level is set using the
adjustable skimmer liner plate.
See section on setting the adjust-
able liner plate and overflow
(page 10).
Fig. 16 Replace the skimmer liner plate
and the two corner screws, and then
proceed with the bottom two corners.
Punch remaining holes, thread screws.
Fig. 1 Mark the outer perimeter of the
skimmer opening on the liner; then mark
a second box 1.5" inside of it. Cut out at
inside mark.
Fig. 14 Remove the awl or nail while
holding the liner plate and liner in place
and begin threading one of the screws
into the filter.
Fig. 15 Apply a bead of fish-safe silicone
sealant around the skimmer opening,
over the nut inserts.
Fig. 1 Cross section of ideal water level
viewed from front of skimmer.
all the screws. Again, be careful
not to damage the threads on the
nut inserts.
• Let dry for at least one hour before
introducing water!
Note: Pump and debris basket as-
sembly instructions are found
in Step 9.
29888 PRO-Fit SS Skimmer Install6 6
3/21/07 1:43:27 PM