Install underlayment and liner step 5, Excavate your pond cont – Aquascape PRO-Fit Signature Series Skimmer (09019 & 29349) User Manual
Page 5
5
Fig. 10 Single pump and overflow.
Fig. 11 Double pumps require a third
hole for overflow assembly.
• Remove any sharp objects from the
excavated hole that may damage
the liner.
• Unfold the underlayment fabric and
place it into your excavated pond.
Starting from the bottom, remove
the slack from the underlayment,
making sure it conforms into all of
the elevations.
• Place the EPDM Fish-Safe liner on
top of the underlayment.
(See fig. 9)
• The installation process is the same
as the underlayment, starting at the
bottom and contouring the liner up
and out of the pond.
• Try to get the large folds out, but
the main goal is to make sure that
it’s lying flat and going into all cor-
ners. Don’t try to get it perfect—you
will hide the liner with rocks and
gravel later.
• Make sure the liner is high enough
around the edges of the pond. This
should not be a problem if you mea-
sured out the pond and excavated
it correctly. Problems can be fixed
by readjusting the liner into the
excavation, backfilling (making the
pond smaller) in areas where there
is not enough liner, or simply buying
a larger liner.
Fig. 9 Place the liner on top of the
underlayment following the same
installation procedures. Make
sure liner is positioned in such a
way that allows it to extend and
completely cover the opening on
the BIOFALLS
®
filter.
Install Underlayment and Liner
STEP 5
Excavate your Pond cont …
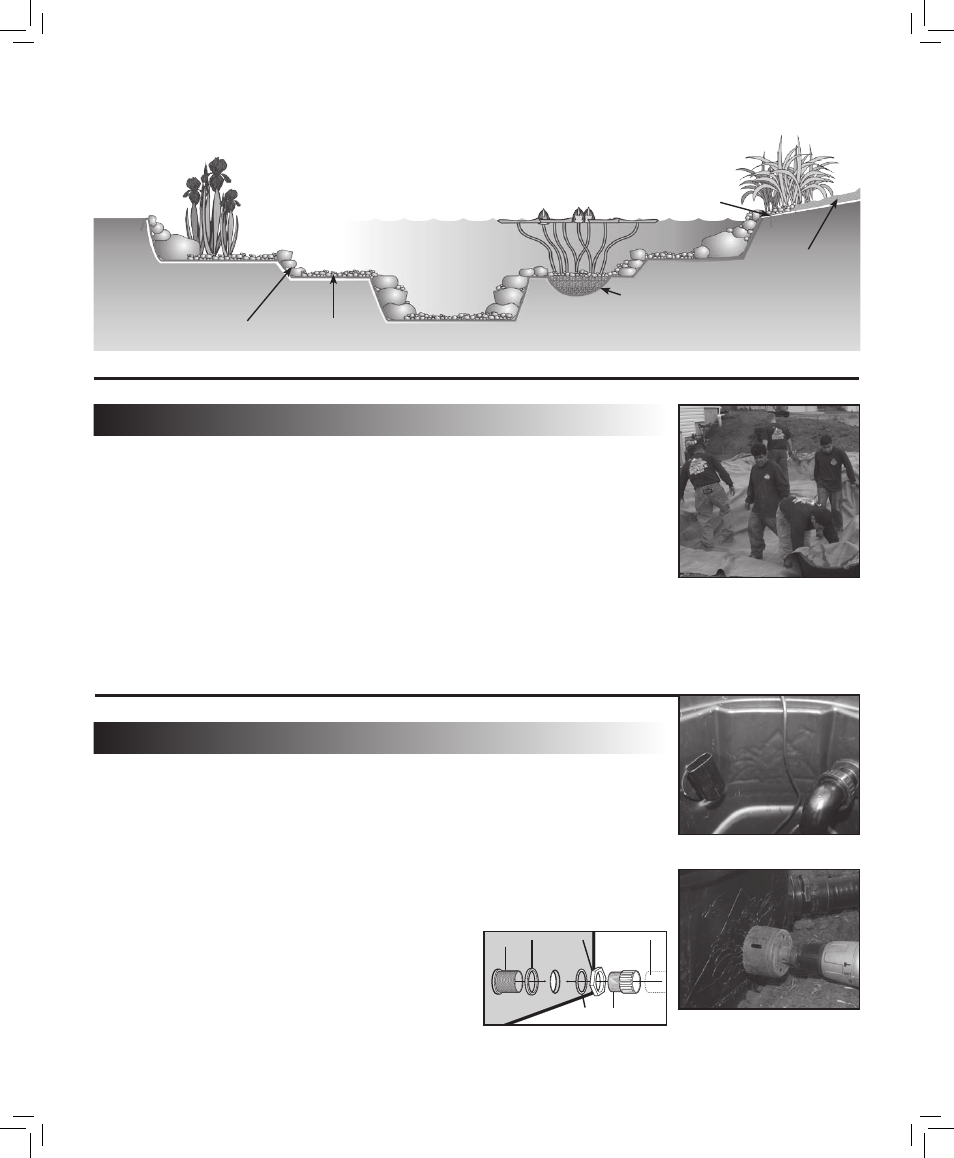
1st plant and rock shelf:
shelf varies 8" or greater wide,
1" to 12' deep
Set 6" to 12" size cobblestones
on vertical edges. Gravel on all
horizontal surfaces
2nd plant & rock shelf:
16" to 20" deep
Plant pocket 6" to 8" deep,
10" to 16" diameter
Water line
Marginal plants should be removed
from containers and placed directly
into the gravel
Liner ends 1" to 2'
outside of pond
Mulch
Fig. 8 Pond excavation - side view of plant pockets.
Installing the Skimmer and Overflow Installation
STEP 6
• Install the two bulkheads into the
back of the Signature Series
™
Skimmer prior to dropping into
the excavated hole. The filter has
two openings on the back allowing
several plumbing options.
1. For single pump applications, the
pump plumbing line attaches into
one bulkhead and the overflow
is attached to the other. Use
the angle of the bulkheads to
your advantage by choosing the
bulkhead that works best with
the direction and sweep of the
plumbing to the BIOFALLS
®
filter.
(See fig. 10)
2. For double pump applications,
each pump will hook up to one of
the bulkheads. A 3rd hole
will need to be drilled in the back
of the skimmer if you desire to
add an overflow. A drill point
guide can be found on the head of
the frog within the logo. Use a 3
inch hole saw to drill the opening
for another bulkhead fitting
(sold separately).
(See fig. 11)
• Follow the same bulkhead installa-
tion steps used when installing the
bulkhead on the BIOFALLS
®
filter.
(see bulkhead assembly).
• Install the PVC slip fitting into each
bulkhead on the outside of the skim-
mer to receive the pump plumbing
and overflow plumbing.
Bulkhead
Adapter
Nut
Plastic
Washer
Rubber
Gasket
Bulkhead
Flex PVC
Bulkhead assembly.
29888 PRO-Fit SS Skimmer Install5 5
3/21/07 1:43:25 PM