Step 3 install the toner cartridges, Install the oil bottle and fuser cleaner, Step 3 install the toner cartridges step 4 – Brother HL-2400Ce Series User Manual
Page 3
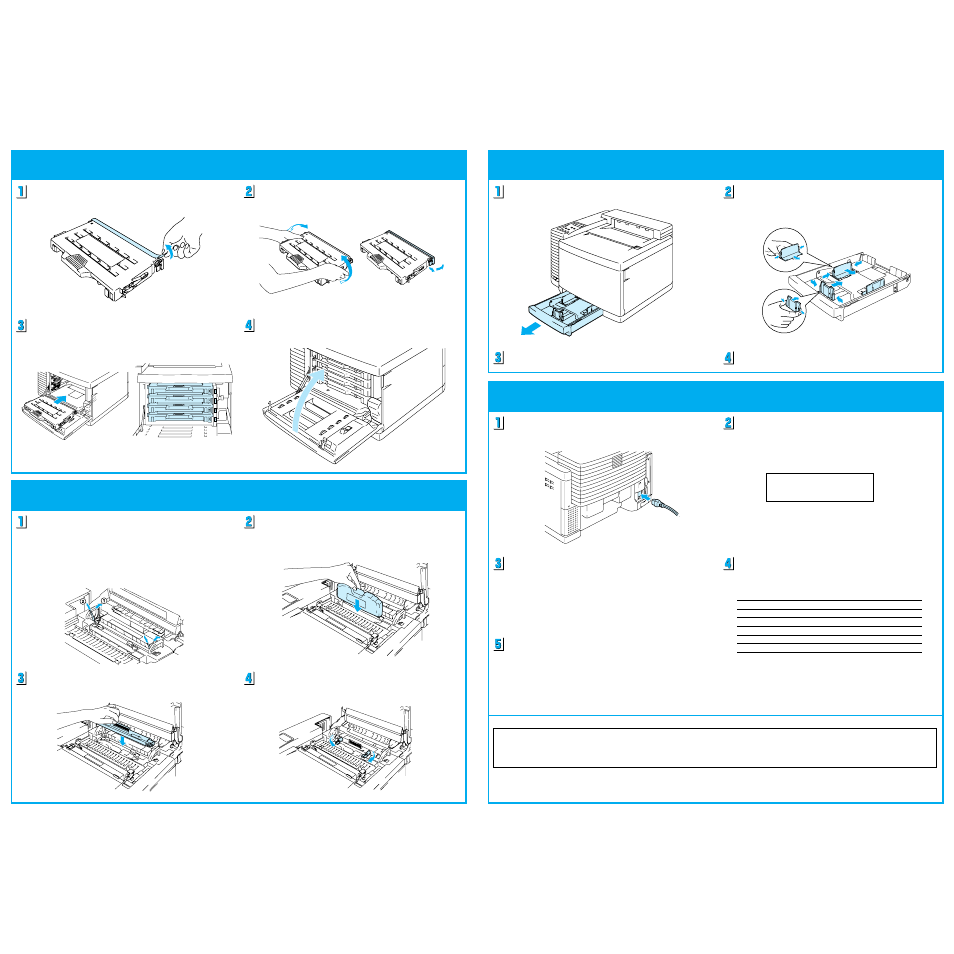
Close the Front Cover.
Step 3
Install the Toner Cartridges
Pull the Media Cassette out of the printer.
Step 5
Load Paper in the Media Cassette
Step 6
Test Print
Step 4
Install the Oil Bottle and Fuser Cleaner
Release the Fusing unit pressure a little by
pushing the Pressure Release Levers to the
OPEN position. (
1
). Pull the orange protective
parts fitted between the rollers of the Fusing
Unit and remove them (
2
). Make sure that the
Pressure Release Levers are put back to the
SET position.
Install the Oil Bottle into the Fusing Unit with
the label side facing the front of the printer.
Lock the Oil Bottle and the Fuser Cleaner in
place by turning the Oil Bottle Lock Levers.
Close the Top Cover.
©2000 Brother Industries, Ltd. Windows and Windows NT are registered trademarks of Microsoft Corporation in the U.S. and other countries. Macintosh and iMac are
registered trademarks of Apple Computer, Inc.
All other brand and product names are trademarks or registered trademarks of their respective owners.
Install the 4 toner cartridges by sliding each of
them into the correct guide.
Adjust the Paper Guides to accommodate the
paper size you want to load. Hold the shaded
parts shown below to move the guides.
Plug in the power cord and turn the printer on.
Wait until the printer initializes.
When the following LCD message appears,
press the
Sel button to take the printer off-
line.
Press the
▲
or
▼
button to scroll through the
display until the desired message appears.
Choose from one of the following selections:
Hold down the Shift
button and press the Test
button then release both buttons.
Press the Set
button and the printer will print
the selected item.
Some models may have NC-3100h pre-installed. For settings information please see the
Network User's guide on the CD-ROM.
To install the printer driver, please refer to the CD-ROM supplied with the printer.
After rocking each toner cartridge 3 to 4 times,
remove the orange protective cover from the
toner cartridges.
Pull off the tape labeled 'REMOVE' from the
toner cartridge.
Load paper into the Media Cassette.
Reinsert the Media Cassette into the printer.
LJ READY 001P T1
AUTO
■ ■ ■ ■
K C M Y
To Print
LCD
Message
the Demonstration Page
DEMO PAGE
the Test Pattern
TEST PRINT
the list of printer settings
PRINT CONFIG
the list of internal or resident fonts
PRINT FONTS I
the list of optional card fonts
PRINT FONTS C
the list of permanent download fonts
PRINT FONTS P
✒ Note
A real time clock is built into this printer. Set the time referring to the user's guide on the CD-ROM.
You need to set the time before you can use the log management and fax functions.
Set the Fuser Cleaner into the Fusing Unit with
the roller side facing you.
Step 3
Install the Toner Cartridges
Step 4
Install the Oil Bottle and Fuser Cleaner
Step 5
Load Paper in the Media Cassette
Step 6
Test Print