Battery instructions – PHCC Pro Series Pro Series C22 User Manual
Page 5
Battery Instructions
A new Pro Series 2200 Standby Battery will run
this system for a minimum of 7.5 hours.
However, most of the time the pump will turn on
and off, and this battery will run the pump
intermittently for days.
In addition, the unique materials in the Pro
Series 2200 Standby batteries enable them to
last longer in standby service.
Note: The battery will not run the primary pump.
• The use of automotive batteries is NOT
recommended. Automotive batteries are
not designed for this application. They will
only run the pump for a short time and will
have a shorter life than a standby battery.
• The battery fluid sensor and cap are
designed to fit the Pro Series Standby
batteries. Measuring the battery fluid is one
of the most important features of the
system, since about 80% of backup sump
pump failures are the result of a battery that
has dried out.
• PHCC Pro Series standby batteries are
specifically designed to work with your
battery backup sump pump system.
Glentronics can not guarantee the
compatibility of other brands of batteries.
For optimal performance the use of a PHCC
Pro Series standby battery is recommended.
DO NOT insert the fluid sensor into any
battery except a Pro Series Standby battery.
DO NOT use the enclosed cap on any battery
except a Pro Series battery. DO NOT drill a
hole in another brand of battery to
accommodate the fluid sensor. Batteries emit
explosive gases which can cause serious
injury or death.
PREPARING THE PRO SERIES STANDBY BATTERY
The Pro Series Standby batteries are shipped dry
(without acid) so they never lose power before
you take them home. A battery is activated
when the acid is added, and then it slowly
begins to deteriorate as it ages. By adding the
acid just before use, the battery will always be
fresh. Use 1.265 specific gravity battery acid to
fill the battery. It is available where you
purchased the battery.
NOTE: PRO SERIES BATTERIES NOW COME IN TWO
CONFIGURATIONS. THE TOPS OF THE BATTERIES
LOOK DIFFERENT, AND THE DIRECTIONS FOR
FILLING THE BATTERIES AND CONNECTING THE
FLUID
SENSOR
WILL
VARY
SLIGHTLY.
INSTRUCTIONS FOR BOTH BATTERIES FOLLOW. IF
THE TOP OF YOUR BATTERY LOOKS LIKE THE
PHOTO OF BATTERY A, FOLLOW THE INSTRUCTIONS
ON THIS PAGE. IF THE TOP OF YOUR BATTERY
LOOKS LIKE THE PHOTO OF BATTERY B, FOLLOW
THE INSTRUCTIONS ON PAGE 5.
Contains sulfuric acid. Wear eye and clothing
protection. If battery acid contacts skin or
clothing, wash immediately with soap and
water. If acid enters eyes, flush with water for
15 minutes, and get prompt medical attention.
Review the safety instructions on page 1.
TO FILL THE BATTERY
1. Place the battery box on the floor. Place the
dry (unfilled) battery into the battery box.
2. Remove the foil seal on the top of the battery.
3. Carefully push in the perforated tab at the top
of the acid pack. Lift up the large tab and
pull out the dispensing hose. Hold the hose
upright above the pack and squeeze the hose
forcing all the acid back into the pack.
4. Position the acid pack and battery as shown
below. Pinch the end of the hose together
and cut off the tip. Insert the end of the hose
into each cell. Control the flow by pinching
the hose with thumb and forefinger. Fill each
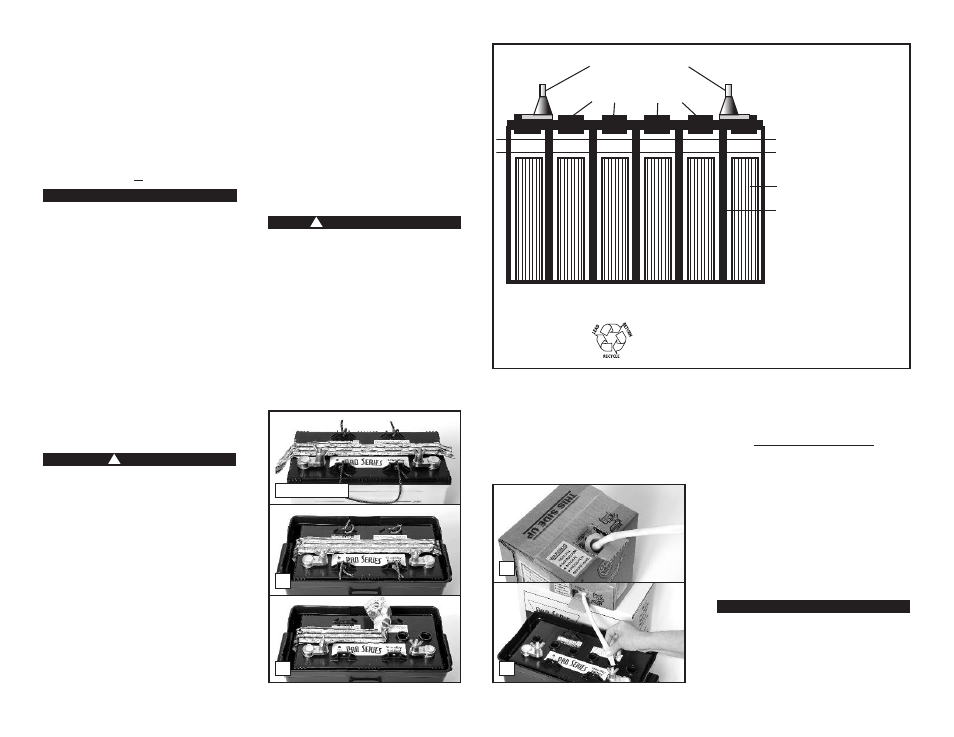
cell of the battery to a level just covering
the battery plates, and then go back and
top off each cell equally. It is important to
have all the cells filled equally or the
battery will not operate properly. The acid
should reach a level about ¼” below the cap
ring as shown in the diagram above. DO NOT
OVERFILL THE BATTERY. (Diagram B)
A newly filled battery will sometimes require
additional acid after about 20 minutes. Re-
examine the fill level, and add additional acid if
necessary. The battery acid may bubble at this
time and give off a sulfur-like smell, but this is
normal. After the battery has been filled, screw
the caps securely on the top of the battery.
When you fill the battery for the FIRST time,
it will be the ONLY time you add acid to the
battery. In the future, when the fluid level is
low, add distilled water to the cells. NEVER
add more acid.
Page 4
!
DANGER
CAUTION
!
DANGER/POISON
4
CAUTION
3
2
1
BATTERY A
2nd LEVEL
1st LEVEL
PLATES
CELL WALL
1
1st LEVEL, COVER THE PLATES
THE BOTTOM OF THE CAP RINGS
BATTERY TERMINALS
BATTERY CAP RINGS
CROSS SECTION OF BATTERY
1. Fill to 1st level,
cover the plates
2. Then fill to 2nd
level, just below
the bottom of the
cap rings
Diagram B
DO NOT throw an old battery in
the trash. Take it to a service
station or recycling center.