PHCC Pro Series Pro Series C22 User Manual
Page 10
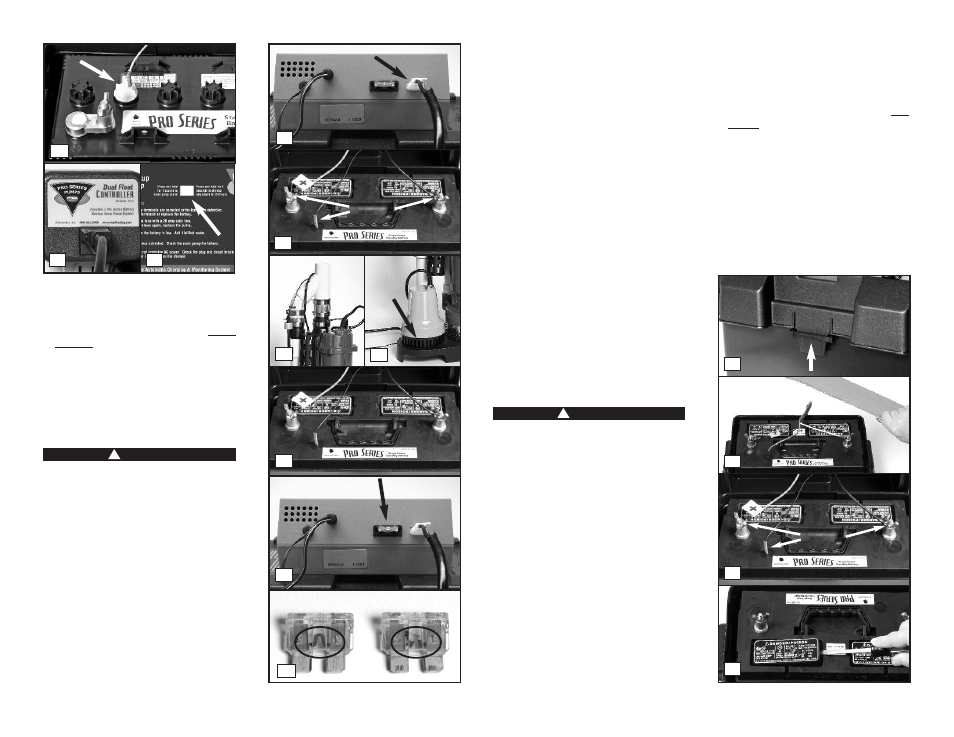
9. Plug the charger back into the wall outlet.
Then plug the piggyback controller and the AC
pump into the outlet. (You should provide
additional protection for the backup
controller by using a surge protector.)
10. If any of the alarms are sounding, press the
GRAY button on the front of the control
panel for one (1) second.
2
Replace the fuse with a 20 amp auto fuse
Unplug the main AC pump and piggyback
controller before servicing the backup pump to
avoid electric shock. Failure to do so could
cause serious injury or death.
This alarm indicates that the 20 amp safety fuse
on the back of the control unit has blown. This
can be the result of a clogged pump motor, or
pump wires that have been shorted out. To
determine the problem:
REFER TO THE PHOTOS AT RIGHT
1. Check the pump plug in the back of the
control unit to make sure it is firmly
connected. Check the pump wires to make
sure they are connected securely to the pump
plug. Check the rest of the pump wires for
any possible breaks.
2. If the pump wires are intact, the pump may be
clogged. (a) Disconnect the control unit from
the wall outlet, and disconnect the battery
cables and the fluid sensor. (b) Release the
union and remove the pumps from the sump
pit. (c) Clear any debris from the strainer, and
then reconnect the pump to the discharge
pipe. (d) Connect the control unit, and the
battery cables to the battery…the BLACK wire
to the NEGATIVE (-) post, and then the RED
wire to the POSITIVE (+) post. Tighten the
wing nuts on the battery posts. (e) Plug the
control unit back into the wall outlet.
3. (a) Check the DC fuse by pulling it out of the
fuse holder. (b) If the wires are burned and
broken, replace the fuse with a 20 amp DC
safety fuse. If the fuse blows again, unplug
the computer control unit from the wall and
disconnect the battery cables from the battery.
Then call Glentronics technical support for
instructions at 800-991-0466, option #3. You
may need to replace the pump.
4. Plug the main AC pump and piggyback
controller back into the wall outlet.
3
The fluid in the battery is low
Risk of electrical shock or battery explosion,
which can cause serious injury or death.
Wear eye protection. Work in a well-
ventilated area. Do not smoke or allow a
spark or flame in the vicinity of the battery.
Avoid dropping metal tools on the battery.
If battery acid contacts eyes, flush with
water for 15 minutes and get prompt
medical attention. Review the safety
instructions on page 1.
REFER TO THE PHOTOS AT RIGHT
If this warning light and alarm are on, you need
to add distilled water to the battery. Battery fluid
levels should be checked once every four to six
months.
1. Unplug the charger from the wall outlet, and
unplug the AC pump and blue piggyback
controller.
2. Remove the cover of the battery box by
pushing in the tabs on the front and back,
then lifting up.
3. Fan the area around the top of the battery
with a piece of cardboard (or another non-
metallic material) to remove any hydrogen or
oxygen gas that may have been emitted from
the battery.
4. Then unscrew the wing nuts and remove the
battery cables and the fluid sensor from the
battery.
5. Pry up the two battery caps, or unscrew the
six (6) battery caps on the top of the battery,
depending on the configuration of the battery
you own.
Page 9
!
DANGER
3a
2b
FUSE
CHARGER
PUMP
2c
2a
Remove
2
3
4
5
Remove
3b
GOOD
BLOWN
2d
1
FUSE
CHARGER
PUMP
10
8b
9
Rinse
!
DANGER