Parallel, Windows, Network – Brother HL-2460 User Manual
Page 2: Macintosh, Interface cable users (for, Users only), Users, Control panel, Step 7, Set up your pc printer port
Go
Back
Set
Reprint
Data
Job cancel
ON OFF
ON OFF
ON OFF
Go
Back
Set
Reprint
Data
Job cancel
Go
Back
Set
Reprint
Data
Job cancel
ON OFF
ON OFF
5
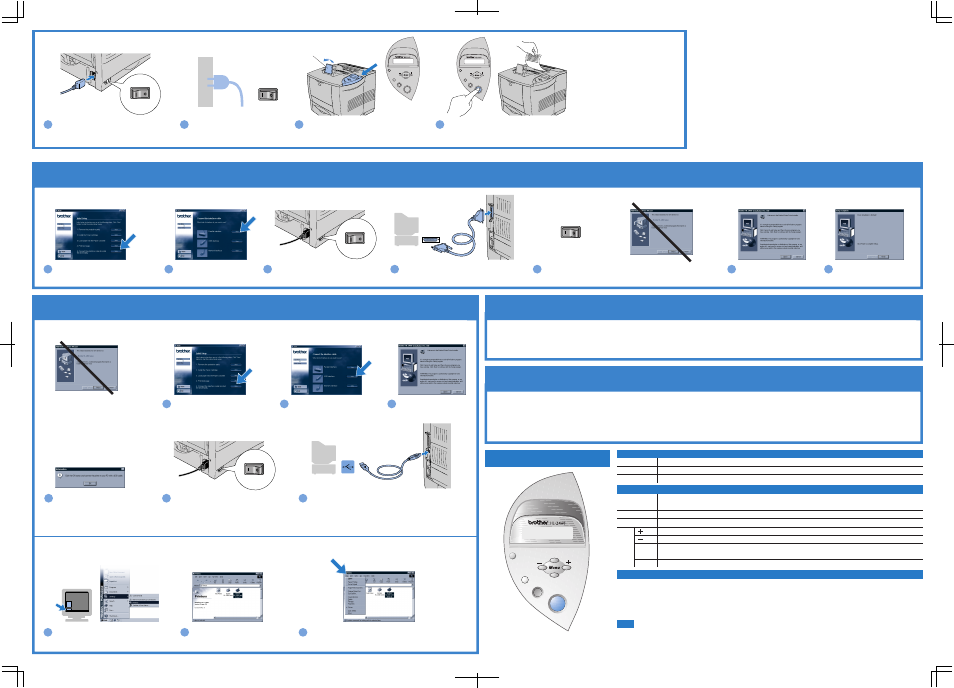
Turn the printer power
switch on.
3
Turn the printer power switch off.
4
Connect the interface cable to your PC, and
then connect it to the printer.
6
Click the Next button.
For
Parallel
interface cable users (For
Windows
®
users only)
If you want to connect your printer using a Network cable, refer to the Quick Network Setup Guide.
After the administrator has made the required settings, install the driver referring to the "Installing the
Driver for Network users" section of the Quick Network Setup Guide.
Step 6 Connect the printer to your PC & Install the printer driver.
Note: If "Add New Hardware Wizard"
appears, click the Cancel button.
1
Click "Connect the interface cable and
install the printer driver / utilities."
2
Select the parallel interface
cable.
Step 5 Print a test page.
Step 6 Install the driver & Connect the printer to your PC.
For
Network
users
If you print from a Macintosh computer, you will have to connect it to the printer via a Network
(Brother recommends using the NC-4100h network board).
For
Macintosh
®
users
4
Click the OK button.
Note: When "Add New Hardware Wizard"
appears on your PC, click the Cancel
button.
Note: Install the driver before you connect
the USB interface cable to the printer. If you
have already connected it, remove it.
1
After your PC has restarted, click Start,
Setting and Printers.
2
Select the Brother HL-2460 series
(copy2) icon.
3
Click the File menu, and then select Set as Default printer.
The setup is now complete.
5
Make sure the printer power switch is on.
6
Connect the USB interface cable to your PC, and then connect
it to the printer.
For
USB
interface cable users (For
Windows
®
users only)
1
Click "Connect the interface cable
and install the printer driver /
utilities."
2
Select the USB cable.
Follow the on-screen
instructions.
3
Click the Next button.
Control Panel
Data LED : Orange
Switches
Language Setting (Default is English)
On
Blinking
Off
For more information, see "CONTROL
PANEL" in Chapter 3 of the User's Guide on
the supplied CD-ROM.
Data remains in the printer buffer.
Receiving or processing data.
No remaining data.
Exit from the control panel menu, reprint settings and clear error messages.
Pause / Continue printing.
Stop and cancel the printer operation in progress.
Select the reprint menu.
Move forward and backward through menus.
Move forward and backward through menus.
Select the control panel menu.
Set the selected menus and the settings.
Go back one level in the menu structure.
1. Select the SETUP mode by pressing the
+
switch, and then press the Set switch.
2. Check that the LANGUAGE message appears, and then press the Set switch.
3. Choose your language by pressing the
+
or
-
switch, and then press the Set switch. An asterisk mark (
*
) appears at
the end of the display.
(You can return to the READY status by pressing the Go switch.)
Set
Back
Go
Job Cancel
Reprint
Menu
Step 7
(For Windows
®
2000 users only)
Set up your PC printer port.
Click the Finish button.
The setup is now complete.
7
Press the Go switch. The printer prints a test page.
Check that the test page has printed correctly.
4
Note: When you are ready to set
the Control Panel message
language, refer to the Control
Panel section at the bottom of
this sheet.
3
After the printer has finished warming up, the
READY message appears.
2
Plug the AC power cord into an AC
outlet.
Turn the power switch on.
1
Make sure that the printer power switch is off.
Connect the AC power cord to the printer.
Do NOT connect the interface cable.
For Windows
®
98/Me users: The setup is now complete.
For Windows
®
2000 users: Go to Step 7.
Follow the instructions for your interface cable
and operating system.
Unfold the tray
extension flap
REDAY
PRINTING
Note
1. A real time clock is built into this printer. Set the time referring to Chapter 3 of the User's Guide on the CD-ROM.
You need to set the time before you can use the log management and reprint functions.
2. Please enhance the RAMDISK size when you want to use the reprint functions without the optional HDD or
CompactFlash.
See RAM expansion in Chapter 4 of the User's Guide.