How to use the on screen display (osd) – Philips COLOR MONITOR 17 INCH User Manual
Page 14
13
How to Use the On Screen Display (OSD)
S p e c i a l C o n t r o l s w i n d o w
A
A
d
d
v
v
anced Controls
anced Controls
VER
VER
TIC
TIC
AL LINEARITY
AL LINEARITY
A
DVANCED
C
ONTROLS
is a set of five adjustments, including
V
ERTICAL
L
INEARITY
. Linearity is the degree with which the
actual location of a pixel on the screen corresponds with its intended
location. To adjust your V
ERTICAL
L
INEARITY
, follow the steps below.
ADVANCED CONTROLS
VERTICAL LINEARITY
2
2
Press the O
N
S
CREEN
D
ISPLAY
button.
3
3
Press the O
N
S
CREEN
D
ISPLAY
button to bring up
A
DVANCED
C
ONTROLS
screen.
4
4
Turn the R
OTARY
knob until
V
ERTICAL
L
INEARITY
is highlighted.
Then, press the O
N
S
CREEN
D
ISPLAY
button.
Turn the R
OTARY
knob until the
A
DVANCED
C
ONTROLS
icon is highlighted.
1
1
R IG H
B
ma i n
r e e n
s c
e t r y
g e om
o l o r
c
c i a l
s p e
TNESS
1 2 00
1 6 0 0 x
9 3 . 8 K / 7 5HZ
RESET
EXIT
o
a u d i
R IGH
B
ma i n
r e e n
s c
e t r y
g e om
o l o r
c
c i a l
s p e
TNE SS
1 2 00
1 6 0 0 x
9 3 . 8 K / 7 5HZ
RESET
EXIT
o
a u d i
Turn the R
OTARY
knob to
adjust the vertical linearity.
VERTICAL LINEARITY
5 0 %
Press the O
N
S
CREEN
D
ISPLAY
button to add your
adjustment and to bring
up A
DVANCED
C
ONTROLS
screen.
5
5
6
6
A
A
d
d
v
v
anced Controls
anced Controls
UP & BUTTOM CORNER
UP & BUTTOM CORNER
A
DVANCED
C
ONTROLS
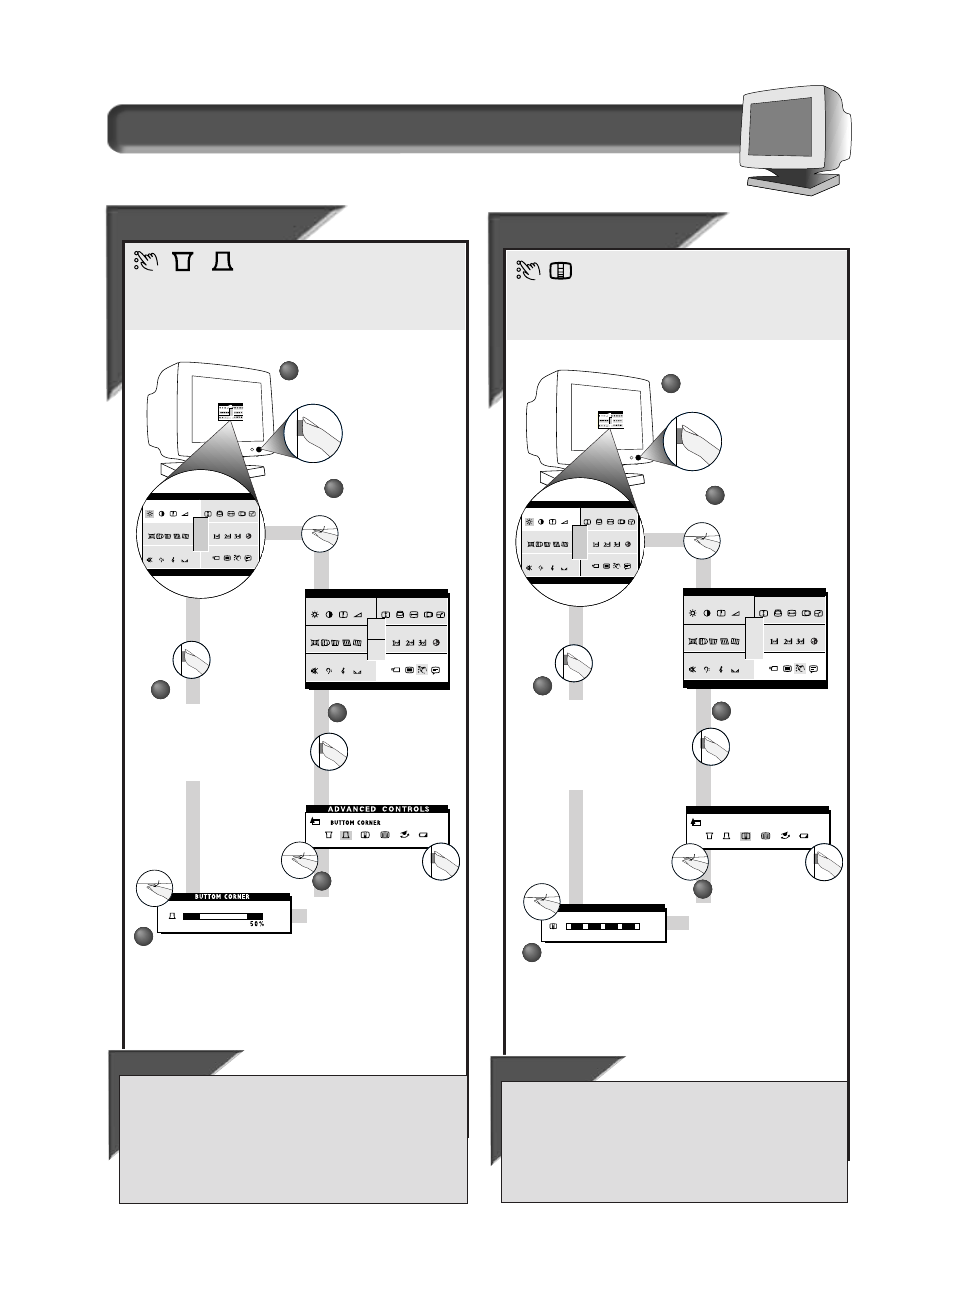
is a set of Six adjustments.
They include U
P
C
ORNER
, B
UTTOM
C
ORNER
,
V
ERTICAL
L
INEARITY
, M
OIRE
, R
OTARY
D
EFAULT
, and P
OWER
S
AVING
. C
ORNER
C
ORRECTION
“squares up” the corners of an image on the screen To
adjust your C
ORNER
C
ORRECTION
, follow the steps below.
ADVANCED CONTROLS
ma i n
r e e n
s c
e t r y
g e om
o l o r
c
c i a l
s p e
1 2 00
1 6 0 0 x
9 3 . 8 K / 7 5HZ
RESET
EXIT
o
a u d i
R IG H
B
ma i n
r e e n
s c
e t r y
g e om
o l o r
c
c i a l
s p e
TNESS
1 2 00
1 6 0 0 x
9 3 . 8 K / 7 5HZ
RESET
EXIT
o
a u d i
R IGH
B
ma i n
r e e n
s c
e t r y
g e om
o l o r
c
c i a l
s p e
TNE SS
1 2 00
1 6 0 0 x
9 3 . 8 K / 7 5HZ
RESET
EXIT
o
a u d i
2
2
Press the O
N
S
CREEN
D
ISPLAY
button.
3
3
Press the O
N
S
CREEN
D
ISPLAY
button to bring up
A
DVANCED
C
ONTROLS
screen.
4
4
If necessary, turn the R
OTARY
knob until U
P
C
ORNER OR
B
UTTOM
C
ORNER
is highlighted.
Then, press the O
N
S
CREEN
D
ISPLAY
button.
Turn the R
OTARY
knob to adjust
the U
P
C
ORNER OR
B
UTTOM
C
ORNER
.
Turn the R
OTARY
knob until the
A
DVANCED
C
ONTROLS
icon is highlighted.
1
1
Press the O
N
S
CREEN
D
ISPLAY
button to bring up
A
DVANCED
C
ONTROLS
screen.
6
6
ADVANCED CONTROLS
ma i n
r e e n
s c
e t r y
g e om
o l o r
c
c i a l
s p e
1 2 00
1 6 0 0 x
9 3 . 8 K / 7 5HZ
RESET
EXIT
o
a u d i
5
5
Smart Help
After returning to A
DVANCED
C
ONTROLS
. . .
. . . to continue to M
OIRE
,
turn the R
OTARY
knob until M
OIRE
icon is
highlighted. Next, follow steps 4 - 7 under M
OIRE
.
. . . to exit completely,
press the OSD button and hold for 1.5
seconds. (See page 16 for other exit options.)
Smart Help
After returning to A
DVANCED
C
ONTROLS
. . .
. . . to continue to V
ERTICAL
L
INEARITY
,
turn the R
OTARY
knob until V
ERTICAL
L
INEARITY
icon is highlighted. Next, follow steps 4 - 6 under V
ERTICAL
L
INEARITY
(on the next page).
. . . to exit completely,
press the OSD button and hold for 1.5
seconds. (See page 16 for other exit options.)