Picture/progressive scan settings 63, Helpful hints – Philips DVDR600VR-37B User Manual
Page 63
• If your TV does not support progressive function
and you have accidentally activated the
progressive scan, there will be a blank screen.
You can deactivated it by following the steps
below.
1
Disconnect the power cord from the power
supply.
2
While holding down the D.DUBBING button
on the front panel, connect the power cord to
the power supply.The current time will appear
on the display panel. Continue to hold the
D.DUBBING button for 15 seconds and press
STANDBY ON
y
button on the front panel.
The display screen will show “PHILIPS” and
“READING CO2”.
• The picture format you select for TV Shape
must be on the DVD. If not, the settings for TV
Shape will not affect the picture.
• Some widescreen TVs may show only part of the
Recorder’s menu.Adjust the screen mode on
your TV. See your TV owner’s manual for details.
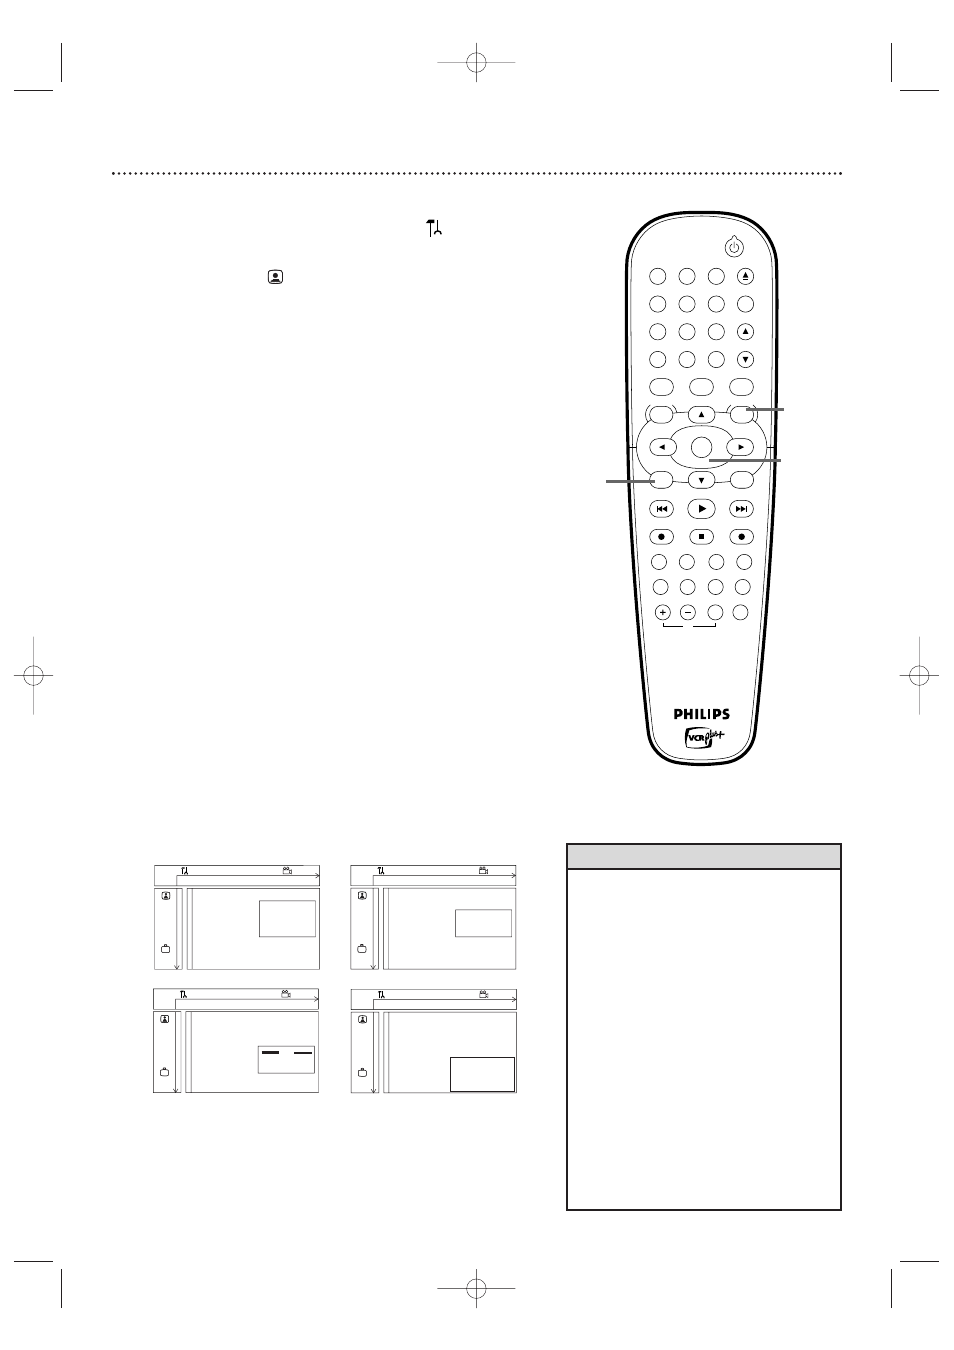
Helpful Hints
Picture/Progressive Scan Settings 63
●
Before you begin, make sure the Recorder is in DVD mode. Press DVD so
the DVD light appears on the front of the Recorder.
1
Press SYSTEM MENU. Press
s
to select
in the top left
corner of the menu bar at the top of the TV screen.
2
Press
L
to select
, then press B.
3
Press
K
or L to select TV Shape, Black level shift,Video shift,
or Component video output.Then, press B and follow step 4
according to your choice.
4
●
If you selected TV Shape, press K or L to select 4:3
letterbox, 4:3 panscan, or 16:9, then press OK.
Select 4:3 letterbox if you want to see the widened picture with
black bars at the top and bottom of the screen.This looks like the
picture you see when watching movies in a theater.This setting is
possible only if the DVD is recorded in letterbox or widescreen
format.
Select 4:3 panscan if you want the picture to be trimmed or
formatted to fit your TV screen.This setting is possible only if the
DVD is recorded in the regular format.
Select 16:9 if you connected the Recorder to a widescreen TV.
●
If you selected Black level shift, press K or L to select On
or Off, then press OK. Set Black level shift to On to improve the
color contrast and brighten the picture of NTSC Discs.
●
If you selected Video shift, press s or B to center the
picture horizontally on your TV screen - or “shift” the video.
When you are satisfied with the position of the picture,
press OK.
●
If you selected Component video output, press SELECT
repeatedly to choose Interlaced or Progressive Scan. Select
Progressive Scan only if you used the COMPONENT VIDEO OUT
(Y P
B
P
R
) jacks on the Recorder to connect it to a TV that has
Progressive Scan. See page 12. Otherwise, choose Interlaced.
If you choose Progressive Scan, PRO will appear on the display panel.
Do not set Component video output to Progressive Scan
unless you have a component video connection to a TV.
Otherwise, you will lose the DVD picture from the
Recorder to the TV.You will have no picture at the TV.
5
Press SYSTEM MENU to remove the menus.
W
X
Y
Z
a
1
2
1en
off
no
off
Picture
TV Shape
s
4:3 letterbox
L
G
Black level shift
4:3 panscan
Video shift
16:9
r
Component video output
~
W
X
Y
Z
a
1
2
1en
off
no
off
Picture
TV Shape
G
Black level shift
s
On
L
Video shift
Off
r
Component video output
~
W
X
Y
Z
a
1
2
1en
off
no
off
Picture
TV Shape
G
Black level shift
Video shift
s B
r
Component video output
OK to exit
~
W
X
Y
Z
a
1
2
1en
off
no
off
Picture
TV Shape
G
Black level shift
Video shift
r
Component video output
~
s
Interlaced
Progressive Scan
Press SELECT to toggle
STANDBY-ON
OK
MENU
MENU
DISC
SYSTEM
CHANNEL
TV/VIDEO
OPEN/CLOSE
DVD
VCR
CLEAR
MONITOR
VCR Plus +/TIMER
RETURN
SELECT
PLAY
STOP
DVD REC
VCR REC
PLAY MODE
MODE
AUDIO
DISPLAY
T/C
FSS
SLOW
MODE
SEARCH
MUTE
VOLUME
TV
PAUSE
1
2
3
4
5
6
7
8
9
0
EJECT
REC
4
1,5
1-4
E9480UD_EN.qx3 05.1.8 4:16 PM Page 63