Check deck drive belt, Warning – Briggs & Stratton 5900692 User Manual
Page 11
S200X 25HP & 27HP - 61” Mower Deck
7/2007
11
TP 300-7333-02-M2-SP
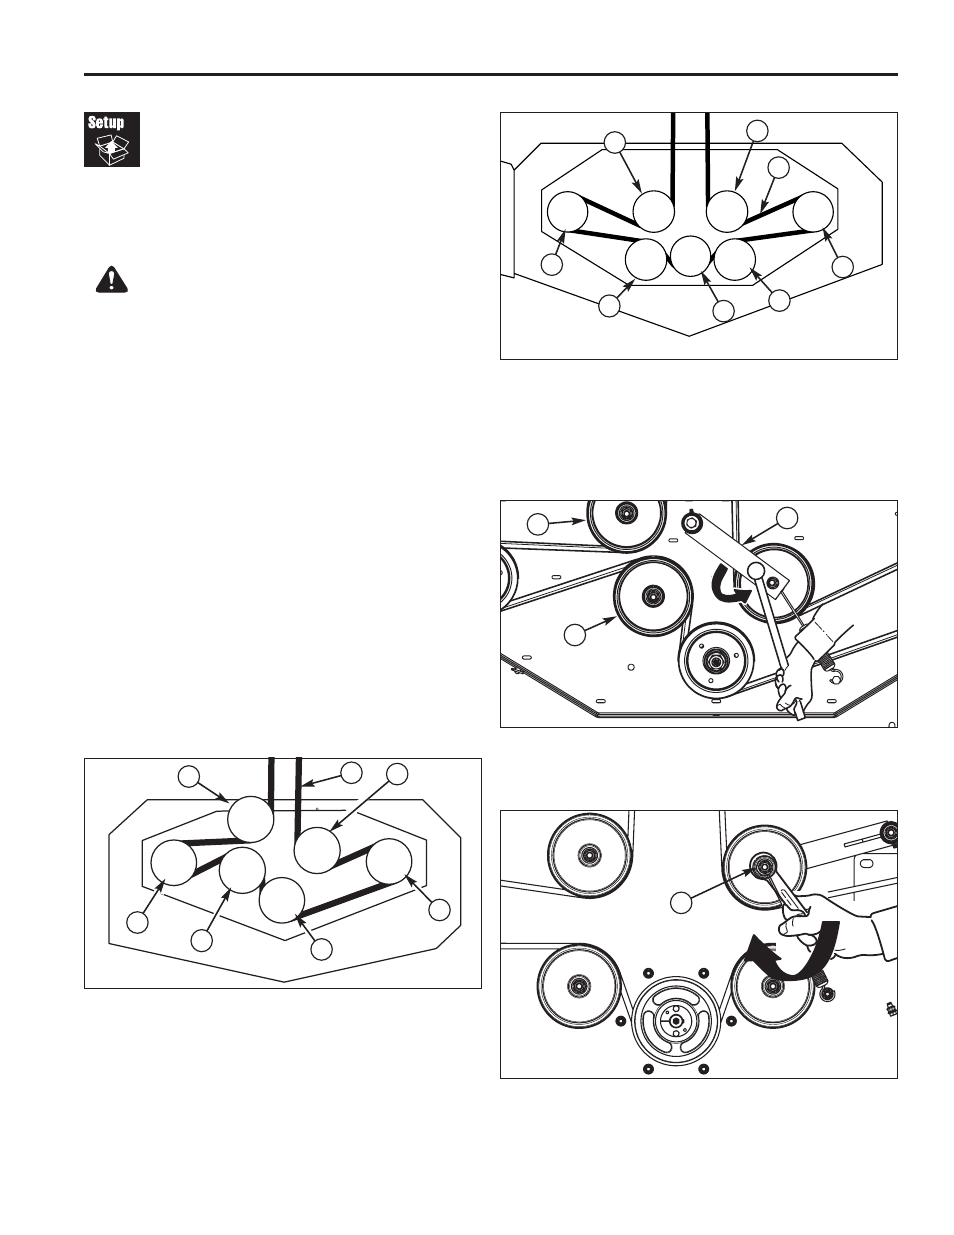
Check Deck Drive Belt
1. Lower the mower deck to its lowest cutting position.
2. Remove the mower deck guards.
3. Make sure the V-side of the belt runs in the pulley
grooves (Figures 21 & 22).
4. For 61” Models: If the belt is not properly seated,
use a 1/2” breaker bar, and place the square end in
the square hole located in the end of the idler arm (A,
Figure 23). Carefully rotate the breaker bar counter
clockwise, which will relieve the tension on the belt
exerted from the idler arm.
For 72” Models: If the belt is not properly seated,
use a 3/4” combination wrench, and place the box
end on the nut (A, Figure 24) securing the idler pulley
located in the end of the idler arm. Carefully rotate
the wrench CLOCKWISE, which will relieve the
tension on the belt exerted from the idler arm.
5. Re-seat belt and carefully release the tension on the
breaker bar.
6. Reinstall the mower deck guards.
Figure 21. Mower PTO Belt Routing (61” Models)
A. Spindle Pulley
B. PTO Drive Belt
C. Spring-loaded Idler Pulley
D. Stationary Idler Pulley
Figure 23. Mower PTO Belt (61” Models)
A. Idler Arm
B. Stationary Idler Pulley
WARNING
Use extreme caution when rotating the idler arm
with the breaker bar, due to the increased tension
in the spring as the idler arm is being rotated.
Injury may result if the breaker bar is prematurely
released while the spring is under tension.
B
A
B
C
D
A
A
A
D
B
Figure 22. Mower PTO Belt Routing (72” Models)
A. Spindle Pulley
B. PTO Drive Belt
C. Spring-loaded Idler
D. Stationary Idler Pulley
C
B
D
A
A
A
D
D
A
Figure 24. Mower PTO Belt (72” Models)
A. Nut