Pioneer VSX-924-S User Manual
Page 32
32
Connecting your equipment
03
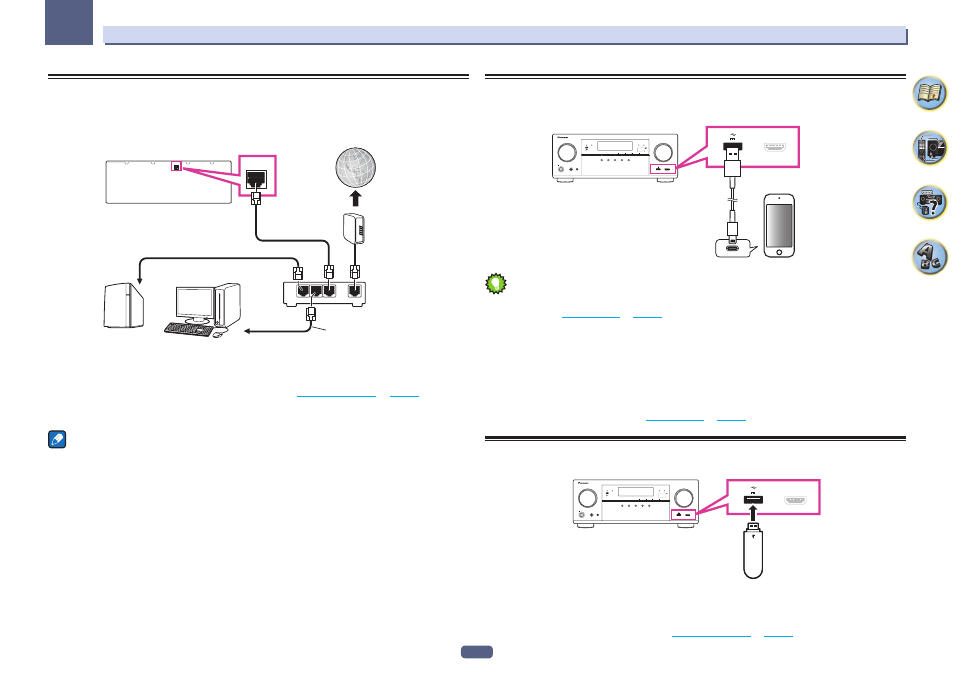
Connecting to the network through LAN interface
By connecting this receiver to the network via the LAN terminal, you can listen to Internet radio stations. To listen
to Internet radio stations, you must sign a contract with an ISP (Internet Service Provider) beforehand.
When connected in this way, you can play audio files stored on the components on the local network, including
your computer.
LAN (10/100)
LAN
(10/100)
WAN
3
2
1
LAN
Internet
Modem
Router
LAN cable (sold separately)
to LAN port
to LAN port
NAS
Computer
Connect the LAN terminal on this receiver to the LAN terminal on your router (with or without the built-in DHCP
server function) with a straight LAN cable (CAT 5 or higher).
Turn on the DHCP server function of your router. In case your router does not have the built-in DHCP server func-
tion, it is necessary to set up the network manually. For details, see
Network Setup menu
on
page 91
.
LAN terminal specifications
! LAN terminal : Ethernet jack (10BASE-T/100BASE-TX)
Notes
! Refer to the operation manual of the equipment you have as the connected equipment and connection method
may differ depending on your Internet environment.
! When using a broadband Internet connection, a contract with an Internet service provider is required. For
more details, contact your nearest Internet service provider.
Connecting an iPod
This receiver has a dedicated iPod terminal that will allow you to control playback of audio content from your iPod
using the controls of this receiver.
MASTER
VOLUME
STANDBY/ON
INPUT
SELECTOR
iPod iPhone
DIRECT CONTROL
STATUS
ADVANCED
SURROUND
STANDARD
SURROUND
AUTO SURR/ALC/
STREAM DIRECT
PHONES
SPEAKERS
CONTROL – MULTI-ZONE – ON / OFF
BAND
TUNER EDIT
TUNE
PRESET
ENTER
iPod iPhone
HDMI
ADVANCED
MCACC
FL OFF
MCACC
SETUP MIC
5V
1 A
HDMI 5 INPUT
5V
1 A
HDMI 5 INPUT
iPod/iPhone
USB cable included with the iPod
Tip
! An iPod/iPhone can be connected to the receiver. For details on supported models and versions of the respec-
tive products, see
Playing an iPod
on
page 44
.
% Switch the receiver into standby, and then use the iPod cable to connect your iPod to the
iPod/iPhone terminal on the front panel of this receiver.
! For the cable connection, also refer to the operating instructions for your iPod.
! When connecting an iPhone to this unit, keep the iPhone at least 20 cm (0.66 ft) away from this unit. If the
iPhone is kept closer to this unit and a telephone call is received by the iPhone, noise may be output from this
device.
! iPod recharging occurs whenever an iPod is connected to this unit. (Recharging is enabled only when the
unit’s power is turned on.)
! For instructions on playing the iPod, see
Playing an iPod
on
page 44
.
Connecting a USB device
It is possible to play audio and photo files by connecting USB devices to this receiver.
MASTER
VOLUME
STANDBY/ON
INPUT
SELECTOR
iPod iPhone
DIRECT CONTROL
STATUS
ADVANCED
SURROUND
STANDARD
SURROUND
AUTO SURR/ALC/
STREAM DIRECT
PHONES
SPEAKERS
CONTROL – MULTI-ZONE – ON / OFF
BAND
TUNER EDIT
TUNE
PRESET
ENTER
iPod iPhone
HDMI
ADVANCED
MCACC
FL OFF
MCACC
SETUP MIC
5V
1 A
HDMI 5 INPUT
5V
1 A
HDMI 5 INPUT
USB mass
storage device
% Switch the receiver into standby then connect your USB device to the USB terminal on the
front panel of this receiver.
! This receiver does not support a USB hub.
! For instructions on playing the USB device, see
Playing a USB device
on
page 45
.