Sub woofer front 1 2 pre out l r – Pioneer VSX-924-S User Manual
Page 28
28
Connecting your equipment
03
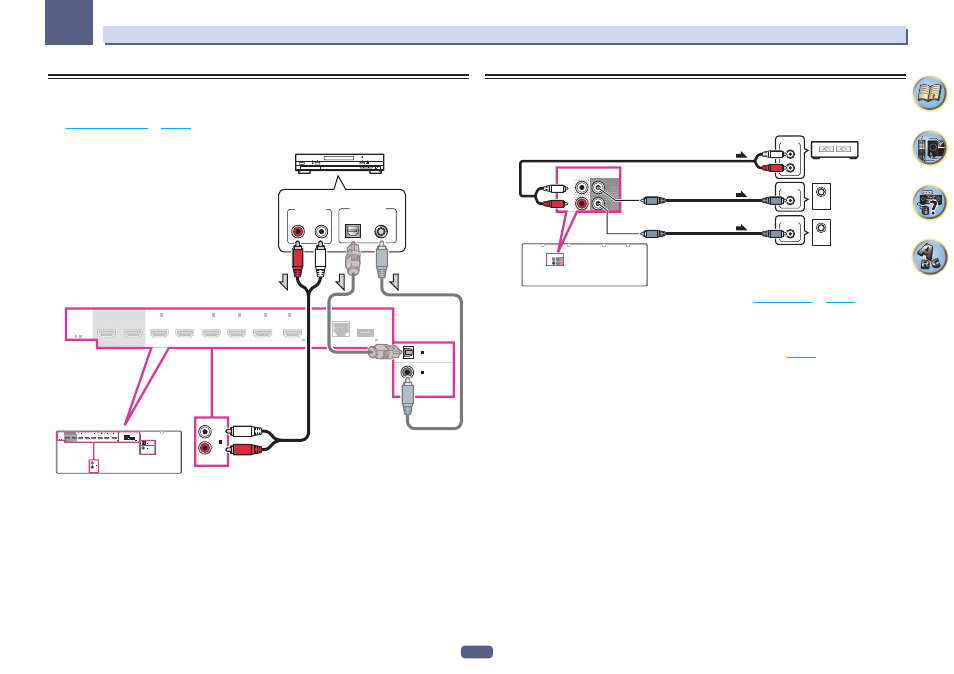
Connecting other audio components
This receiver has both digital and analog inputs, allowing you to connect audio components for playback.
When you set up the receiver you’ll need to tell the receiver which input you connected the component to (see
also
The Input Setup menu
on
page 39
).
1
ANALOG
IN
(CD)
ASSIGNABLE
HDMI
IN
1
IN (TV)
1
IN (DVD)
1
-
1 6
IN
2
IN
3
IN
4
IN /MHL
6
(SAT/CBL)
ASSIGNABLE
BD IN
LAN (10/100)
(
OUTPUT 5 V
0.6 A MAX)
(
OUTPUT 5 V
0.9 A MAX)
DC OUTPUT
for WIRELESS LAN
ASSIGNABLE
ASSIGNABLE
OPTICAL
COAXIAL
OUT 2
(HDZONE)
OUT 1
(CONTROL)
SELECTABLE
(DVD)
1
ANALOG
IN
(CD)
ASSIGNABLE
HDMI
IN
1
IN (TV)
1
IN (DVD)
1
-
1 6
IN
2
IN
3
IN
4
IN /MHL
6
(SAT/CBL)
ASSIGNABLE
BD IN
LAN
(10/100)
(
OUTPUT 5 V
0.6 A MAX
)
(
OUTPUT 5 V
0.9 A MAX
)
DC OUTPUT
for WIRELESS LAN
ASSIGNABLE
ASSIGNABLE
OPTICAL
COAXIAL
OUT 2
(HDZONE)
OUT 1
(CONTROL)
SELECTABLE
(DVD)
DIGITAL OUT
COAXIAL
OPTICAL
ANALOG
R
L
AUDIO OUT
Select one
CD player, etc.
! If your turntable has line-level outputs (i.e., it has a built-in phono pre-amp), connect it to the ANALOG IN 1
(CD) inputs instead.
Connecting additional amplifiers
This receiver has more than enough power for any home use, but it’s possible to add additional amplifiers to front
and subwoofer channels of your system using the pre-outs. Make the connections shown below to add amplifiers
to power your speakers.
SUB
WOOFER
FRONT
1
2
PRE OUT
L
R
SUB
WOOFER
FRONT
1
2
PRE OUT
L
R
R
L
ANALOG
INPUT
Front channel
amplifier
ANALOG
INPUT
Powered
subwoofer 1
ANALOG
INPUT
Powered
subwoofer 2
! If you’re not using a subwoofer, change the front speaker setting (see
Speaker Setting
on
page 86
) to
LARGE.
! If you have two subwoofers, the second subwoofer can be connected to the SUBWOOFER 2 terminal.
Connecting two subwoofers increases the bass sound to achieve more powerful sound reproduction. In this
case, the same sound is output from the two subwoofers.
! To hear sound only from the pre-outs, switch the speaker terminals to SP: OFF (
page 71
) or simply discon-
nect any speakers that are connected directly to the receiver.