Vollrath O431RC User Manual
Page 17
11
B. DISASSEMBLY OF AUGER
1.
Remove the front auger support and bushing.
2.
Remove the auger assembly from the machine.
Pull the auger out of the machine barrel slowly. As
the auger is being pulled out, carefully remove each
of the plastic flights with springs.
3.
Keep the rear of the auger tipped up once it is clear
of the freezing cylinder to prevent the rear seal
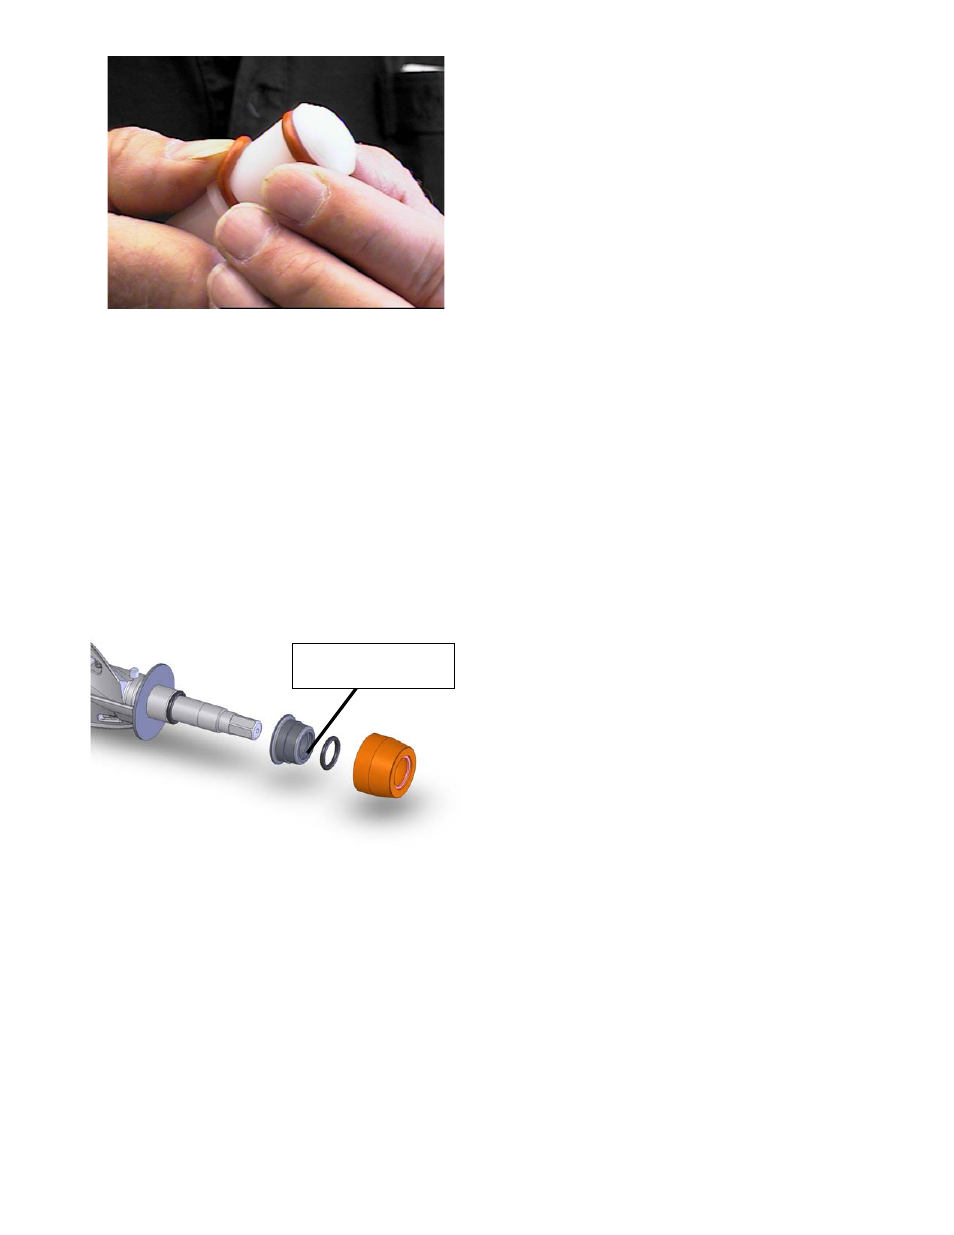
assembly from dropping.
4.
Wipe the hex drive anti-seize off of the hex end of
the auger with a paper towel. Remove the rear seal
assembly (Fig. 3-5).
5.
Unscrew the springs from the auger flights.
3.5 CLEANING DISASSEMBLED PARTS
Disassembled machine parts require complete cleaning,
sanitizing and air drying before assembling. Local and state
health codes will dictate the procedure required. Some
state health codes require a four sink process (pre-wash,
wash, rinse, sanitize, air dry), while others require a three
sink process (without the pre-wash step). The following
procedures are a general guideline only. Consult your local
and state health codes for the procedures required in your
location.
A.
Disassemble all parts. (Refer to Section 3.4 for the
disassembly of machine parts.)
B.
Place all front door and auger parts in clean 90° to
110°F (32°C to 43°C) water and wash thoroughly
(four sink procedure only).
C.
Place all parts in 90° to 110°F (32°C to 43°C) mild
detergent water and wash thoroughly.
D.
Rinse all parts with clean 90° to 110°F (32°C to
43°C) water.
E.
Sanitize all machine parts following procedures
outlined below.
3.6 SANITIZING MACHINE PARTS
A.
Use a sanitizer, mixed according to manufacturer’s
instructions, to provide a 100 parts per million
strength solution. Mix sanitizer in quantities of no
less than 2 gallons of 90° to 110°F (32°C to 43°C)
water. Any sanitizer must be used only in
accordance with the manufacturer’s instructions.
B.
Place all parts in the sanitizing solution for 5
minutes, then remove and let air dry completely
before assembling in machine.
3.7 CLEANING THE MACHINE
The exterior should be kept clean at all times to preserve
the luster of the stainless steel. A high grade of stainless
steel has been used on the machine to ease cleanup. To
remove spilled or dried mix, wash the exterior with 90° to
110°F (32°C to 43°C) soapy water and wipe dry.
Do not use highly abrasive materials, as they will mar the
finish. A mild alkaline cleaner is recommended. Use a soft
cloth or sponge to apply the cleaner. For best results, wipe
with the grain of the steel.
A.
Clean the rear seal surface from inside of the
freezing cylinder.
B.
Using sanitizing solution and the large barrel
brush provided, sanitize the freezing cylinder by
dipping the brush in the sanitizing solution and
brushing the inside of the freezing cylinder.
C.
Remove the drip tray by pulling from the front
panel. Clean and replace the drip tray.
3.8 ASSEMBLING MACHINE
To assemble the machine parts, refer to the following
steps:
NOTICE
Petrol-Gel sanitary lubricant or equivalent must be
used when lubrication of machine parts is speci-
fied.
NOTICE
The United States Department of Agriculture and
the Food and Drug Administration require that lu-
bricants used on food processing equipment be cer-
tified for this use. Use lubricants only in accordance
with the manufacturer’s instructions.
Figure 3-4 Removing O-Ring
Figure 3-5 Rear Seal Assembly
Remove O-Ring
From Inside Insert