Rugged Ridge XHD Rear Bumper, 76-06 Jeep CJ & Wrangler User Manual
Page 2
P
age 2 of 7
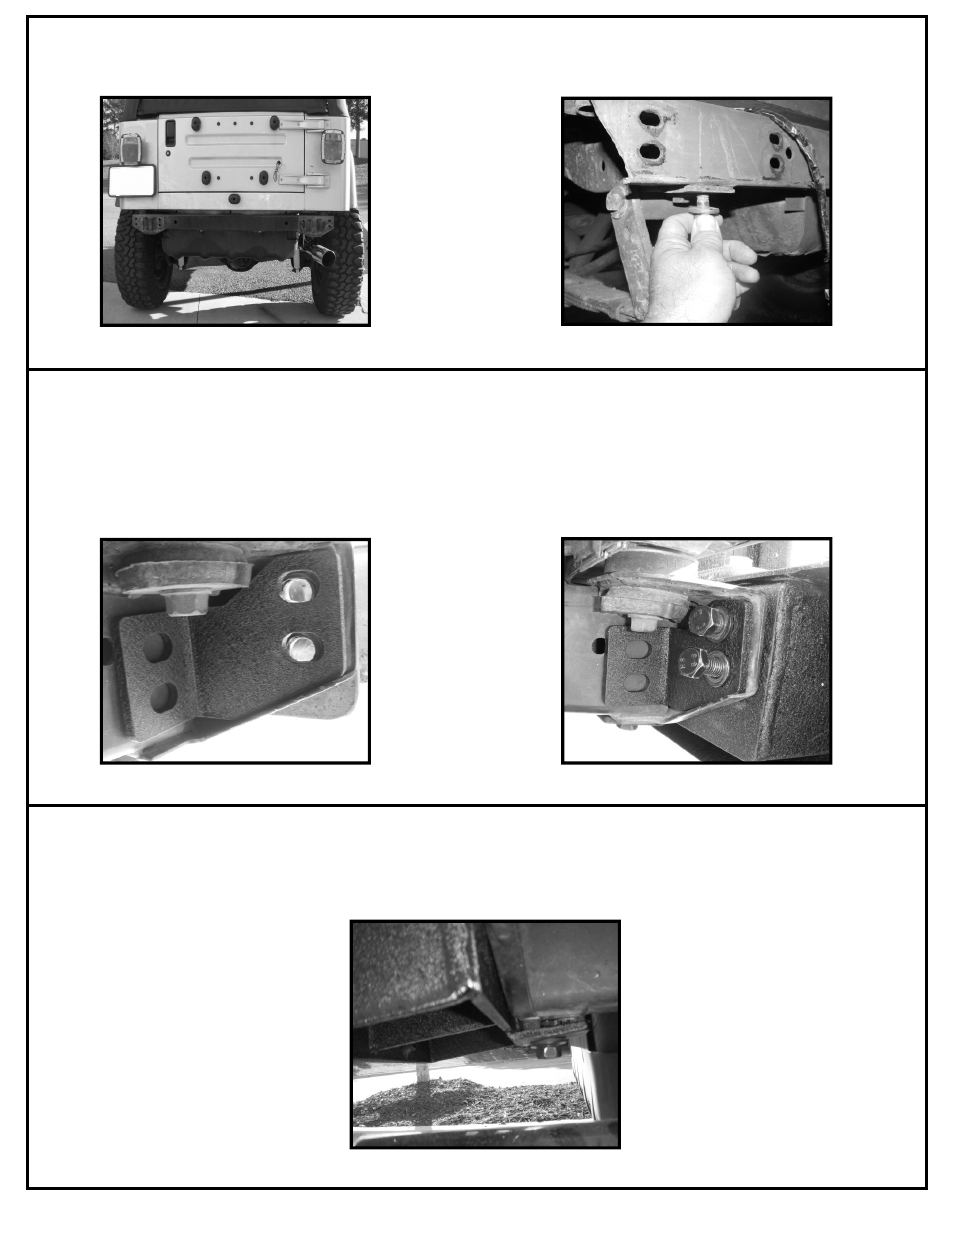
1.
Remove the rear bumper from the vehicle leaving the rear crossmember exposed (Figure 1). Save the
lower frame mounting bolts (Figure 2) as these will be reused in the installation of the new bumper.
2.
Place drivers’ side-frame bracket in crossmember channel and line up holes (Figure 3). Place driver’s side
sub-frame against crossmember, and using the supplied M12 x 35 bolts and washers, attach the sub-frame to
the vehicle (Figure 4). Do not tighten bolts at this time.
Note: YJ’s may require the the outer crossmember holes to be enlarged for a proper fit. Do not exceed 5/8” or
16mm in diameter.
3.
Support the sub-frame with your hand and line up the lower mounting tab with the hole in the bottom of
the frame rail. Using the bolt saved from Step 1, insert through sub-frame tab and thread into lower frame rail
(Figure 5). Do not tighten bolts at this time.
Figure 1. Figure 2.
Figure 3. Figure 4.
Figure 5.
- HD Steering Box Mount, 76-86 Jeep CJ Models (4 pages)
- Manual Locking Hub Set, 86.5-93 Nissan Frontier, Pathfinder, & Xterras (1 page)
- Manual Locking Hub Conversion Kit, 90-97 Ford, Mazda SUV & Pickup (2 pages)
- AMC20 Heavy Duty Differential Cover (1 page)
- Dana 44 Heavy Duty Differential Cover (1 page)
- Differential Skid Plate, Dana 30 (1 page)
- Differential Skid Plate, Dana 44 (1 page)
- Heavy Duty Steering Box Brace, 84-01 Jeep Cherokee (XJ) (3 pages)
- Differential Skid Plate, Jeep logo, Dana 44 (1 page)
- Dana 30 Heavy Duty Differential Cover (1 page)
- Dana 35 Heavy Duty Differential Cover (1 page)
- Differential Skid Plate, Dana 35 (1 page)
- Manual Locking Hub Set, 86-93 Nissan Pathfinder & Pickup (1 page)
- Manual Locking Hub Set, 90-94 Nissan Patrol (1 page)
- Heavy Duty Steering Box Brace, 76-86 Jeep CJ Models (3 pages)
- Differential Skid Plate, Jeep logo, Dana 30 (1 page)
- Dana 60 Heavy Duty Differential Cover (1 page)
- Differential Skid Plate, Jeep logo, Dana 35 (1 page)
- Tail Light Euro Guards, Black, 07-14 Jeep Wrangler (3 pages)
- Headlight Euro Guards, Black, 07-14 Jeep Wrangler (3 pages)
- RRC Side Armor Guards, 07-14 Jeep Wrangler Unlimited (JK) (1 page)
- Euro Style Turn Signal & Side Marker Guard,07-14 Jeep Wrangler (JK) (3 pages)
- RRC Side Armor Guards, 07-14 Jeep Wrangler (JK) (1 page)
- RRC Rocker Guards, Black, 07-14 Jeep Wrangler Unlimited (JK) (1 page)
- 3-Inch Round Tube Steps, Black, 07-14 Jeep Wrangler Unlimited (JK) (2 pages)
- 4 1/4-inch Oval Tube Side Steps, Black, 07-14 Wrangler Unlimited (JK) (2 pages)
- Steering Component Skid Plate, 07-14 Jeep Wrangler (JK) (2 pages)
- Rear Corner Guards, Body Armor, 97-06 Jeep Wrangler (2 pages)
- Rocker Side Panels, Body Armor, 97-06 Jeep Wrangler (TJ) (2 pages)
- Front Fender Guards, Body Armor, 97-06 Jeep Wrangler (2 pages)
- Corner Guards, Body Armor, 07-14 Jeep 4-Door Wrangler (JK) (2 pages)
- Hood Guard, Body Armor, 07-14 Jeep Wrangler (1 page)
- Tail Light Euro Guards, 07-14 Jeep Wrangler (JK) (3 pages)
- Euro Guard, Turn Signal, Black, 07-14 Jeep Wrangler (1 page)
- RRC Side Armor Guards, 87-06 Jeep Wrangler (1 page)
- RRC Rocker Guards, Black, 07-14 Jeep Wrangler (JK) (1 page)
- 3-Inch Round Side Steps, Black, 07-14 Jeep 2-Door Wrangler (JK) (2 pages)
- 4 1/4-inch Oval Tube Side Steps, Black, 07-14 Jeep Wrangler (JK) (2 pages)
- 6-Piece Body Armor Kit, 97-06 Jeep Wrangler (TJ) (10 pages)
- Rear Corner Guards, Body Armor, 97-06 Jeep Wrangler (TJ) (2 pages)
- Corner Guards, Body Armor, 07-14 Jeep 2-Door Wrangler (JK) (2 pages)
- Side Marker Light Euro Guards, Black, 07-14 Jeep Wrangler (2 pages)
- Fog Light Euro Guards, Black, 07-14 Jeep Wrangler (2 pages)
- 3-Inch Round Tube Side Steps, Black, 97-06 Jeep Wrangler (TJ) (2 pages)
- Gas Tank Skid Plate, 97-06 Jeep Wrangler (TJ) (3 pages)