頁面 11 – MIPRO ACT-82a Wideband Dual-Channel Digital Receiver User Manual
Page 11
1. Press the rotary controller to activate and move the cursor to the icon. When the icon starts
to flash, the Lock function is ready to be set.
2. Rotate the rotary controller clockwise or counterclockwise to the “ON” position.
3. Press the rotary controller once to confirm and save the selected “ON” to lock all parameters.
8
NOTE:
When locked, the receiver parameters can no longer be changed (except this one!). However, you can
still navigate to view existing settings and parameters.
L
L
Encryption icon starts flashing
indicates receiver is encrypted
indicates receiver is not encrypted
Press & hold to encrypt or decrypt
GRP
CH
BAND
ANT
MHz ACT
RF
AF
SQ
BA
EQ
ADD
" "
" "
Encryption ( ): to Add or Remove Encryption
Encryption Instructions:
To Lock Receiver:
1. Press the rotary controller to activate and move the cursor to the icon. When the icon starts
to flash and the word “NO” appears, the encryption function is ready to be set.
2. Press and hold the rotary controller for approximately 3 seconds until the word changes from “NO” to
“YES”.
3. Press rotary controller once to confirm and save the selected “YES” for encryption. The transmitter
now needs to be synced to the receiver using the ACT function to apply the encryption.
8
NOTE:
!
Encryption is factory set by default to “NO” in the receiver (encryption OFF).
!
The transmitter can only display encryption status and cannot activate/de-activate encryption.
!
The 128-bit encryption key is randomly generated; hence, a new, secure, encryption key is also downloaded to a
transmitter each time an ACT function is synced successfully.
!
This means the last encrypted transmitter will work only with the encrypting receiver. It also means that previously
encrypted transmitters will not work with the encrypting receiver even though they are on the same frequency as there will
be no audio output. This method also ensures that another similar receiver cannot listen in to the encrypted transmitter.
Decryption Instructions:
1. Press the rotary controller to activate and move the cursor to the icon. When the icon starts
to flash and the word “YES” appears, the Encryption function is ready to be set.
2. Press and hold the rotary controller for approximately 3 seconds until the word changes from “YES”
to “NO”.
3. Press the rotary controller once to confirm and save the selected “NO” to turn off the Encryption.
Transmitter now needs to be re-synced using ACT to turn transmitter encryption OFF.
8
GRP
CH
BAND
ANT
MHz ACT
RF
AF
BA
EQ
SQ
ADD
GRP
CH
BAND
ANT
MHz ACT
RF
AF
BA
EQ
SQ
ADD
(Encrypted)
(Not Encrypted)
Hold (8)(11) for
2 ~ 3 Seconds
Encryption
Aim TX to
ACT Button
TX
Encrypted
No→YES
ENCRYP→No
Encryption
Press ACT
Button
Not Encrypted
YES→No
ENCRYP→YES
TX
Aim TX to
ACT Button
Press ACT
Button
Encryption Setup Flow Chart
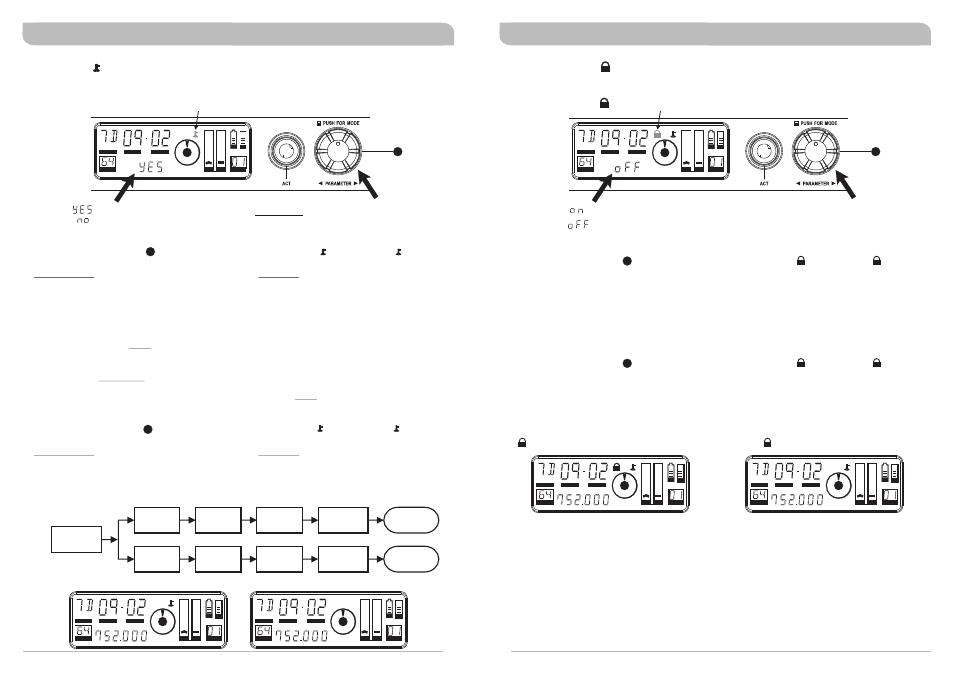
Parameter Lock ( ): to Lock and Unlock Receiver Parameters
L
L
GRP
CH
BAND
L
ANT
MHz ACT
RF
AF
SQ
BA
EQ
ADD
Rotate for “ON” or “OFF”
Icon starts flashing
indicates the receiver is ready to be locked
indicates the receiver is not locked
" "
" "
GRP
CH
BAND
L
ANT
MHz ACT
RF
AF
BA
EQ
SQ
ADD
GRP
CH
BAND
ANT
MHz ACT
RF
AF
BA
EQ
SQ
ADD
To Unlock Receiver:
( : icon illuminated: Parameters locked)
L
1. Press the rotary controller to activate and move the cursor to the icon. When the icon starts
to flash, the Lock function is ready to be set.
2. Rotate the rotary controller clockwise or counterclockwise to the “OFF” position.
3. Press the rotary controller once to confirm and save the selected “OFF” to unlock all parameters.
Changes can now be made normally.
8
L
L
L
(no : icon: Receiver not locked)
8
8
16
17
Encrypted Digital Wideband Diversity Receiver
Encrypted Digital Wideband Diversity Receiver