Decolav 1417-8 User Manual
Page 14
Número de modelo: Serie lVC1417 (1417-8, 1417-1)
MODEL NUMBER: LVC1417 SERIES (1417-8, 1417-1)
4
INSTALLATION INSTRUCTIONS
Customer Service: 561-274-2110
www.decolav.com
LET YOUR DREAMS COME ALIVE, YOUR PASSIONS
BECOME REALITY, BE THE ENVY OF YOUR NEIGHBORS
®
t45&1
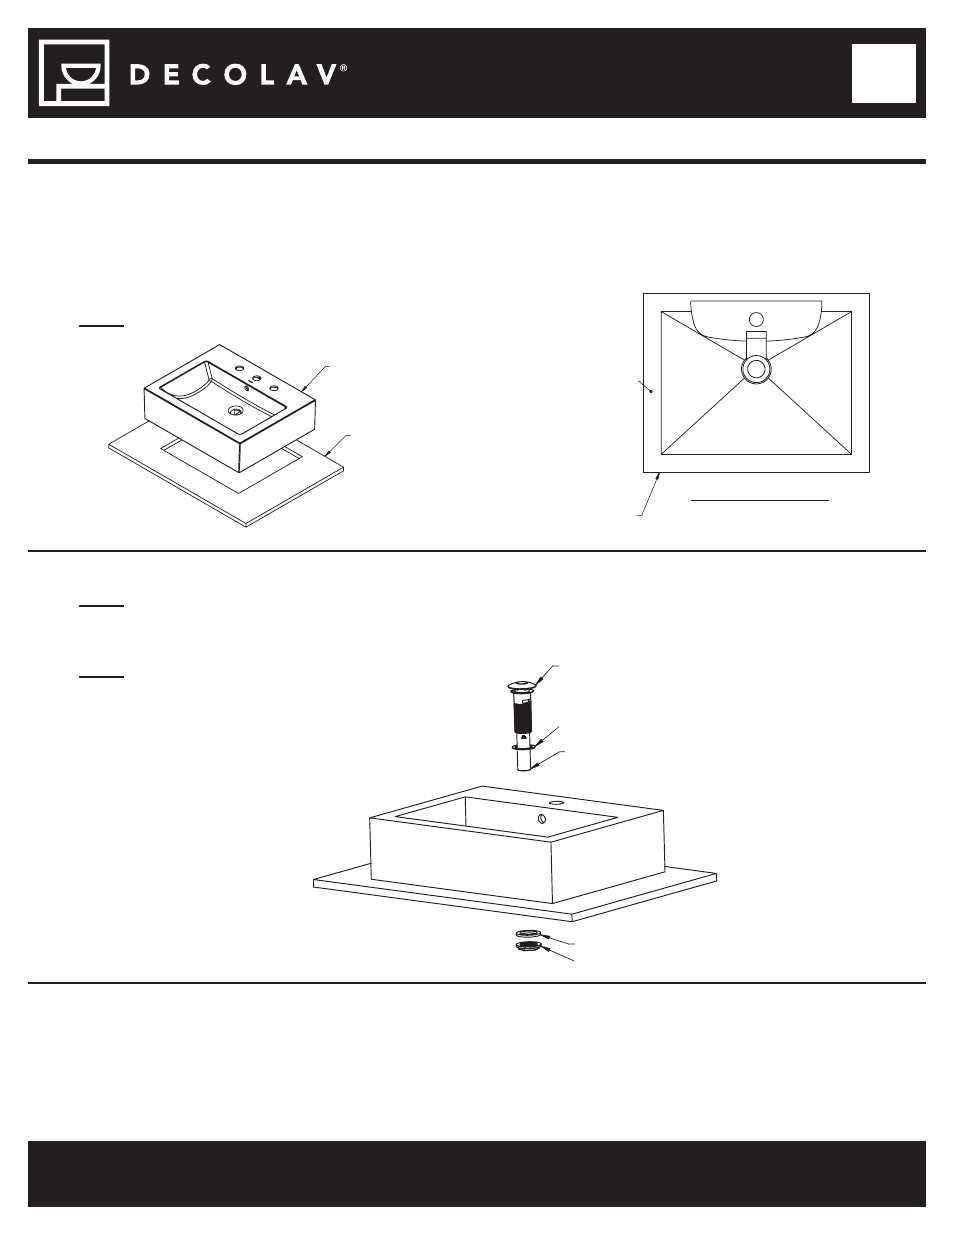
o Apply Plumber’s Putty or Caulking around the underside of rim near the edge as shown.
o Carefully lower
Lavatory
in place, align, and press firmly.
o Wipe off excess sealant.
o Refer to
Figure #1.
o
NOTE: ALLOW SEALANT TO SET BEFORE PROCEEDING!
t45&1
o
NOTE: DRAIN SHOWN, DECOLAV
®
9297 UMBRELLA DRAIN, IS A RECOMMENDED ACCESSORY AND NOT INCLUDED!
o Install Drain according to manufacturer’s installation instructions.
o
NOTE: DO NOT OVERTIGHTEN DRAIN!
o Refer to
Figure #2.
Figure #1
Figure #2
Figure #1
A
Countertop
A
Countertop
Apply Plumber’s
Putty or Caulk-
ing Here
BOTTOM VIEW
Drain
Thin washer
Tailpiece
Drain thick washer
Drain nut
A
t45&1
o
NOTE: WASTE SYSTEM, FAUCET AND WATER SUPPLY NOT INCLUDED!
o Install waste system, faucet and water supply according to manufacturer’s installation instructions.
o Check for leakage.
MODEL NUMBER: LVC1417 SERIES (1417-8, 1417-1)
4
INSTALLATION INSTRUCTIONS
Customer Service: 561-274-2110
www.decolav.com
LET YOUR DREAMS COME ALIVE, YOUR PASSIONS
BECOME REALITY, BE THE ENVY OF YOUR NEIGHBORS
®
t45&1
o Apply Plumber’s Putty or Caulking around the underside of rim near the edge as shown.
o Carefully lower
Lavatory
in place, align, and press firmly.
o Wipe off excess sealant.
o Refer to
Figure #1.
o
NOTE: ALLOW SEALANT TO SET BEFORE PROCEEDING!
t45&1
o
NOTE: DRAIN SHOWN, DECOLAV
®
9297 UMBRELLA DRAIN, IS A RECOMMENDED ACCESSORY AND NOT INCLUDED!
o Install Drain according to manufacturer’s installation instructions.
o
NOTE: DO NOT OVERTIGHTEN DRAIN!
o Refer to
Figure #2.
Figure #1
Figure #2
Figure #1
A
Countertop
A
Countertop
Apply Plumber’s
Putty or Caulk-
ing Here
BOTTOM VIEW
Drain
Thin washer
Tailpiece
Drain thick washer
Drain nut
A
t45&1
o
NOTE: WASTE SYSTEM, FAUCET AND WATER SUPPLY NOT INCLUDED!
o Install waste system, faucet and water supply according to manufacturer’s installation instructions.
o Check for leakage.
4
iNStruCCioNeS de iNStalaCióN
• PASO Nº 5
o
NOTA: EL SISTEMA DE DESAGÜE, EL GRIFO Y EL SUMINISTRO DE AGUA NO ESTÁN
INCLUIDOS.
o Instale el sistema de desagüe, el grifo y el suministro de agua según las instrucciones de instalación del
fabricante.
o Compruebe que no haya fugas.
Servicio al cliente: 561-274-2110
www.decolav.com
Let your dreams come aLive, your passions
become reaLity, be the envy of your neighbors
®
• PASO Nº 3
o Aplique masilla para plomería o sellador alrededor de la parte inferior del borde, cerca del contorno
externo, como se muestra.
o Baje con cuidado
el lavamanos
hasta su posición, alinéelo y presione firmemente.
o Quite el excedente de sellador.
o Vea la
figura 1.
o
Nota: permita Que el Sellador Se SeQue aNteS de CoNtiNuar.
• PASO Nº 4
o
Nota: el deSaGÜe Que Se mueStra (deSaGÜe deCoratiVo deColaV
®
9297) eS uN aCCeSorio reComeNdado. No
eStÁ iNCluido.
o Instale el desagüe según las instrucciones de instalación del fabricante.
o
Nota: No apriete demaSiado el deSaGÜe.
o Vea la
figura 2.
Figura 1
Figura 2
Mostrador
Aplique masilla
para plomería o
sellador aquí
VISTA INFERIOR
Desagüe
Arandela fina
Pieza del extremo
Arandela gruesa para desagüe
Tuerca del desagüe