Model number: 1199t – Decolav 1199T User Manual
Page 4
MODEL NUMBER: 1199T
4
INSTALLATION INSTRUCTIONS
Customer Service: 561-274-2110
www.decolav.com
LET YOUR DREAMS COME ALIVE, YOUR PASSIONS BECOME
REALITY, BE THE ENVY OF YOUR NEIGHBORS
®
5 3/4"
Aprox.
Figure #3
A
Finished Wall
B
Floor
Figure #2
Finished
C
A
Figure #5
B
H
A
Apply Clear
Silicone Here
Rubber
A
Base Rail
Liner
Set
Screws
Set Screws
Figure #4
H
A
A
B
Rubber Liner
• STEP #2
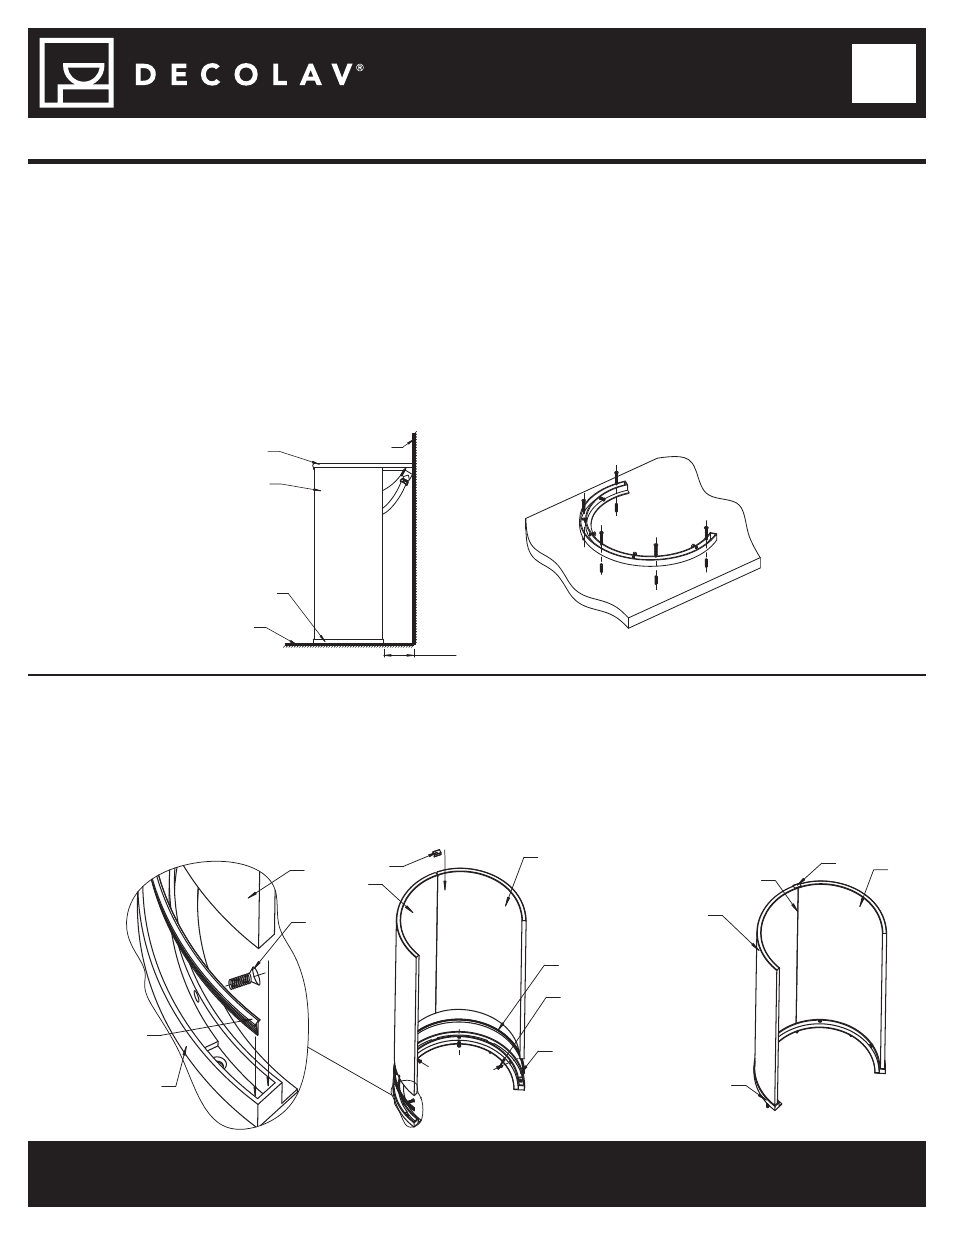
o Location of Unit is determined by current position of Waste Outlet.
o Refer to Rouging-in Dimensions, Page 2.
o Place Pre-Assembled Unit so Center Seam/Drain Line aligns with Waste Outlet.
o With Pencil, trace location of Base Rail on Floor.
o Refer to Figure #2
o Disassemble and remove Unit.
o Place Base Rail on traced location.
o Mark hole locations for Base Rail using Template.
o Drill appropriately sized holes for Floor Mounting.
o Insert Anchors into drilled holes and attach Base Rail to fl oor using Screws provided.
o NOTE: IF FLOOR IS UNEVEN, BASE RAIL NEEDS TO BE SHIMMED!
o Refer to Figure #3
• STEP #3
o Remove Set Screws from Base Rail.
o Place Tempered Glass Panels on Base Rail and secure them with Rubber Liner, Set Screws and Plastic Joint.
o NOTE: DO NOT OVERTIGHTEN SET SCREWS. OVERTIGHTENING MAY CAUSE DAMAGE TO GLASS!
o Refer to Figure #4
o Apply Silicone to back side of joint between Tempered Glass Panels.
o Allow Silicone to set before installing Glass Basin. Refer to Silicon instructions for curing time.
o Refer to Figure #5