Custom Brackets RF-PRO AS (Rapid Fire) User Manual
Page 2
Attaching the camera to the bracket
Note:
- Prior to attaching the camera, raise the flash rotator to the up position (see
back view of bracket).
To attach the camera:
Open the clamp to the fully open position by turning the clamp knob in the counter-clockwise direction.
Insert your camera (with Arca-Swiss style camera plate) into the quick release clamp.
Close the clamp securely by turning the knob in the clockwise direction.
To remove the camera:
Open the clamp to the fully open position by turning the clamp knob in the counter-clockwise direction.
Remove your camera from the quick release clamp.
Anti-twist
Anti-twist
Shown with Canon
Off Camera cord II attached
Attaching the flash cord to the flash mount
Note:
- Do not rotate the flash rotator unless a flash cord or the
RF-WT (mount for wireless flash operation) is
attached to the flash mounting plate and “D” clip of the screw is folded down. Rotating without one of these
attached may cause damage to the rotator and void warranty.
Anti-twist
Anti-twist
Flash rotator
Captive flash screw
“D” clip
Flash mounting plate
1-
2-
3-
4-
Flash anti-twist procedure
Nikon SC-28, SC-29 Cords
(first time installation)
Canon off-camera cord II, Canon Cord 3,
Nikon SC-17 cords (first time installation)
5-
1-
2-
3-
4-
Back view of
bracket
Up position
Down position
Upright screw
Up position
(shown for reference)
Upright screw
Down position
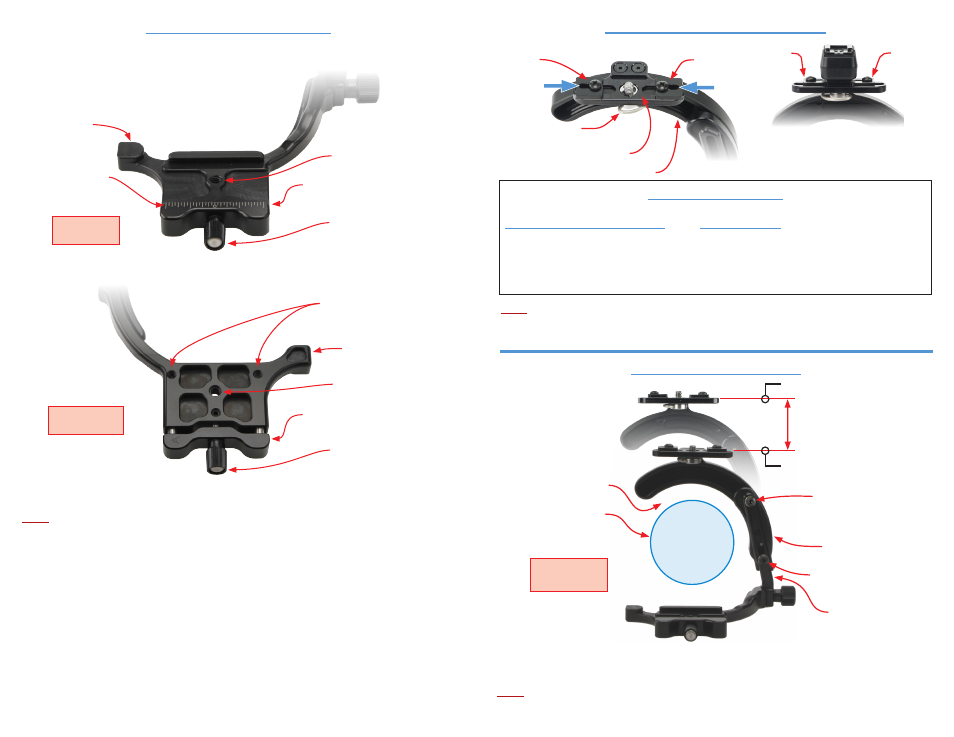
Adjusting the flash rotator height
The flash rotator is adjustable to work with short or tall cameras.
Adjust by loosening the upright screw, then position the rotator to be centered around the lens of the camera.
After desired position of rotator is set, lock upright screw using the 1/8” Allen wrench provided with bracket.
Note:
- Rotating without equal space around lens may cause damage to the lens or bracket.
- The leg must be completely folded in or out to rotate flash to avoid damage to the bracket.
Lens outside diameter
Position rotator
for equal space
around lens
Equal space around lens
Attach cord with flash screw
(do not tighten completely)
Slide one anti-twist to cord
(tighten anti-twist screw)
Slide other anti-twist to cord
(tighten anti-twist screw)
Tighten flash screw to cord
Attach cord (reversed) with flash screw
(do not tighten completely)
Slide left anti-twist to cord
(tighten anti-twist screw)
Remove cord and install normal
Slide right anti-twist to cord
(tighten anti-twist screw)
Tighten flash screw to cord
Flash rotator base
Upright
Height Adjustment
Clamp knob
Arca-Swiss style camera
quick release clamp
Support
Laser engraved
scale for camera
positioning
Tripod hole
1/4” x 20 thread
Top view of
camera clamp
Bottom view of
camera clamp
Clamp knob
Arca-Swiss style camera
quick release clamp
Tripod hole
1/4” x 20 thread
Bottom plate holes
for attaching CK-500
Arca-Swiss Style bottom plate
Support