Setup how to use – CatEye OS1.0 User Manual
Page 2
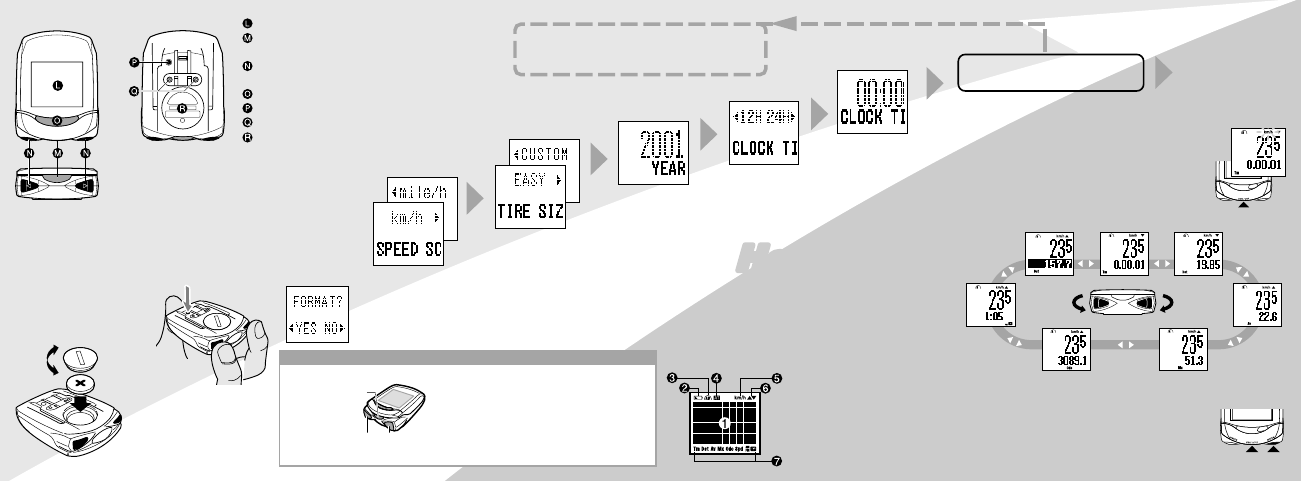
Setup
How to Use
• Names
1 Installing battery
2 Format operation
Format your unit before starting various setting.
Hold the unit as shown in the figure below.
PRESS AND HOLD the two MODE/SELECT
buttons, press and release RESTART button on
the back of the OS. CONTINUE HOLDING
DOWN the twoMODE/SELECT buttons for TWO
MORE SECONDS and let go. Now the FORMAT
YES/NO prompt will appear.
Select YES and press ENTER/START/STOP
button.
3 Speed scale setting
4 Tire size setting
5 Date setting
6 Time scale setting
7 Clock time setting
• Custom Setup
Select your favorite functions and preferred font
size. (See "Reference guide" page 5.)
•Start/stop of measurement
By a press of START/STOP button, the unit starts measur-
ing; by another press, it stops measuring. While measuring,
the speed scale icon flashes.
START/STOP/ENTER button measures Elapsed Time
(Tm), Trip Distance (Dst) and Average Speed (Av).
Maximum Speed (Mx) and Total Distance (Odo) continue
to be measured regardless of start/stop.
•Changing lower display
EASY -------- 14inch~27inch
CUSTOM --- 100~3999mm
(See "Tire Size Calibration Chart"
page 16.)
Setup finished
If "YES" is selected
8 Custom setup entrance
Select "NO".
Liquid crystal display
START/STOP button
[ENTER button]
MODE button
[SELECT button (FWD/REV)]
MENU button
RESTART button
Contacts
Battery cover
* appears when the countdown function is on.
(See "Countdown setting" page 15.)
•Reset operation
Press START/STOP/ENTER button and either of MODE/
SELECT button simultaneously, and the data other than
Total distance (Odo) and Clock Time is reset.
CLOSE
OPEN
Battery (CR2032)
Press simultaneously
Elapsed Time (Tm)
Clockwise
Trip Distance
(Dst)
Average
Speed (Av)
Maximum Speed (Mx)
Totall Distance (Odo)
Counter-
clockwise
Countdown*
Clock Time
• Icons on the screen
1
Screen
2
Battery life indicator
3
Selected tire icon
4
Auto mode icon
5
Speed scale icon
6
Pacer
7
Selected function icon
How buttons work in the SETUP process:
PRESSING FWD BUTTON:
Moves to the right or increases the figure
PRESSING REV BUTTON:
Moves to the left or decreases the figure
PRESSING BOTH FWD/REV BUTTONS:
Goes back to the previous screen
PRESSING ENTER BUTTON:
Enters the figure and executes the selection
REV FWD
MODE button (SELECT)
START/STOP
button (ENTER)