Configuring main unit – CatEye CC-TR100 User Manual
Page 16
CC-TR100
29
28
CC-TR100
MODE-
1
MODE-
2
MODE-
1
MODE-
2
MODE-
1
MODE-
2
Auto-mode menu screen
Power select menu screen
MENU
MODE-
2
MODE-
1
For the basic information on how to use the
menu screen, refer to page 28.
S/S/E
MODE-
1
or
MODE-
2
S/S/E
MODE-
2
MODE-
2
MODE-
1
MODE-
1
S/S/E
S/S/E
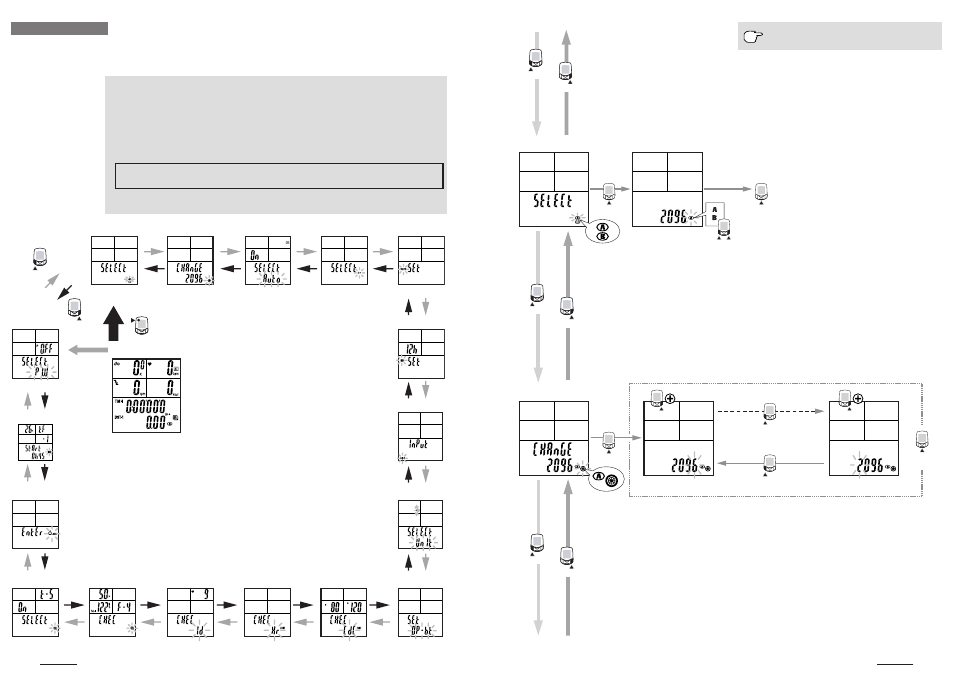
Wheel selection
You can choose between two wheels, A and B. The initial value for tire size (circumference) B
is 2050 mm.
NOTE: • Before Wheel circumference, it is necessary to stop the measurement and reset all
measured data.
• Not resetting all measured data causes the “PLEASE rESEt” message to be displayed,
making selection impossible.
Tire circumference input
You can change the tire circumference selected in “Wheel selection” (wheels A or B). You can
view data, but cannot alter it while the bicycle is in motion.
NOTE: • Before tire circumference input, it is necessary to stop the measurement and reset
all measured data.
• Not resetting all measured data causes the “PLEASE rESEt” indication to be dis-
played, making selection impossible.
• Specifying a numerical value outside the setting range causes the “Error” indication
to be displayed, making selection impossible.
Select
Changing numerical values
Changing numerical values
Digit shift
Select
Wheel selection menu screen
Tire circumference input menu
screen
*1: If you select “on” for Power Select on
the menu screen, the main display
will switch to torque measurement/
power calculation.
*2: This menu is available when the op-
tional download kit and/or power unit
is used.
*3: This menu is displayed when Power
Select and Data Storage are turned on.
Initially, it is not displayed as the de-
fault setting for Power Select is off.
To use these functions, the optional
power unit is required.
*4: To use the data files recorded in this
menu, the optional download kit or
power unit is required.
Tire circumference input
Auto-mode
Date
Power select
Cadence zone
Heart rate zone
Heart rate sensor ID
Data file *4
Main display
See page 29
See page 29
See page 30
See page 30
See page 31
See page 32
See page 43
See page 32
See page 39
See page 38
See page 36
See page 34
See page 41
Menu screens at
a glance
*1
Setting clock
Manual odometer input
Speed unit
Defining remote
button setting
See page 31
See page 33
PC Link *2
Torque *2
Data storage *4
See page 42
Sound
Wheel selection
Configuring main unit
When the MENU button is pressed with the Measuring screen displayed, the menu screen appears.
The menu includes a total of 17 screens as shown in the figure below: the main unit settings can be
checked or changed using these screens.
The basic information on how to use the menu screen is as follows:
1. When the Measuring screen is displayed, press the MENU button to switch to “Wheel circum-
ference” of the menu screen.
2. Press the MODE-1 or MODE-2 button until desired menu screen appears.
3. Press the START/STOP/ENTER button to change the settings.
NOTE: For information on how to change various settings, refer to the relevant page as shown below.
4. When the setting change is completed, press the START/STOP/ENTER button to confirm the
setting and return to the menu screen.
NOTE: Make sure to press the START/STOP/ENTER button each time the setting is changed.
Pressing the MENU button cancels the setting.
5. Press the MENU button to return to the Measuring screen.
NOTE: After one minute idle, menu screen will return to the Measuring screen.