Guía de configuración, Remote commander, Para los clientes de ee. uu. advertencia – Sony RM-VZ220 User Manual
Page 2: Configuración del rm-vz220, Especificaciones, Solución de problemas, Descripción de los botones del control remoto, Startup guide, Rm-vz220, Establezca el código del fabricante
Español
Para los clientes de EE. UU.
ADVERTENCIA
Este equipo ha sido probado y se ha encontrado que cumple con los límites para
dispositivos digitales de Clase B, de acuerdo con la Parte 15 de las normas de la FCC.
Estos límites han sido diseñados para proporcionar una protección razonable contra
interferencias perjudiciales en una instalación residencial.
Este equipo genera, usa y puede emitir energía de radiofrecuencia y, si no se instala y
utiliza de acuerdo con las instrucciones, puede provocar interferencias perjudiciales en
las radiocomunicaciones. Sin embargo, no existe ninguna garantía de que tales
interferencias no se produzcan en una instalación particular. Si este equipo llega a
producir interferencias dañinas en la recepción por radio o TV, lo que podrá
comprobarse encendiendo y apagando el aparato, se recomienda al usuario que intente
corregir la interferencia tocontrol remoto una o más de las siguientes medidas:
Reorientación o reubicación de la antena receptora.
Aumento de la separación entre el equipo y el receptor.
Conexión del equipo a un tomacorriente diferente del utilizado por el receptor.
Solicitud de ayuda al proveedor o a un técnico de radio/televisión experimentado.
Tenga en cuenta que cualquier cambio o modificación que no se apruebe expresamente
en este manual puede anular su derecho a utilizar este equipo.
Configuración del RM-VZ220
El RM-VZ220 está configurado de fábrica para funcionar con los
dispositivos de video de la marca Sony en cualquiera de los botones de
selección de dispositivos (consulte la tabla a continuación).
Para usar los dispositivos que no sean marca Sony, o dispositivos marca Sony
que no vengan configurados de fábrica, establezca el código del fabricante de
cada dispositivo.
Dispositivos
Botón
Configuración de
fábrica*
TV
TV
Televisor Sony (00810)
TV, decodificador de cable,
receptor de satéllite, IPTV,
reproductor de DVD, grabadora
de DVD, reproductor de Blu-ray
Disc, DVR (videograbadora
digital), PVR (videograbadora
personal), VCR, DVD con cine en
casa
CBL (SAT)
Decodificador de cable
(no de marca Sony)
(51376)
VCR
VCR Sony (60032)
DVD
Reproductor de DVD
Sony (11033)
*
El código de cinco dígitos es el código establecido por el fabricante.
Nota
Solamente se puede asignar un TV al botón de selección de dispositivos del TV. Puede
asignar cualquier dispositivo a los otros botones de selección de dispositivos.
Instalación de las baterías
Abra el compartimiento de las baterías e inserte dos baterías tamaño AA
(R6) secas (no incluidas).
Inserte las baterías (primero el lado negativo) en el compartimiento tal como
se muestra abajo.
1
2
Vida útil de la batería
En condiciones normales, las baterías secas alcalinas AA (LR6) pueden
durar hasta un año. Si el RM-VZ220 no funciona apropiadamente, las
baterías pueden descargarse. Si ocurriera esto, reemplace ambas baterías con
un par nuevo.
Notas
Reemplace las baterías por nuevas dentro de los dos minutos, y no presione ningún
botón mientras las reemplaza. De hacerlo, se pueden borrar las configuraciones de los
códigos.
No usar una batería vieja con una nueva, ni usar diferentes tipos de baterías juntos.
Si se derraman los electrolitos contenidos dentro de la batería, limpie el área
contaminada del compartimiento de las baterías con un paño y reemplace las baterías
viejas con nuevas. Para evitar los derrames de electrolitos, quite las baterías si tiene
planeado no utilizar el RM-VZ220 durante un período de tiempo prolongado.
Especificaciones
Distancia de operación Aproximadamente 11 m (36 pies) (varía según los
dispositivos de los diferentes fabricantes)
Requisitos de alimentación
Dos baterías secas de tamaño AA (R6) (no incluidas)
Vida útil de la batería
Aproximadamente 1 año cuando se utilizan baterías alcalinas
de tamaño AA (LR6) (varía de acuerdo con la frecuencia del
uso de los botones, hasta un uso aproximado de 300 veces
por día.)
Dimensiones
Aproximadamente 53 Ч 213 Ч 27 mm
(2
1
/
8
Ч 8
1
/
2
Ч 1
1
/
8
pulgadas) (a × h × d)
Peso
Aproximadamente 100 g (3,5 onzas) (sin incluir las baterías)
El diseño y las especificaciones están sujetos a cambios sin previo aviso.
Solución de problemas
Si tiene problemas con la configuración o el funcionamiento del RM-VZ220:
Realice con cuidado el procedimiento de configuración de la “Guía de configuración”.
Si el RM-VZ220 no funciona, intente repetir el procedimiento de configuración con
otro código de fabricante (si hay otros en la enumeración de códigos de su
dispositivo). Si sigue sin poder operar el RM-VZ220, intente con la función Búsqueda
(consulte “Búsqueda del código del fabricante”).
Apunte el RM-VZ220 directamente al dispositivo.
Quite cualquier obstáculo en el camino entre el RM-VZ220 y el dispositivo.
Asegúrese de haber presionado el botón de selección de dispositivo correcto.
Controle que el dispositivo tenga capacidad para infrarrojo de control remoto. Por
ejemplo, si su dispositivo no incluía un control remoto, probablemente no sea capaz
de ser controlado por el RM-VZ220.
Las baterías están agotadas o no están insertadas correctamente. Reemplácelas por
nuevas o insértelas correctamente.
Para clientes en EE. UU.
Información de asistencia al cliente
Luego de leer este manual, si todavía no puede lograr que el RM-VZ220 funcione
apropiadamente, llame a la Línea de ayuda de asistencia al cliente de Sony
al 1-800-822-2217.
Guía de configuración
Esta guía muestra la configuración y uso del RM-VZ220 para operar sus dispositivos.
Si su dispositivo Sony ya ha sido configurado, consulte “Funcionamiento del dispositivo”.
Establezca el código del fabricante
Ejemplo: Para usar un televisor Philips
1
Encuentre el código del fabricante en la “Lista de códigos del fabricante”.
RM-VZ220_U [US,ES] 4-170-642-12(1)
RM-VZ220_U [US,ES] 4-170-642-12(1)
4-170-642-12(1)
Remote Commander
RM-VZ220
©2010 Sony Corporation Printed in China
Operating Instructions
Manual de instrucciones (parte posterior)
English
For the Customers in the U.S.A.
WARNING
This equipment has been tested and found to comply with the limits for a Class B digital
device, pursuant to Part 15 of the FCC Rules. These limits are designed to provide
reasonable protection against harmful interference in a residential installation. This
equipment generates, uses and can radiate radio frequency energy and, if not installed
and used in accordance with the instructions, may cause harmful interference to radio
communications. However, there is no guarantee that interference will not occur in a
particular installation. If this equipment does cause harmful interference to radio or
television reception, which can be determined by turning the equipment off and on, the
user is encouraged to try to correct the interference by one or more of the following
measures:
ˎ Reorient or relocate the receiving antenna.
ˎ Increase the separation between the equipment and receiver.
ˎ Connect the equipment into an outlet on a circuit different from that to which the
receiver is connected.
ˎ Consult the dealer or an experienced radio/TV technician for help.
You are cautioned that any changes or modifications not expressly approved in this
manual could void your authority to operate this equipment.
Setting Up the RM-VZ220
The RM-VZ220 is preset at the factory to operate Sony brand video devices
set to any of the Device Select buttons (see the table below).
To use with non-Sony devices, or Sony devices that are not preset at the
factory, set the manufacturer’s code for each device.
Devices
Button
Factory setting*
TV
TV
Sony TV (00810)
TV, Cable set top box, Satellite
receiver, IPTV, DVD player, DVD
recorder, Blu-ray Disc player, DVR
(digital video recorder), PVR
(personal video recorder), VCR,
DVD Home Theater
CBL (SAT)
Cable set top box (non-
Sony) (51376)
VCR
Sony VCR (60032)
DVD
Sony DVD player
(11033)
*
The five-digit code is the preset manufacturer’s code.
Note
Only a TV can be assigned to the TV Device Select button. You can assign any device to
the other Device Select buttons.
Installing the batteries
Slide open the battery compartment and insert two size AA (R6) dry
batteries (not supplied).
Insert the batteries (negative end first) through the guide clamp within each
compartment as shown below.
1
2
Battery life
Under normal conditions, size AA (LR6) alkaline batteries will last up to one
year. If the RM-VZ220 does not operate properly, the batteries might be
drained. Replace both batteries with new ones.
Notes
ˎ Replace the batteries within 2 minutes after removing them, and do not press any
button when replacing the batteries. Otherwise, your code settings may be cleared.
ˎ Do not use an old battery with a new one, or mix different types of batteries together.
ˎ If the electrolyte inside the battery should leak, wipe the contaminated area of the
battery compartment with a cloth and replace the old batteries with new ones. To
prevent electrolyte from leaking, remove the batteries when you plan not to use the
RM-VZ220 for a long period of time.
Specifications
Operating distance
Approx. 11 m (36 ft) (varies depending on devices of
different manufacturers)
Power requirements
Two size AA (R6) dry batteries (not supplied)
Battery life
Approx. 1 year when using size AA (LR6) alkaline batteries
(varies depending on frequency of button use - up to approx.
300 times per day.)
Dimensions
Approx. 53 Ч 213 Ч 27 mm (2 1/8 Ч 8 1/2 Ч 1 1/8 in.)
(w/h/d)
Mass
Approx. 100 g (3.5 oz) (not including batteries)
Design and specifications are subject to change without notice.
Troubleshooting
If you have problems setting up or using the RM-VZ220:
ˎ Carefully perform the setup procedure of “Startup Guide.” If the RM-VZ220 does not
work, try repeating the setup procedure using another manufacturer’s code (if listed
for your device). If you still cannot operate the RM-VZ220, try the Search function
(see “Searching for the correct code”).
ˎ Aim the RM-VZ220 directly at the device.
ˎ Remove any obstacles in the path between the RM-VZ220 and the device.
ˎ Make sure you have pressed the correct Device Select button.
ˎ Check that the device has infrared remote capability. For example, if your device did
not come with a remote control, it probably is not capable of being controlled by the
RM-VZ220.
ˎ The batteries are weak, or not inserted correctly. Replace them with new ones or insert
them correctly.
For the customers in the U.S.A.
Customer Support Information
After you have read through this manual, if you still cannot get the RM-VZ220 to work
properly, call the Sony Customer Support Helpline at
1-800-822-2217.
Startup Guide
This guide shows you how to set up and use the RM-VZ220 to operate your devices.
If your Sony device has already been preset, see “Operate the device.”
Set the manufacturer’s code
Example: To set up a Philips TV
1
Find the manufacturer’s code in “Manufacturer’s Code List.”
Manufacturer’s Code List /
Lista de códigos del fabricante
English
The following tables show brand names (Brand) and their corresponding
code numbers (Code No.).
1 Press and hold SET for more than 3 seconds.
The SET indicator lights up.
While keeping SET held down, press the desired Device Select button,
then release both buttons.
2 Enter the manufacturer’s code.
The SET indicator flashes three times and turns off.
Español
La siguiente tabla muestra los nombres de las marcas (Brand) y el número
de código correspondiente (Code No.).
1 Presione y mantenga presionado el botón SET durante más de 3 segundos.
Se encenderá la luz indicadora SET.
Mientras tiene presionado el botón SET, presione el botón de selección de
dispositivo deseado y luego suelte ambos botones.
2 Ingrese el código del fabricante.
El indicador SET parpadeará tres veces y se apagará.
Brand
Code No.
Sony
00810, 00000
Acer
01339
Action
00650
Admiral
00463
Akai
00812, 01675, 00702, 02232
Akira
01733
AOC
01365, 01589
Apex Digital
00748
Aventura
00171
Bell & Howell
00154
BPL
01543
Broksonic
00463
Carver
00054
Celebrity
00000
Coby
02306, 02345, 02348
Commercial
Solutions
01447
Crosley
00054
Curtis
02352
Curtis Mathes
00054, 00154, 00702, 01661
Daewoo
01661
Digital Lifestyles
01765
Durabrand
00463, 00171
Dynex
01463, 01810, 02049
Electroband
00000
Electrograph
01755
Electrohome
00463
Elektra
01661
Element
01687
Emerson
01864, 00154, 00463, 00171,
01661, 01394
Emprex
01765
Envision
01365, 01589
ESA
00812, 00171
Fisher
00154
Funai
00171
Gateway
01755, 01756
GE
01447, 00051, 02359
GFM
00171
Haier
01748, 01749, 02309, 02449
Harman/Kardon
00054
Hisense
00748, 01314, 02098
Hitachi
01643, 02215, 02433
iLo
01684
Infinity
00054
Insignia
01564, 00171, 02049
JBL
00054
JCB
00000
JVC
00731, 01253, 01601, 01774
KDS
01687
Kolin
01331
LG
01423, 02358
LXI
00054, 00154, 00156
MAG
01687
Magnavox
01454, 01866, 00054, 01254,
01365, 02372
Marantz
00054
Matsushita
00650
Maxent
01755
Memorex
00154, 00463, 00150
MGA
00150
Brand
Code No.
Midland
00051
Mitsubishi
01250, 00150, 00836
NAD
00156
NEC
01797
NetTV
01755
Norcent
00748, 01365, 01589
Olevia
01610, 01144, 01331
Onida
01253, 02396
Optimus
00154, 00650
Orion
00463, 01463
Panasonic
01480, 00051, 00650
PARK
02104
Penney
00156, 00051
Petters
01523
Philco
00054
Philips
01454, 00054, 00690, 01744,
02372
Pioneer
01457, 01260
Polaroid
01523, 01276, 01314, 01687
Portland
01661
Prism
00051
Proscan
01447, 02147, 02256
Proview
01687
Quasar
00051, 00650
RadioShack
00154
RCA
01447, 01781, 02187, 02247,
02403, 02429, 02434
Realistic
00154
Sampo
01755
Samsung
00812, 00702
Sansui
00463
Sanyo
00154, 01142
Sceptre
01360, 01599
Scott
01711
Sears
00054, 00154, 00156, 00171
Sharp
00818
Spectroniq
01687
Squareview
00171
Superscan
00864
Supreme
00000
SVA
00748
Sylvania
01864, 00054, 00171, 01314,
01394
Symphonic
00171
Syntax
01610, 01144, 01331
Tatung
01756
TCL
02403, 02429
Technics
00051
Techwood
00051
Teknika
00054, 00150
Telefunken
00702
Toshiba
01524, 00154, 00156, 00650
TVS
00463
Venturer
01865
Videocon
01540, 01541, 02436
Vidikron
00054
Viewsonic
01755, 00864, 00885, 01627,
01742
Viore
01684, 02104, 02352
Vizio
01758, 00864, 00885, 01756
VU
02098
TV / TV
Brand
Code No.
Wards
00054
Waycon
00156
Westinghouse
01712, 00885, 01577
White
Westinghouse
00463, 01661
Wyse
01365
Zenith
00463, 01661
Brand
Code No.
Sony
11633, 10533, 10864, 11033,
11070, 11431, 11516
Accurian
10675
Akai
10695
Allegro
10869
Apex Digital
10672, 11056
Bel Canto Design 11571
Broksonic
10695
CineVision
10869
Citizen
10695
CyberHome
11024
Daewoo
10869
Denon
10490, 11634, 12258
Disney
10675, 11270
Emerson
10591, 10675
Enterprise
10591
Funai
10675
GE
10522
GFM
10675
Go Video
10744, 10741, 10869, 11044,
11075
GoldStar
10741
Harman/Kardon
11229
Hitachi
10573, 10664
Hiteker
10672
Insignia
10675, 12428, 12596
Integra
11769, 10627, 12147
JVC
10623, 10867, 11164
Kenwood
10490
LG
10591, 10741, 10869
Magnavox
10503, 10539, 10646, 10675,
11354
Marantz
10539, 12414, 12432
Memorex
10695, 11270, 12213
Microsoft
10522, 12083
Mitsubishi
11521
NAD
10741, 12572
Olevia
12331
Brand
Code No.
Onkyo
10503, 11769, 10627, 11627,
12147
Oppo
10575, 12545
Panasonic
10490, 11579, 11641
Philco
10675
Philips
10503, 10539, 12056, 12084,
10646, 10675, 11267, 11354,
12434
Pioneer
10142, 10631, 11571, 12442
Polk Audio
10539
Presidian
10675
Proscan
10522
RCA
10522, 11769, 10822, 12213,
12587, 12592, 12594
Rio
10869
Rotel
10623
Samsung
10490, 10573, 10199, 11044,
11075, 12329, 12489
Sansui
10695
Sanyo
10695
Sharp
10630, 10675, 12250
Shinsonic
10533
Sonic Blue
10869
Sylvania
10675
Symphonic
10675
TCL
12587
Technics
10490
Tivo
11503
Toshiba
10503, 11769, 10695, 11154,
11503, 12006, 12277
Urban Concepts
10503
Viore
12553
Vizio
12563
Vtrek
12587
Xbox
10522, 12083
Yamaha
10490, 10539, 10497, 10817,
12298
Zenith
10503, 10591, 10741, 10869
DVD player / Reproductor de DVD
Brand
Code No.
Sony
11033, 11070, 11431
Accurian
10675
Apex Digital
11056
Funai
10675
Go Video
10741
JVC
11164
LG
10741
Magnavox
10646, 10675
Panasonic
10490, 11579
Brand
Code No.
Philips
10646
Pioneer
10631
RCA
10522
Samsung
10490
Sharp
10675
Sylvania
10675
Toshiba
12277
Zenith
10741
DVD recorder / Grabadora de DVD
Blu-ray Disc/HD-DVD player/
Reproductor de Blu-ray Disc/HD-DVD
Brand
Code No.
Sony
11516
Denon
12258
Insignia
10675, 12428, 12596
Integra
11769, 12147
LG
10741
Magnavox
10675
Marantz
12414, 12432
Microsoft
12083
NAD
12572
Olevia
12331
Onkyo
11769, 12147
Oppo
12545
Brand
Code No.
Panasonic
11641
Philips
12084, 12434
Pioneer
10142, 12442
RCA
11769
Samsung
10199
Sharp
12250
Sylvania
10675
Toshiba
11769
Viore
12553
Vizio
12563
Xbox
12083
Yamaha
12298
Brand
Code No.
Sony
00810, 00000
Acer
01339
Action
00650
Brand
Code No.
Midland
00051
Mitsubishi
01250, 00150, 00836
NAD
00156
TV / TV
BPL
01543
Broksonic
00463
Carver
00054
Celebrity
00000
Coby
02306, 02345, 02348
Commercial
Solutions
01447
Crosley
00054
Curtis
02352
Curtis Mathes
00054, 00154, 00702, 01661
Daewoo
01661
Digital Lifestyles
01765
Durabrand
00463, 00171
Panasonic
01480, 00051, 00650
PARK
02104
Penney
00156, 00051
Petters
01523
Philco
00054
Philips
01454, 00054, 00690, 01744,
02372
Pioneer
01457, 01260
Polaroid
01523, 01276, 01314, 01687
Portland
01661
Prism
00051
Proscan
01447, 02147, 02256
Proview
01687
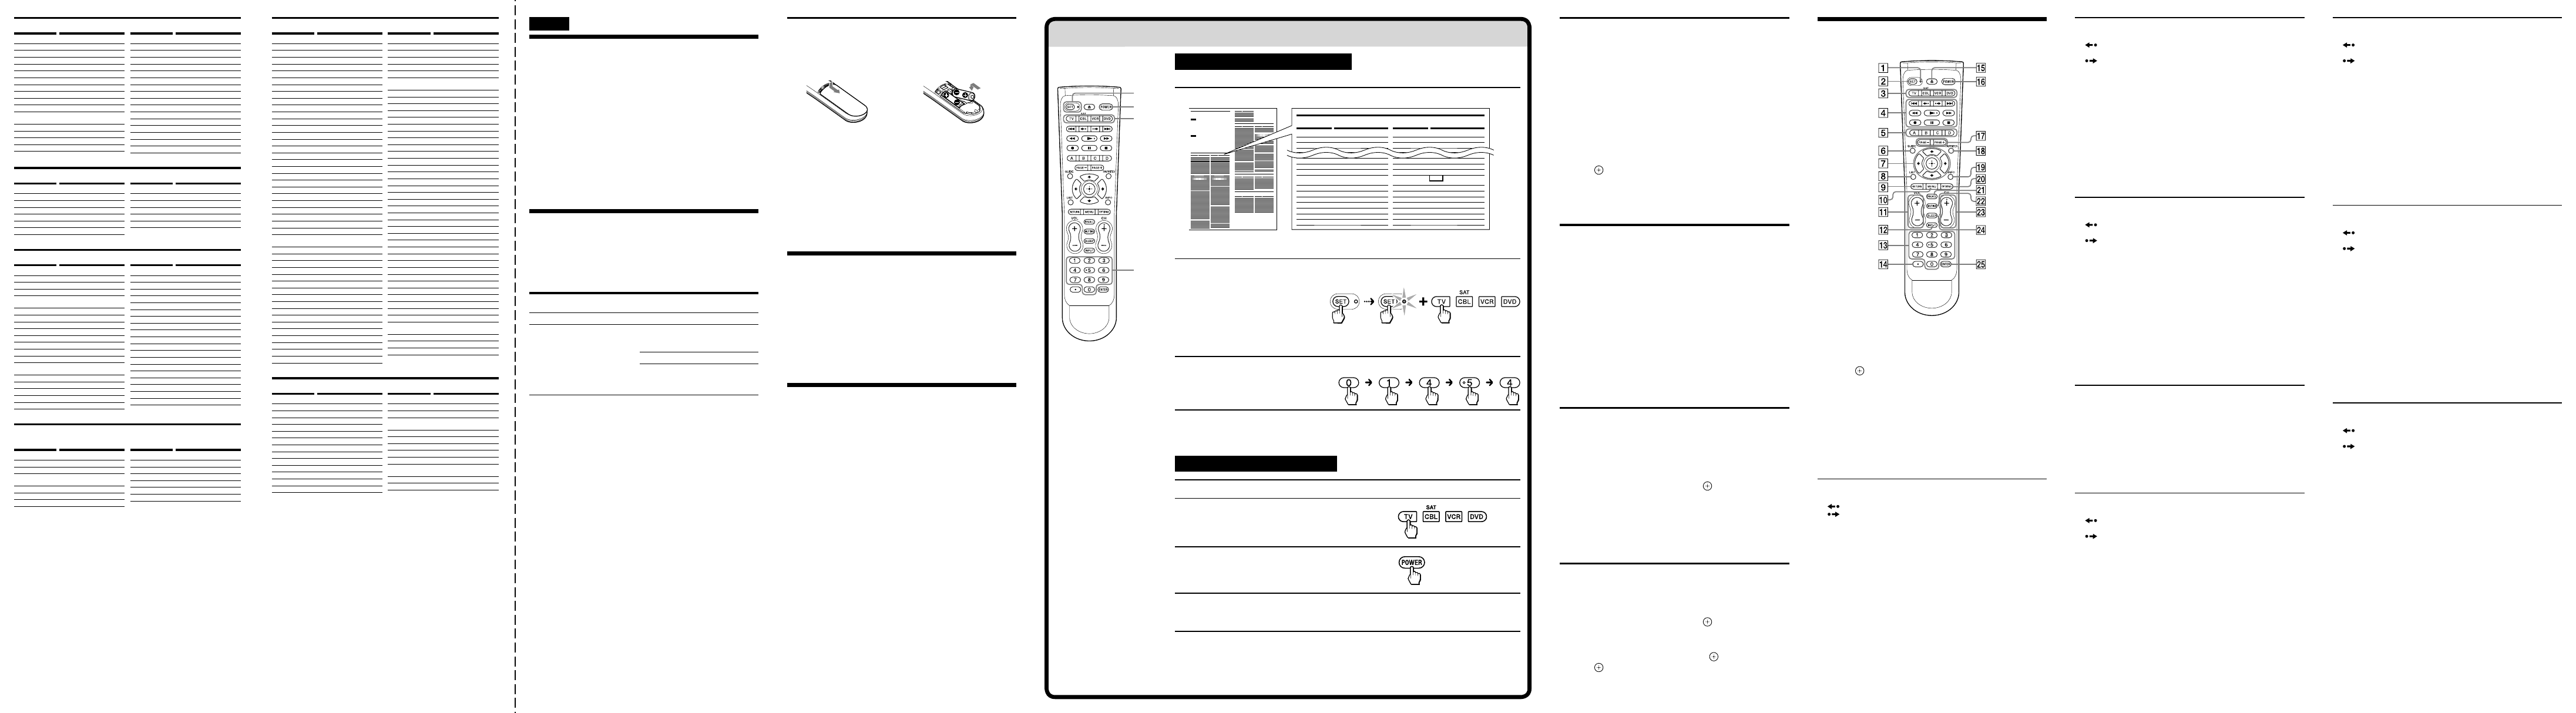
If your device is not listed, try the Search function (see “Searching for the correct code”).
2
Press and hold SET for more than 3 seconds.
The SET indicator lights up.
While keeping SET held down, press
the desired Device Select button,
then release both buttons.
3
Enter the manufacturer’s code (01454).
The SET indicator flashes three times and
turns off.
Operate the device
1
Aim the RM-VZ220 directly at the device.
2
Press the Device Select button for the
device you want to operate.
3
Press POWER to turn on the device.
4
Press buttons on the RM-VZ220 to check that they function.
See “Remote Button Descriptions” for the functions of buttons for each device.
If the RM-VZ220 does not seem to be working…
ˎ Check that you have set the correct manufacturer’s code.
ˎ Try repeating the setup procedure using another manufacturer’s code (if listed for your device).
If you still cannot operate the RM-VZ220 after trying all the listed codes, try the Search function (see “Searching
for the correct code”).
Notes
ˎ If the setting is incomplete,
the SET indicator flashes once
and the indicators turn off.
Start again from the
beginning.
ˎ If no operations are
performed for 10 seconds
while setting, the setting will
be canceled, and must be
restarted.
ˎ To cancel the process, press
SET any time. The SET
indicator turns off.
SET
POWER
Device
Select
buttons
Number
buttons
The SET indicator
lights up.
Searching for the correct code
You can set the manufacturer’s code using the Search function.
1 Power on the device with its power switch.
2 Aim the RM-VZ220 at the device you want to set.
3 Press and hold SET for more than 3 seconds.
The SET indicator lights up.
While keeping SET held down, press the desired Device Select button,
then release both buttons.
4 Enter 9 - 2 - 2 using the number buttons.
The SET indicator flashes three times.
5 Press and hold à to start searching.
When the device turns off, release the button.
If you overshoot the required code, you can search for the next or previous
code using the ß or ù button.
6 Press .
The SET indicator flashes three times and turns off.
7 Check if the code number works correctly (see “Remote Button
Descriptions”).
If you still cannot operate the device, repeat steps to search for another
code that works for most functions of your device.
Checking the manufacturer’s code you have set
1 Press and hold SET for more than 3 seconds.
The SET indicator lights up.
While keeping SET held down, press the desired Device Select button,
then release both buttons.
2 Enter 9 - 3 - 3 using the number buttons.
The SET indicator flashes three times.
3 Press à.
4 When the SET indicator starts flashing, count the number of flashes.
Short flash(es) indicate which digit (first, second, etc.), followed by long
flash(es) to indicate the digit number (i.e., 2 long flashes represent the
number 2). “0” is indicated by rapid flashing.
Determine the 5-digit code number this way. To recheck, press à.
5 Press SET to finish.
Clearing the automatic power-on control (Sony
devices only)
The Device Select buttons are preset to automatically turn on a device when
pressed.
To cancel the function:
1 Press and hold SET for more than 3 seconds.
The SET indicator lights up.
While keeping SET held down, press , then release both buttons.
2 Enter 9 - 7 - 7 using the number buttons.
The SET indicator flashes three times.
3 Press the desired Device Select button.
The SET indicator flashes three times and turns off.
To set the function again, perform the same procedure above.
Restoring the factory settings
You can clear all the settings and reset the RM-VZ220 to its factory settings.
1 Press and hold SET for more than 3 seconds.
The SET indicator lights up.
While keeping SET held down, press , then release both buttons.
2 Enter 9 - 0 - 0 using the number buttons.
The SET indicator flashes three times.
To cancel, press any button except .
3 Press .
The SET indicator flashes three times and turns off.
Remote Button Descriptions
General
ȩȪ SET: Press to set up the RM-VZ220. The indicator lights or flashes while
setting.
ȫ Device Select buttons: Press to select the device to operate.
Ȯ GUIDE: Displays the program guide (EPG).
ȯ j//V/p/ : Moves the cursor to select a menu item/enters the selected item.
ȱ RETURN: Returns to the previous display/exits the menu.
ȳ VOL +/–: Turns the volume up/down.
ȸ POWER: Turns the selected device on and off.
Ⱦ MUTING: Mutes the volume. Press again to turn muting off.
ɀ SLEEP: Enables the Sleep function (when available).
The number 5, CH+, and à buttons each have a tactile dot for ease of use.
The GUIDE and RETURN buttons do not work for a VCR.
Note on the VOL+/– and MUTING buttons
When a TV or other video device is selected, the TV’s volume is controlled. When a
DVD Home Theater is selected, its volume can be controlled.
TV
Ȭ Ã: VIDEO 1 input
: VIDEO 2 input
: HDMI input
Ñ: RGB input
ù: (PIP INPUT) Changes the
input mode of the “window”
picture.
à: (PIP) Turns the “window”
picture on and off.
ß: (PIP MOVE) Moves the
location of the “window” picture.
ê: (PIP STILL) Freezes the
“window” picture.
Ą: (PIP SWAP) Switches between
“main” and “window” picture.
ȭ A: Red button
B: Green button
C: Yellow button
D: Blue button
Ȱ LIST: (CAPTION) Displays closed
captioning.
Ȳ MENU: Calls up the menu display.
ȴ INPUT: Changes the input mode.
ȵȶɁ 1 – 9, 0, ENTER, ˎ (dot):
Changes the channel. For example,
to change to channel 5, press 0 and
5 (or, press 5 and ENTER).
ȹ PAGE +/–: (PIP CH +/–) Changes
the channel up/down in the
“window” picture.
Ⱥ FAVORITES: Enables the Favorite
function.
Ȼ INFO: Displays program
information.
ȼ OPTIONS: Displays the options
menu.
Ƚ RECALL: Selects the channel
previously selected.
ȿ CH +/–: Switches the channel up/
down.
Cable set top box/IPTV
Ȭ Ã: Proceeds to the previous
location.
: Briefly replays the scene
(Flash –).
: Briefly fast forwards the
scene (Flash +).
Ñ: Proceeds to the next location.
ù: Fast reverses.
à: Plays.
ß: Fast forwards.
Ć: Records.
ê: Pauses.
Ą: Stops.
ȭ A, B, C buttons
D: (Live TV) Displays Master
Guide.
Ȱ LIST: Displays the title of recorded
program.
Ȳ MENU: Calls up the menu display.
ȴ INPUT: Changes the input mode.
ȵ ȶ Ɂ 1 – 9, 0, ENTER, ˎ (dot):
Changes the channel. For example,
to change to channel 5, press 0 and
5 (or, press 5 and ENTER).
ȹ PAGE +/–: Page up/down
Ⱥ FAVORITES: Enables the Favorite
function.
Ȼ INFO: Displays program
information.
ȼ OPTIONS: Displays the options
menu.
Ƚ RECALL: Switches between the
current and previous channel.
ȿ CH +/–: Switches the channel up/
down.
Satellite receiver
Ȭ Ã: Proceeds to the previous
location.
: Briefly replays the scene
(Flash –).
: Briefly fast forwards the
scene (Flash +).
Ñ: Proceeds to the next location.
ù: Fast reverses.
à: Plays.
ß: Fast forwards.
Ć: Records.
ê: Pauses.
Ą: Stops.
ȭ A: Red button
B: Green button
C: Yellow button
D: Blue button
Ȱ LIST: Displays the title of recorded
program/PVR menu.
Ȳ MENU: Calls up the menu display.
ȴ INPUT: (TV/SAT) Switches the
output between SAT and TV.
ȵ ȶ Ɂ 1 – 9, 0, ENTER, ˎ (dot):
Changes the channel. For example,
to change to channel 5, press 0 and
5 (or, press 5 and ENTER).
ȹ PAGE +/–: Page up/down
Ⱥ FAVORITES: Enables the Favorite
function.
Ȼ INFO: Displays program
information.
ȼ OPTIONS: Displays the Satellite
dish menu/Station Index.
Ƚ RECALL: Tunes to the last tuned
station.
ȿ CH +/–: Switches the channel up/
down.
VCR
Ȭ ù: Rewinds.
à: Plays.
ß: Fast forwards.
Ć: Records.
ê: Pauses.
Ą: Stops.
ȴ INPUT: Changes the input mode.
ȵ 1 – 9, 0: Number buttons
ȷ ì: Ejects a tape.
Ȼ INFO: (DISPLAY) Displays the
playback information.
ȼ OPTIONS: (ANT/SW) Switches
the antenna output.
Ƚ RECALL: (DRIVE SELECT) Selects
the deck.
ȿ CH +/–: Switches the channel up/
down.
Ɂ ENTER: Enters the selected item.
DVD player/recorder
Ȭ Ã: Skips to the previous
chapter/track.
: Briefly replays the scene
(Flash –).
: Briefly fast forwards the
scene (Flash +).
Ñ: Skips to the next chapter/
track.
ù: Fast reverses.
à: Plays.
ß: Fast forwards.
Ć: Records (for DVD recorder).
ê: Pauses.
Ą: Stops.
ȭ A: (SET UP) Calls up the system/
setup menu.
B: (SUBTITLE) Switches the
subtitle.
C: (AUDIO) Changes the sound.
D: (CLEAR) Clears the setting.
Ȱ LIST: Displays the Title List.
Ȳ MENU: Displays the DVD menu.
ȴ INPUT: Changes the input mode.
ȵ 1 – 9, 0: Number buttons
ȶ ˎ (dot): (+10) Selects numbers 10
and above.
ȷ ì: Opens/closes the disc tray.
ȹ PAGE +: (DVD) Selects the DVD
drive.
PAGE –: (HDD) Selects the
internal HDD (hard disk drive).
Ⱥ FAVORITES: (TOP MENU)
Displays the Top Menu.
Ȼ INFO: (DISPLAY) Displays the
playback information.
ȼ OPTIONS: Displays the options
menu.
Ƚ RECALL: (DRIVE SELECT)
Switches between HDD and DVD.
ȿ CH +/–: Switches the channel up/
down (for DVD recorder).
Ɂ ENTER: Enters the selected item.
Blu-ray Disc/HD-DVD player
Ȭ Ã: Skips to the previous
chapter/track.
: Briefly replays the scene
(Flash –).
: Briefly fast forwards the
scene (Flash +).
Ñ: Skips to the next chapter/
track.
ù: Fast reverses.
à: Plays.
ß: Fast forwards.
Ć: Records (for BD recorder).
ê: Pauses.
Ą: Stops.
ȭ A: (SET UP) Calls up the system/
setup menu.
B: (SUBTITLE) Switches the
subtitle.
C: (AUDIO) Changes the sound.
D: (CLEAR) Clears the setting.
Ȳ MENU: Displays the Pop-up Menu/
Disc Menu.
ȴ INPUT: Changes the input mode.
ȵ 1 – 9, 0: Number buttons
ȶ ˎ (dot): (+10) Selects numbers 10
and above.
ȷ ì: Opens/closes the disc tray.
ȹ PAGE +: (BD) Selects the BD drive.
PAGE –: (HDD) Selects the
internal HDD (hard disk drive).
Ⱥ FAVORITES: (TOP MENU)
Displays the Top Menu.
Ȼ INFO: (DISPLAY) Displays the
playback information.
ȼ OPTIONS: Displays the options
menu.
Ɂ ENTER: Enters the selected item.
DVR (digital video recorder)/PVR (personal video recorder)
Ȭ Ã: Proceeds to the previous
location.
: Briefly replays the scene
(Flash –).
: Briefly fast forwards the
scene (Flash +).
Ñ: Proceeds to the next location.
ù: Fast reverses.
à: Plays.
ß: Fast forwards.
Ć: Records.
ê: Pauses.
Ą: Stops.
ȭ A: (REPLAY*) Enables the Replay
function for DVR/Replay TV.
B: (Live TV*) Displays Master
Guide.
Ȱ LIST: Displays the title of recorded
program.
Ȳ MENU: Calls up the menu display.
ȴ INPUT: Changes the input mode.
ȵ 1 – 9, 0: Number buttons
ȶ ˎ (dot): (+10) Selects numbers 10
and above.
ȷ ì: Opens/closes the disc tray.
ȹ PAGE +/–: Page up/down,
Thumbs* up/down
Ȼ INFO: (DISPLAY) Displays the
playback information.
Ƚ RECALL: Selects the channel
previously selected.
ȿ CH +/–: Switches the channel up/
down.
Ɂ ENTER: Enters the selected item.
*
These buttons correspond to TiVo
service or the Replay service. Refer to
its instruction manual for details.
DVD Home Theater
Ȭ Ã: Skips to the previous
chapter/track.
: Briefly replays the scene
(Flash –).
: Briefly fast forwards the
scene (Flash +).
Ñ: Skips to the next chapter/
track.
ù: Fast reverses.
à: Plays.
ß: Fast forwards.
Ć: Records.
ê: Pauses.
Ą: Stops.
ȭ A: (SET UP) Calls up the system/
setup menu.
B: (SUBTITLE) Switches the
subtitle.
C: (AUDIO) Changes the sound.
D: (CLEAR) Clears the setting.
Ȱ LIST: Enables the SOUND FIELD
function.
Ȳ MENU: Displays the DVD menu.
ȴ INPUT: Changes the input mode.
ȵ 1 – 9, 0: Number buttons
ȶ ˎ (dot): (+10) Selects numbers 10
and above.
ȷ ì: Opens/closes the disc tray.
Ⱥ FAVORITES: (TOP MENU)
Displays the Top Menu.
Ȼ INFO: (DISPLAY) Displays the
playback information.
ȼ OPTIONS: Displays the amplifier
menu.
Ƚ RECALL: (BAND) Selects FM/AM.
ȿ CH +/–: Presets or tunes frequency
up/down.
Ɂ ENTER: Enters the selected item.
Notes on using the RM-VZ220
ˎ The RM-VZ220 will not perform functions that the device is not designed for. For
example, if your TV does not have the muting function, MUTING on the RM-VZ220
will not function with your TV.
ˎ The function of the buttons varies depending on settings/operating modes. The table
of “Remote Button Descriptions” shows how the RM-VZ220 generally operates for
each device in the preset mode.
ˎ If your cable set top box can control volume, be sure to set its volume to a moderate
level. If the volume on the cable set top box is turned down completely, you will not be
able to adjust your TV’s volume with the RM-VZ220.
Manufacturer’s Code List /
Lista de códigos del fabricante
English
The following tables show brand names (Brand) and their corresponding
code numbers (Code No.).
1 Press and hold SET for more than 3 seconds.
The SET indicator lights up.
While keeping SET held down, press the desired Device Select button,
then release both buttons.
2 Enter the manufacturer’s code.
The SET indicator flashes three times and turns off.
Español
La siguiente tabla muestra los nombres de las marcas (Brand) y el número
de código correspondiente (Code No.).
1 Presione y mantenga presionado el botón SET durante más de 3 segundos.
Se encenderá la luz indicadora SET.
Mientras tiene presionado el botón SET, presione el botón de selección de
dispositivo deseado y luego suelte ambos botones.
2 Ingrese el código del fabricante.
El indicador SET parpadeará tres veces y se apagará.
Brand
Code No.
Acer
01339
Action
00650
Admiral
00463
Akai
00812, 01675, 00702, 02232
Akira
01733
AOC
01365, 01589
Apex Digital
00748
Aventura
00171
Bell & Howell
00154
BPL
01543
Broksonic
00463
Carver
00054
Celebrity
00000
Coby
02306, 02345, 02348
Commercial
Solutions
01447
Crosley
00054
Curtis
02352
Curtis Mathes
00054, 00154, 00702, 01661
Daewoo
01661
Digital Lifestyles
01765
Durabrand
00463, 00171
Dynex
01463, 01810, 02049
Electroband
00000
Electrograph
01755
Electrohome
00463
Elektra
01661
Element
01687
Emerson
01864, 00154, 00463, 00171,
01661, 01394
Emprex
01765
Envision
01365, 01589
ESA
00812, 00171
Fisher
00154
Funai
00171
Gateway
01755, 01756
GE
01447, 00051, 02359
GFM
00171
Haier
01748, 01749, 02309, 02449
Harman/Kardon
00054
Hisense
00748, 01314, 02098
Hitachi
01643, 02215, 02433
iLo
01684
Infinity
00054
Insignia
01564, 00171, 02049
JBL
00054
JCB
00000
JVC
00731, 01253, 01601, 01774
KDS
01687
Kolin
01331
LG
01423, 02358
LXI
00054, 00154, 00156
MAG
01687
Magnavox
01454, 01866, 00054, 01254,
01365, 02372
Marantz
00054
Matsushita
00650
Maxent
01755
Memorex
00154, 00463, 00150
MGA
00150
Midland
00051
Brand
Code No.
Mitsubishi
01250, 00150, 00836
NAD
00156
NEC
01797
NetTV
01755
Norcent
00748, 01365, 01589
Olevia
01610, 01144, 01331
Onida
01253, 02396
Optimus
00154, 00650
Orion
00463, 01463
Panasonic
01480, 00051, 00650
PARK
02104
Penney
00156, 00051
Petters
01523
Philco
00054
Philips
01454, 00054, 00690, 01744,
02372
Pioneer
01457, 01260
Polaroid
01523, 01276, 01314, 01687
Portland
01661
Prism
00051
Proscan
01447, 02147, 02256
Proview
01687
Quasar
00051, 00650
RadioShack
00154
RCA
01447, 01781, 02187, 02247,
02403, 02429, 02434
Realistic
00154
Sampo
01755
Samsung
00812, 00702
Sansui
00463
Sanyo
00154, 01142
Sceptre
01360, 01599
Scott
01711
Sears
00054, 00154, 00156, 00171
Sharp
00818
Sony
00810, 00000
Spectroniq
01687
Squareview
00171
Superscan
00864
Supreme
00000
SVA
00748
Sylvania
01864, 00054, 00171, 01314,
01394
Symphonic
00171
Syntax
01610, 01144, 01331
Tatung
01756
TCL
02403, 02429
Technics
00051
Techwood
00051
Teknika
00054, 00150
Telefunken
00702
Toshiba
01524, 00154, 00156, 00650
TVS
00463
Venturer
01865
Videocon
01540, 01541, 02436
Vidikron
00054
Viewsonic
01755, 00864, 00885, 01627,
01742
Viore
01684, 02104, 02352
Vizio
01758, 00864, 00885, 01756
VU
02098
TV / TV
Brand
Code No.
Wards
00054
Waycon
00156
Westinghouse
01712, 00885, 01577
White
Westinghouse
00463, 01661
Wyse
01365
Zenith
00463, 01661
Brand
Code No.
Accurian
10675
Akai
10695
Allegro
10869
Apex Digital
10672, 11056
Bel Canto Design 11571
Broksonic
10695
CineVision
10869
Citizen
10695
CyberHome
11024
Daewoo
10869
Denon
10490, 11634, 12258
Disney
10675, 11270
Emerson
10591, 10675
Enterprise
10591
Funai
10675
GE
10522
GFM
10675
Go Video
10744, 10741, 10869, 11044,
11075
GoldStar
10741
Harman/Kardon
11229
Hitachi
10573, 10664
Hiteker
10672
Insignia
10675, 12428, 12596
Integra
11769, 10627, 12147
JVC
10623, 10867, 11164
Kenwood
10490
LG
10591, 10741, 10869
Magnavox
10503, 10539, 10646, 10675,
11354
Marantz
10539, 12414, 12432
Memorex
10695, 11270, 12213
Microsoft
10522, 12083
Mitsubishi
11521
NAD
10741, 12572
Olevia
12331
Onkyo
10503, 11769, 10627, 11627,
12147
Brand
Code No.
Oppo
10575, 12545
Panasonic
10490, 11579, 11641
Philco
10675
Philips
10503, 10539, 12056, 12084,
10646, 10675, 11267, 11354,
12434
Pioneer
10142, 10631, 11571, 12442
Polk Audio
10539
Presidian
10675
Proscan
10522
RCA
10522, 11769, 10822, 12213,
12587, 12592, 12594
Rio
10869
Rotel
10623
Samsung
10490, 10573, 10199, 11044,
11075, 12329, 12489
Sansui
10695
Sanyo
10695
Sharp
10630, 10675, 12250
Shinsonic
10533
Sonic Blue
10869
Sony
11633, 10533, 10864, 11033,
11070, 11431, 11516
Sylvania
10675
Symphonic
10675
TCL
12587
Technics
10490
Tivo
11503
Toshiba
10503, 11769, 10695, 11154,
11503, 12006, 12277
Urban Concepts
10503
Viore
12553
Vizio
12563
Vtrek
12587
Xbox
10522, 12083
Yamaha
10490, 10539, 10497, 10817,
12298
Zenith
10503, 10591, 10741, 10869
DVD player / Reproductor de DVD
Brand
Code No.
Accurian
10675
Apex Digital
11056
Funai
10675
Go Video
10741
JVC
11164
LG
10741
Magnavox
10646, 10675
Panasonic
10490, 11579
Philips
10646
Brand
Code No.
Pioneer
10631
RCA
10522
Samsung
10490
Sharp
10675
Sony
11033, 11070, 11431
Sylvania
10675
Toshiba
12277
Zenith
10741
DVD recorder / Grabadora de DVD
Blu-ray Disc/HD-DVD player/
Reproductor de Blu-ray Disc/HD-DVD
Brand
Code No.
Denon
12258
Insignia
10675, 12428, 12596
Integra
11769, 12147
LG
10741
Magnavox
10675
Marantz
12414, 12432
Microsoft
12083
NAD
12572
Olevia
12331
Onkyo
11769, 12147
Oppo
12545
Panasonic
11641
Brand
Code No.
Philips
12084, 12434
Pioneer
10142, 12442
RCA
11769
Samsung
10199
Sharp
12250
Sony
11516
Sylvania
10675
Toshiba
11769
Viore
12553
Vizio
12563
Xbox
12083
Yamaha
12298
RM-VZ220_U [US,ES] 4-170-642-12(1)
RM-VZ220_U [US,ES] 4-170-642-12(1)
4-170-642-12(1)
Remote Commander
RM-VZ220
©2010 Sony Corporation Printed in China
Operating Instructions
Manual de instrucciones (parte posterior)
English
For the Customers in the U.S.A.
WARNING
This equipment has been tested and found to comply with the limits for a Class B digital
device, pursuant to Part 15 of the FCC Rules. These limits are designed to provide
reasonable protection against harmful interference in a residential installation. This
equipment generates, uses and can radiate radio frequency energy and, if not installed
and used in accordance with the instructions, may cause harmful interference to radio
communications. However, there is no guarantee that interference will not occur in a
particular installation. If this equipment does cause harmful interference to radio or
television reception, which can be determined by turning the equipment off and on, the
user is encouraged to try to correct the interference by one or more of the following
measures:
ˎ Reorient or relocate the receiving antenna.
ˎ Increase the separation between the equipment and receiver.
ˎ Connect the equipment into an outlet on a circuit different from that to which the
receiver is connected.
ˎ Consult the dealer or an experienced radio/TV technician for help.
You are cautioned that any changes or modifications not expressly approved in this
manual could void your authority to operate this equipment.
Setting Up the RM-VZ220
The RM-VZ220 is preset at the factory to operate Sony brand video devices
set to any of the Device Select buttons (see the table below).
To use with non-Sony devices, or Sony devices that are not preset at the
factory, set the manufacturer’s code for each device.
Devices
Button
Factory setting*
TV
TV
Sony TV (00810)
TV, Cable set top box, Satellite
receiver, IPTV, DVD player, DVD
recorder, Blu-ray Disc player, DVR
(digital video recorder), PVR
(personal video recorder), VCR,
DVD Home Theater
CBL (SAT)
Cable set top box (non-
Sony) (51376)
VCR
Sony VCR (60032)
DVD
Sony DVD player
(11033)
*
The five-digit code is the preset manufacturer’s code.
Note
Only a TV can be assigned to the TV Device Select button. You can assign any device to
the other Device Select buttons.
Installing the batteries
Slide open the battery compartment and insert two size AA (R6) dry
batteries (not supplied).
Insert the batteries (negative end first) through the guide clamp within each
compartment as shown below.
1
2
Battery life
Under normal conditions, size AA (LR6) alkaline batteries will last up to one
year. If the RM-VZ220 does not operate properly, the batteries might be
drained. Replace both batteries with new ones.
Notes
ˎ Replace the batteries within 2 minutes after removing them, and do not press any
button when replacing the batteries. Otherwise, your code settings may be cleared.
ˎ Do not use an old battery with a new one, or mix different types of batteries together.
ˎ If the electrolyte inside the battery should leak, wipe the contaminated area of the
battery compartment with a cloth and replace the old batteries with new ones. To
prevent electrolyte from leaking, remove the batteries when you plan not to use the
RM-VZ220 for a long period of time.
Specifications
Operating distance
Approx. 11 m (36 ft) (varies depending on devices of
different manufacturers)
Power requirements
Two size AA (R6) dry batteries (not supplied)
Battery life
Approx. 1 year when using size AA (LR6) alkaline batteries
(varies depending on frequency of button use - up to approx.
300 times per day.)
Dimensions
Approx. 53 Ч 213 Ч 27 mm (2
1
/
8
Ч 8
1
/
2
Ч 1
1
/
8
in.)
(w/h/d)
Mass
Approx. 100 g (3.5 oz) (not including batteries)
Design and specifications are subject to change without notice.
Troubleshooting
If you have problems setting up or using the RM-VZ220:
ˎ Carefully perform the setup procedure of “Startup Guide.” If the RM-VZ220 does not
work, try repeating the setup procedure using another manufacturer’s code (if listed
for your device). If you still cannot operate the RM-VZ220, try the Search function
(see “Searching for the correct code”).
ˎ Aim the RM-VZ220 directly at the device.
ˎ Remove any obstacles in the path between the RM-VZ220 and the device.
ˎ Make sure you have pressed the correct Device Select button.
ˎ Check that the device has infrared remote capability. For example, if your device did
not come with a remote control, it probably is not capable of being controlled by the
RM-VZ220.
ˎ The batteries are weak, or not inserted correctly. Replace them with new ones or insert
them correctly.
For the customers in the U.S.A.
Customer Support Information
After you have read through this manual, if you still cannot get the RM-VZ220 to work
properly, call the Sony Customer Support Helpline at
1-800-822-2217.
Startup Guide
This guide shows you how to set up and use the RM-VZ220 to operate your devices.
If your Sony device has already been preset, see “Operate the device.”
Set the manufacturer’s code
Example: To set up a Philips TV
1
Find the manufacturer’s code in “Manufacturer’s Code List.”
Manufacturer’s Code List /
Lista de códigos del fabricante
English
The following tables show brand names (Brand) and their corresponding
code numbers (Code No.).
1 Press and hold SET for more than 3 seconds.
The SET indicator lights up.
While keeping SET held down, press the desired Device Select button,
then release both buttons.
2 Enter the manufacturer’s code.
The SET indicator flashes three times and turns off.
Español
La siguiente tabla muestra los nombres de las marcas (Brand) y el número
de código correspondiente (Code No.).
1 Presione y mantenga presionado el botón SET durante más de 3 segundos.
Se encenderá la luz indicadora SET.
Mientras tiene presionado el botón SET, presione el botón de selección de
dispositivo deseado y luego suelte ambos botones.
2 Ingrese el código del fabricante.
El indicador SET parpadeará tres veces y se apagará.
Brand
Code No.
Sony
00810, 00000
Acer
01339
Action
00650
Admiral
00463
Akai
00812, 01675, 00702, 02232
Akira
01733
AOC
01365, 01589
Apex Digital
00748
Aventura
00171
Bell & Howell
00154
BPL
01543
Broksonic
00463
Carver
00054
Celebrity
00000
Coby
02306, 02345, 02348
Commercial
Solutions
01447
Crosley
00054
Curtis
02352
Curtis Mathes
00054, 00154, 00702, 01661
Daewoo
01661
Digital Lifestyles
01765
Durabrand
00463, 00171
Dynex
01463, 01810, 02049
Electroband
00000
Electrograph
01755
Electrohome
00463
Elektra
01661
Element
01687
Emerson
01864, 00154, 00463, 00171,
01661, 01394
Emprex
01765
Envision
01365, 01589
ESA
00812, 00171
Fisher
00154
Funai
00171
Gateway
01755, 01756
GE
01447, 00051, 02359
GFM
00171
Haier
01748, 01749, 02309, 02449
Harman/Kardon
00054
Hisense
00748, 01314, 02098
Hitachi
01643, 02215, 02433
iLo
01684
Infinity
00054
Insignia
01564, 00171, 02049
JBL
00054
JCB
00000
JVC
00731, 01253, 01601, 01774
KDS
01687
Kolin
01331
LG
01423, 02358
LXI
00054, 00154, 00156
MAG
01687
Magnavox
01454, 01866, 00054, 01254,
01365, 02372
Marantz
00054
Matsushita
00650
Maxent
01755
Memorex
00154, 00463, 00150
MGA
00150
Brand
Code No.
Midland
00051
Mitsubishi
01250, 00150, 00836
NAD
00156
NEC
01797
NetTV
01755
Norcent
00748, 01365, 01589
Olevia
01610, 01144, 01331
Onida
01253, 02396
Optimus
00154, 00650
Orion
00463, 01463
Panasonic
01480, 00051, 00650
PARK
02104
Penney
00156, 00051
Petters
01523
Philco
00054
Philips
01454, 00054, 00690, 01744,
02372
Pioneer
01457, 01260
Polaroid
01523, 01276, 01314, 01687
Portland
01661
Prism
00051
Proscan
01447, 02147, 02256
Proview
01687
Quasar
00051, 00650
RadioShack
00154
RCA
01447, 01781, 02187, 02247,
02403, 02429, 02434
Realistic
00154
Sampo
01755
Samsung
00812, 00702
Sansui
00463
Sanyo
00154, 01142
Sceptre
01360, 01599
Scott
01711
Sears
00054, 00154, 00156, 00171
Sharp
00818
Spectroniq
01687
Squareview
00171
Superscan
00864
Supreme
00000
SVA
00748
Sylvania
01864, 00054, 00171, 01314,
01394
Symphonic
00171
Syntax
01610, 01144, 01331
Tatung
01756
TCL
02403, 02429
Technics
00051
Techwood
00051
Teknika
00054, 00150
Telefunken
00702
Toshiba
01524, 00154, 00156, 00650
TVS
00463
Venturer
01865
Videocon
01540, 01541, 02436
Vidikron
00054
Viewsonic
01755, 00864, 00885, 01627,
01742
Viore
01684, 02104, 02352
Vizio
01758, 00864, 00885, 01756
VU
02098
TV / TV
Brand
Code No.
Wards
00054
Waycon
00156
Westinghouse
01712, 00885, 01577
White
Westinghouse
00463, 01661
Wyse
01365
Zenith
00463, 01661
Brand
Code No.
Sony
11633, 10533, 10864, 11033,
11070, 11431, 11516
Accurian
10675
Akai
10695
Allegro
10869
Apex Digital
10672, 11056
Bel Canto Design 11571
Broksonic
10695
CineVision
10869
Citizen
10695
CyberHome
11024
Daewoo
10869
Denon
10490, 11634, 12258
Disney
10675, 11270
Emerson
10591, 10675
Enterprise
10591
Funai
10675
GE
10522
GFM
10675
Go Video
10744, 10741, 10869, 11044,
11075
GoldStar
10741
Harman/Kardon
11229
Hitachi
10573, 10664
Hiteker
10672
Insignia
10675, 12428, 12596
Integra
11769, 10627, 12147
JVC
10623, 10867, 11164
Kenwood
10490
LG
10591, 10741, 10869
Magnavox
10503, 10539, 10646, 10675,
11354
Marantz
10539, 12414, 12432
Memorex
10695, 11270, 12213
Microsoft
10522, 12083
Mitsubishi
11521
NAD
10741, 12572
Olevia
12331
Brand
Code No.
Onkyo
10503, 11769, 10627, 11627,
12147
Oppo
10575, 12545
Panasonic
10490, 11579, 11641
Philco
10675
Philips
10503, 10539, 12056, 12084,
10646, 10675, 11267, 11354,
12434
Pioneer
10142, 10631, 11571, 12442
Polk Audio
10539
Presidian
10675
Proscan
10522
RCA
10522, 11769, 10822, 12213,
12587, 12592, 12594
Rio
10869
Rotel
10623
Samsung
10490, 10573, 10199, 11044,
11075, 12329, 12489
Sansui
10695
Sanyo
10695
Sharp
10630, 10675, 12250
Shinsonic
10533
Sonic Blue
10869
Sylvania
10675
Symphonic
10675
TCL
12587
Technics
10490
Tivo
11503
Toshiba
10503, 11769, 10695, 11154,
11503, 12006, 12277
Urban Concepts
10503
Viore
12553
Vizio
12563
Vtrek
12587
Xbox
10522, 12083
Yamaha
10490, 10539, 10497, 10817,
12298
Zenith
10503, 10591, 10741, 10869
DVD player / Reproductor de DVD
Brand
Code No.
Sony
11033, 11070, 11431
Accurian
10675
Apex Digital
11056
Funai
10675
Go Video
10741
JVC
11164
LG
10741
Magnavox
10646, 10675
Panasonic
10490, 11579
Brand
Code No.
Philips
10646
Pioneer
10631
RCA
10522
Samsung
10490
Sharp
10675
Sylvania
10675
Toshiba
12277
Zenith
10741
DVD recorder / Grabadora de DVD
Blu-ray Disc/HD-DVD player/
Reproductor de Blu-ray Disc/HD-DVD
Brand
Code No.
Sony
11516
Denon
12258
Insignia
10675, 12428, 12596
Integra
11769, 12147
LG
10741
Magnavox
10675
Marantz
12414, 12432
Microsoft
12083
NAD
12572
Olevia
12331
Onkyo
11769, 12147
Oppo
12545
Brand
Code No.
Panasonic
11641
Philips
12084, 12434
Pioneer
10142, 12442
RCA
11769
Samsung
10199
Sharp
12250
Sylvania
10675
Toshiba
11769
Viore
12553
Vizio
12563
Xbox
12083
Yamaha
12298
Brand
Code No.
Sony
00810, 00000
Acer
01339
Action
00650
Brand
Code No.
Midland
00051
Mitsubishi
01250, 00150, 00836
NAD
00156
TV / TV
BPL
01543
Broksonic
00463
Carver
00054
Celebrity
00000
Coby
02306, 02345, 02348
Commercial
Solutions
01447
Crosley
00054
Curtis
02352
Curtis Mathes
00054, 00154, 00702, 01661
Daewoo
01661
Digital Lifestyles
01765
Durabrand
00463, 00171
Panasonic
01480, 00051, 00650
PARK
02104
Penney
00156, 00051
Petters
01523
Philco
00054
Philips
01454, 00054, 00690, 01744,
02372
Pioneer
01457, 01260
Polaroid
01523, 01276, 01314, 01687
Portland
01661
Prism
00051
Proscan
01447, 02147, 02256
Proview
01687
If your device is not listed, try the Search function (see “Searching for the correct code”).
2
Press and hold SET for more than 3 seconds.
The SET indicator lights up.
While keeping SET held down, press
the desired Device Select button,
then release both buttons.
3
Enter the manufacturer’s code (01454).
The SET indicator flashes three times and
turns off.
Operate the device
1
Aim the RM-VZ220 directly at the device.
2
Press the Device Select button for the
device you want to operate.
3
Press POWER to turn on the device.
4
Press buttons on the RM-VZ220 to check that they function.
See “Remote Button Descriptions” for the functions of buttons for each device.
If the RM-VZ220 does not seem to be working…
ˎ Check that you have set the correct manufacturer’s code.
ˎ Try repeating the setup procedure using another manufacturer’s code (if listed for your device).
If you still cannot operate the RM-VZ220 after trying all the listed codes, try the Search function (see “Searching
for the correct code”).
Notes
ˎ If the setting is incomplete,
the SET indicator flashes once
and the indicators turn off.
Start again from the
beginning.
ˎ If no operations are
performed for 10 seconds
while setting, the setting will
be canceled, and must be
restarted.
ˎ To cancel the process, press
SET any time. The SET
indicator turns off.
SET
POWER
Device
Select
buttons
Number
buttons
The SET indicator
lights up.
Searching for the correct code
You can set the manufacturer’s code using the Search function.
1 Power on the device with its power switch.
2 Aim the RM-VZ220 at the device you want to set.
3 Press and hold SET for more than 3 seconds.
The SET indicator lights up.
While keeping SET held down, press the desired Device Select button,
then release both buttons.
4 Enter 9 - 2 - 2 using the number buttons.
The SET indicator flashes three times.
5 Press and hold à to start searching.
When the device turns off, release the button.
If you overshoot the required code, you can search for the next or previous
code using the ß or ù button.
6 Press .
The SET indicator flashes three times and turns off.
7 Check if the code number works correctly (see “Remote Button
Descriptions”).
If you still cannot operate the device, repeat steps to search for another
code that works for most functions of your device.
Checking the manufacturer’s code you have set
1 Press and hold SET for more than 3 seconds.
The SET indicator lights up.
While keeping SET held down, press the desired Device Select button,
then release both buttons.
2 Enter 9 - 3 - 3 using the number buttons.
The SET indicator flashes three times.
3 Press à.
4 When the SET indicator starts flashing, count the number of flashes.
Short flash(es) indicate which digit (first, second, etc.), followed by long
flash(es) to indicate the digit number (i.e., 2 long flashes represent the
number 2). “0” is indicated by rapid flashing.
Determine the 5-digit code number this way. To recheck, press à.
5 Press SET to finish.
Clearing the automatic power-on control (Sony
devices only)
The Device Select buttons are preset to automatically turn on a device when
pressed.
To cancel the function:
1 Press and hold SET for more than 3 seconds.
The SET indicator lights up.
While keeping SET held down, press , then release both buttons.
2 Enter 9 - 7 - 7 using the number buttons.
The SET indicator flashes three times.
3 Press the desired Device Select button.
The SET indicator flashes three times and turns off.
To set the function again, perform the same procedure above.
Restoring the factory settings
You can clear all the settings and reset the RM-VZ220 to its factory settings.
1 Press and hold SET for more than 3 seconds.
The SET indicator lights up.
While keeping SET held down, press , then release both buttons.
2 Enter 9 - 0 - 0 using the number buttons.
The SET indicator flashes three times.
To cancel, press any button except .
3 Press .
The SET indicator flashes three times and turns off.
Remote Button Descriptions
General
ȩȪ SET: Press to set up the RM-VZ220. The indicator lights or flashes while
setting.
ȫ Device Select buttons: Press to select the device to operate.
Ȯ GUIDE: Displays the program guide (EPG).
ȯ j//V/p/ : Moves the cursor to select a menu item/enters the selected item.
ȱ RETURN: Returns to the previous display/exits the menu.
ȳ VOL +/–: Turns the volume up/down.
ȸ POWER: Turns the selected device on and off.
Ⱦ MUTING: Mutes the volume. Press again to turn muting off.
ɀ SLEEP: Enables the Sleep function (when available).
The number 5, CH+, and à buttons each have a tactile dot for ease of use.
The GUIDE and RETURN buttons do not work for a VCR.
Note on the VOL+/– and MUTING buttons
When a TV or other video device is selected, the TV’s volume is controlled. When a
DVD Home Theater is selected, its volume can be controlled.
TV
Ȭ Ã: VIDEO 1 input
: VIDEO 2 input
: HDMI input
Ñ: RGB input
ù: (PIP INPUT) Changes the
input mode of the “window”
picture.
à: (PIP) Turns the “window”
picture on and off.
ß: (PIP MOVE) Moves the
location of the “window” picture.
ê: (PIP STILL) Freezes the
“window” picture.
Ą: (PIP SWAP) Switches between
“main” and “window” picture.
ȭ A: Red button
B: Green button
C: Yellow button
D: Blue button
Ȱ LIST: (CAPTION) Displays closed
captioning.
Ȳ MENU: Calls up the menu display.
ȴ INPUT: Changes the input mode.
ȵȶɁ 1 – 9, 0, ENTER, ˎ (dot):
Changes the channel. For example,
to change to channel 5, press 0 and
5 (or, press 5 and ENTER).
ȹ PAGE +/–: (PIP CH +/–) Changes
the channel up/down in the
“window” picture.
Ⱥ FAVORITES: Enables the Favorite
function.
Ȼ INFO: Displays program
information.
ȼ OPTIONS: Displays the options
menu.
Ƚ RECALL: Selects the channel
previously selected.
ȿ CH +/–: Switches the channel up/
down.
Cable set top box/IPTV
Ȭ Ã: Proceeds to the previous
location.
: Briefly replays the scene
(Flash –).
: Briefly fast forwards the
scene (Flash +).
Ñ: Proceeds to the next location.
ù: Fast reverses.
à: Plays.
ß: Fast forwards.
Ć: Records.
ê: Pauses.
Ą: Stops.
ȭ A, B, C buttons
D: (Live TV) Displays Master
Guide.
Ȱ LIST: Displays the title of recorded
program.
Ȳ MENU: Calls up the menu display.
ȴ INPUT: Changes the input mode.
ȵ ȶ Ɂ 1 – 9, 0, ENTER, ˎ (dot):
Changes the channel. For example,
to change to channel 5, press 0 and
5 (or, press 5 and ENTER).
ȹ PAGE +/–: Page up/down
Ⱥ FAVORITES: Enables the Favorite
function.
Ȼ INFO: Displays program
information.
ȼ OPTIONS: Displays the options
menu.
Ƚ RECALL: Switches between the
current and previous channel.
ȿ CH +/–: Switches the channel up/
down.
Satellite receiver
Ȭ Ã: Proceeds to the previous
location.
: Briefly replays the scene
(Flash –).
: Briefly fast forwards the
scene (Flash +).
Ñ: Proceeds to the next location.
ù: Fast reverses.
à: Plays.
ß: Fast forwards.
Ć: Records.
ê: Pauses.
Ą: Stops.
ȭ A: Red button
B: Green button
C: Yellow button
D: Blue button
Ȱ LIST: Displays the title of recorded
program/PVR menu.
Ȳ MENU: Calls up the menu display.
ȴ INPUT: (TV/SAT) Switches the
output between SAT and TV.
ȵ ȶ Ɂ 1 – 9, 0, ENTER, ˎ (dot):
Changes the channel. For example,
to change to channel 5, press 0 and
5 (or, press 5 and ENTER).
ȹ PAGE +/–: Page up/down
Ⱥ FAVORITES: Enables the Favorite
function.
Ȼ INFO: Displays program
information.
ȼ OPTIONS: Displays the Satellite
dish menu/Station Index.
Ƚ RECALL: Tunes to the last tuned
station.
ȿ CH +/–: Switches the channel up/
down.
VCR
Ȭ ù: Rewinds.
à: Plays.
ß: Fast forwards.
Ć: Records.
ê: Pauses.
Ą: Stops.
ȴ INPUT: Changes the input mode.
ȵ 1 – 9, 0: Number buttons
ȷ ì: Ejects a tape.
Ȼ INFO: (DISPLAY) Displays the
playback information.
ȼ OPTIONS: (ANT/SW) Switches
the antenna output.
Ƚ RECALL: (DRIVE SELECT) Selects
the deck.
ȿ CH +/–: Switches the channel up/
down.
Ɂ ENTER: Enters the selected item.
DVD player/recorder
Ȭ Ã: Skips to the previous
chapter/track.
: Briefly replays the scene
(Flash –).
: Briefly fast forwards the
scene (Flash +).
Ñ: Skips to the next chapter/
track.
ù: Fast reverses.
à: Plays.
ß: Fast forwards.
Ć: Records (for DVD recorder).
ê: Pauses.
Ą: Stops.
ȭ A: (SET UP) Calls up the system/
setup menu.
B: (SUBTITLE) Switches the
subtitle.
C: (AUDIO) Changes the sound.
D: (CLEAR) Clears the setting.
Ȱ LIST: Displays the Title List.
Ȳ MENU: Displays the DVD menu.
ȴ INPUT: Changes the input mode.
ȵ 1 – 9, 0: Number buttons
ȶ ˎ (dot): (+10) Selects numbers 10
and above.
ȷ ì: Opens/closes the disc tray.
ȹ PAGE +: (DVD) Selects the DVD
drive.
PAGE –: (HDD) Selects the
internal HDD (hard disk drive).
Ⱥ FAVORITES: (TOP MENU)
Displays the Top Menu.
Ȼ INFO: (DISPLAY) Displays the
playback information.
ȼ OPTIONS: Displays the options
menu.
Ƚ RECALL: (DRIVE SELECT)
Switches between HDD and DVD.
ȿ CH +/–: Switches the channel up/
down (for DVD recorder).
Ɂ ENTER: Enters the selected item.
Blu-ray Disc/HD-DVD player
Ȭ Ã: Skips to the previous
chapter/track.
: Briefly replays the scene
(Flash –).
: Briefly fast forwards the
scene (Flash +).
Ñ: Skips to the next chapter/
track.
ù: Fast reverses.
à: Plays.
ß: Fast forwards.
Ć: Records (for BD recorder).
ê: Pauses.
Ą: Stops.
ȭ A: (SET UP) Calls up the system/
setup menu.
B: (SUBTITLE) Switches the
subtitle.
C: (AUDIO) Changes the sound.
D: (CLEAR) Clears the setting.
Ȳ MENU: Displays the Pop-up Menu/
Disc Menu.
ȴ INPUT: Changes the input mode.
ȵ 1 – 9, 0: Number buttons
ȶ ˎ (dot): (+10) Selects numbers 10
and above.
ȷ ì: Opens/closes the disc tray.
ȹ PAGE +: (BD) Selects the BD drive.
PAGE –: (HDD) Selects the
internal HDD (hard disk drive).
Ⱥ FAVORITES: (TOP MENU)
Displays the Top Menu.
Ȼ INFO: (DISPLAY) Displays the
playback information.
ȼ OPTIONS: Displays the options
menu.
Ɂ ENTER: Enters the selected item.
DVR (digital video recorder)/PVR (personal video recorder)
Ȭ Ã: Proceeds to the previous
location.
: Briefly replays the scene
(Flash –).
: Briefly fast forwards the
scene (Flash +).
Ñ: Proceeds to the next location.
ù: Fast reverses.
à: Plays.
ß: Fast forwards.
Ć: Records.
ê: Pauses.
Ą: Stops.
ȭ A: (REPLAY*) Enables the Replay
function for DVR/Replay TV.
B: (Live TV*) Displays Master
Guide.
Ȱ LIST: Displays the title of recorded
program.
Ȳ MENU: Calls up the menu display.
ȴ INPUT: Changes the input mode.
ȵ 1 – 9, 0: Number buttons
ȶ ˎ (dot): (+10) Selects numbers 10
and above.
ȷ ì: Opens/closes the disc tray.
ȹ PAGE +/–: Page up/down,
Thumbs* up/down
Ȼ INFO: (DISPLAY) Displays the
playback information.
Ƚ RECALL: Selects the channel
previously selected.
ȿ CH +/–: Switches the channel up/
down.
Ɂ ENTER: Enters the selected item.
*
These buttons correspond to TiVo
service or the Replay service. Refer to
its instruction manual for details.
DVD Home Theater
Ȭ Ã: Skips to the previous
chapter/track.
: Briefly replays the scene
(Flash –).
: Briefly fast forwards the
scene (Flash +).
Ñ: Skips to the next chapter/
track.
ù: Fast reverses.
à: Plays.
ß: Fast forwards.
Ć: Records.
ê: Pauses.
Ą: Stops.
ȭ A: (SET UP) Calls up the system/
setup menu.
B: (SUBTITLE) Switches the
subtitle.
C: (AUDIO) Changes the sound.
D: (CLEAR) Clears the setting.
Ȱ LIST: Enables the SOUND FIELD
function.
Ȳ MENU: Displays the DVD menu.
ȴ INPUT: Changes the input mode.
ȵ 1 – 9, 0: Number buttons
ȶ ˎ (dot): (+10) Selects numbers 10
and above.
ȷ ì: Opens/closes the disc tray.
Ⱥ FAVORITES: (TOP MENU)
Displays the Top Menu.
Ȼ INFO: (DISPLAY) Displays the
playback information.
ȼ OPTIONS: Displays the amplifier
menu.
Ƚ RECALL: (BAND) Selects FM/AM.
ȿ CH +/–: Presets or tunes frequency
up/down.
Ɂ ENTER: Enters the selected item.
Notes on using the RM-VZ220
ˎ The RM-VZ220 will not perform functions that the device is not designed for. For
example, if your TV does not have the muting function, MUTING on the RM-VZ220
will not function with your TV.
ˎ The function of the buttons varies depending on settings/operating modes. The table
of “Remote Button Descriptions” shows how the RM-VZ220 generally operates for
each device in the preset mode.
ˎ If your cable set top box can control volume, be sure to set its volume to a moderate
level. If the volume on the cable set top box is turned down completely, you will not be
able to adjust your TV’s volume with the RM-VZ220.
Manufacturer’s Code List /
Lista de códigos del fabricante
English
The following tables show brand names (Brand) and their corresponding
code numbers (Code No.).
1 Press and hold SET for more than 3 seconds.
The SET indicator lights up.
While keeping SET held down, press the desired Device Select button,
then release both buttons.
2 Enter the manufacturer’s code.
The SET indicator flashes three times and turns off.
Español
La siguiente tabla muestra los nombres de las marcas (Brand) y el número
de código correspondiente (Code No.).
1 Presione y mantenga presionado el botón SET durante más de 3 segundos.
Se encenderá la luz indicadora SET.
Mientras tiene presionado el botón SET, presione el botón de selección de
dispositivo deseado y luego suelte ambos botones.
2 Ingrese el código del fabricante.
El indicador SET parpadeará tres veces y se apagará.
Brand
Code No.
Acer
01339
Action
00650
Admiral
00463
Akai
00812, 01675, 00702, 02232
Akira
01733
AOC
01365, 01589
Apex Digital
00748
Aventura
00171
Bell & Howell
00154
BPL
01543
Broksonic
00463
Carver
00054
Celebrity
00000
Coby
02306, 02345, 02348
Commercial
Solutions
01447
Crosley
00054
Curtis
02352
Curtis Mathes
00054, 00154, 00702, 01661
Daewoo
01661
Digital Lifestyles
01765
Durabrand
00463, 00171
Dynex
01463, 01810, 02049
Electroband
00000
Electrograph
01755
Electrohome
00463
Elektra
01661
Element
01687
Emerson
01864, 00154, 00463, 00171,
01661, 01394
Emprex
01765
Envision
01365, 01589
ESA
00812, 00171
Fisher
00154
Funai
00171
Gateway
01755, 01756
GE
01447, 00051, 02359
GFM
00171
Haier
01748, 01749, 02309, 02449
Harman/Kardon
00054
Hisense
00748, 01314, 02098
Hitachi
01643, 02215, 02433
iLo
01684
Infinity
00054
Insignia
01564, 00171, 02049
JBL
00054
JCB
00000
JVC
00731, 01253, 01601, 01774
KDS
01687
Kolin
01331
LG
01423, 02358
LXI
00054, 00154, 00156
MAG
01687
Magnavox
01454, 01866, 00054, 01254,
01365, 02372
Marantz
00054
Matsushita
00650
Maxent
01755
Memorex
00154, 00463, 00150
MGA
00150
Midland
00051
Brand
Code No.
Mitsubishi
01250, 00150, 00836
NAD
00156
NEC
01797
NetTV
01755
Norcent
00748, 01365, 01589
Olevia
01610, 01144, 01331
Onida
01253, 02396
Optimus
00154, 00650
Orion
00463, 01463
Panasonic
01480, 00051, 00650
PARK
02104
Penney
00156, 00051
Petters
01523
Philco
00054
Philips
01454, 00054, 00690, 01744,
02372
Pioneer
01457, 01260
Polaroid
01523, 01276, 01314, 01687
Portland
01661
Prism
00051
Proscan
01447, 02147, 02256
Proview
01687
Quasar
00051, 00650
RadioShack
00154
RCA
01447, 01781, 02187, 02247,
02403, 02429, 02434
Realistic
00154
Sampo
01755
Samsung
00812, 00702
Sansui
00463
Sanyo
00154, 01142
Sceptre
01360, 01599
Scott
01711
Sears
00054, 00154, 00156, 00171
Sharp
00818
Sony
00810, 00000
Spectroniq
01687
Squareview
00171
Superscan
00864
Supreme
00000
SVA
00748
Sylvania
01864, 00054, 00171, 01314,
01394
Symphonic
00171
Syntax
01610, 01144, 01331
Tatung
01756
TCL
02403, 02429
Technics
00051
Techwood
00051
Teknika
00054, 00150
Telefunken
00702
Toshiba
01524, 00154, 00156, 00650
TVS
00463
Venturer
01865
Videocon
01540, 01541, 02436
Vidikron
00054
Viewsonic
01755, 00864, 00885, 01627,
01742
Viore
01684, 02104, 02352
Vizio
01758, 00864, 00885, 01756
VU
02098
TV / TV
Brand
Code No.
Wards
00054
Waycon
00156
Westinghouse
01712, 00885, 01577
White
Westinghouse
00463, 01661
Wyse
01365
Zenith
00463, 01661
Brand
Code No.
Accurian
10675
Akai
10695
Allegro
10869
Apex Digital
10672, 11056
Bel Canto Design 11571
Broksonic
10695
CineVision
10869
Citizen
10695
CyberHome
11024
Daewoo
10869
Denon
10490, 11634, 12258
Disney
10675, 11270
Emerson
10591, 10675
Enterprise
10591
Funai
10675
GE
10522
GFM
10675
Go Video
10744, 10741, 10869, 11044,
11075
GoldStar
10741
Harman/Kardon
11229
Hitachi
10573, 10664
Hiteker
10672
Insignia
10675, 12428, 12596
Integra
11769, 10627, 12147
JVC
10623, 10867, 11164
Kenwood
10490
LG
10591, 10741, 10869
Magnavox
10503, 10539, 10646, 10675,
11354
Marantz
10539, 12414, 12432
Memorex
10695, 11270, 12213
Microsoft
10522, 12083
Mitsubishi
11521
NAD
10741, 12572
Olevia
12331
Onkyo
10503, 11769, 10627, 11627,
12147
Brand
Code No.
Oppo
10575, 12545
Panasonic
10490, 11579, 11641
Philco
10675
Philips
10503, 10539, 12056, 12084,
10646, 10675, 11267, 11354,
12434
Pioneer
10142, 10631, 11571, 12442
Polk Audio
10539
Presidian
10675
Proscan
10522
RCA
10522, 11769, 10822, 12213,
12587, 12592, 12594
Rio
10869
Rotel
10623
Samsung
10490, 10573, 10199, 11044,
11075, 12329, 12489
Sansui
10695
Sanyo
10695
Sharp
10630, 10675, 12250
Shinsonic
10533
Sonic Blue
10869
Sony
11633, 10533, 10864, 11033,
11070, 11431, 11516
Sylvania
10675
Symphonic
10675
TCL
12587
Technics
10490
Tivo
11503
Toshiba
10503, 11769, 10695, 11154,
11503, 12006, 12277
Urban Concepts
10503
Viore
12553
Vizio
12563
Vtrek
12587
Xbox
10522, 12083
Yamaha
10490, 10539, 10497, 10817,
12298
Zenith
10503, 10591, 10741, 10869
DVD player / Reproductor de DVD
Brand
Code No.
Accurian
10675
Apex Digital
11056
Funai
10675
Go Video
10741
JVC
11164
LG
10741
Magnavox
10646, 10675
Panasonic
10490, 11579
Philips
10646
Brand
Code No.
Pioneer
10631
RCA
10522
Samsung
10490
Sharp
10675
Sony
11033, 11070, 11431
Sylvania
10675
Toshiba
12277
Zenith
10741
DVD recorder / Grabadora de DVD
Blu-ray Disc/HD-DVD player/
Reproductor de Blu-ray Disc/HD-DVD
Brand
Code No.
Denon
12258
Insignia
10675, 12428, 12596
Integra
11769, 12147
LG
10741
Magnavox
10675
Marantz
12414, 12432
Microsoft
12083
NAD
12572
Olevia
12331
Onkyo
11769, 12147
Oppo
12545
Panasonic
11641
Brand
Code No.
Philips
12084, 12434
Pioneer
10142, 12442
RCA
11769
Samsung
10199
Sharp
12250
Sony
11516
Sylvania
10675
Toshiba
11769
Viore
12553
Vizio
12563
Xbox
12083
Yamaha
12298
Si su dispositivo no figura en la lista, intente con la función Búsqueda (consulte “Búsqueda del
código del fabricante”).
2
Presione y mantenga presionado el
botón SET durante más de 3 segundos.
Se encenderá la luz indicadora SET.
Mientras tiene presionado el botón
SET, presione el botón de selección
de dispositivo deseado y luego suelte
ambos botones.
3
Ingrese el código del fabricante (01454).
El indicador SET parpadeará tres veces y se
apagará.
Funcionamiento del dispositivo
1
Apunte el RM-VZ220 directamente al dispositivo.
2
Presione el botón de selección de dispositivo
del dispositivo que desee hacer funcionar.
3
Presione POWER para encender el dispositivo.
4
Presione los botones en el RM-VZ220 para comprobar que funcionan.
Consulte “Descripción de los botones del control remoto” para conocer las funciones de los botones para cada
dispositivo.
Si el RM-VZ220 parece no estar funcionando…
Compruebe que haya establecido el código del fabricante correcto.
Intente repetir el procedimiento de configuración usando otro código de fabricante (si hay otros en la
enumeración de códigos de su dispositivo).
Si sigue sin poder operar el RM-VZ220 después de probar todos los códigos de la lista, intente con la función
Búsqueda (consulte “Búsqueda del código del fabricante”).
Notas
Si la configuración está
incompleta, el indicador SET
parpadeará una vez y los
indicadores se apagarán.
Vuelva a comenzar desde el
principio.
Si no se realizan operaciones
en el transcurso de 10
segundos cuando se está
realizando la configuración, la
configuración se cancelará y
deberá volver a iniciarse.
Para cancelar el proceso,
presione SET en cualquier
momento. El indicador SET se
apaga.
SET
POWER
Botones de
selección
de
dispositivo
Botones
numéricos
Se encenderá la luz
indicadora SET.
Búsqueda del código del fabricante
Puede configurar el código del fabricante correcto usando la función
Búsqueda.
1 Encienda el dispositivo con su botón de encendido.
2 Apunte el RM-VZ220 al dispositivo que desea configurar.
3 Presione y mantenga presionado el botón SET durante más de 3 segundos.
Se encenderá la luz indicadora SET.
Mientras tiene presionado el botón SET, presione el botón de selección de
dispositivo deseado y luego suelte ambos botones.
4 Ingrese 9 - 2 - 2 usando los botones con números.
El indicador SET parpadea tres veces.
5 Presione y mantenga presionado para comenzar a buscar.
Cuando el dispositivo se apague suelte el botón.
Si se pasa del código que necesita, puede buscar el código anterior o
siguiente con los botones o .
6 Presione .
El indicador SET parpadeará tres veces y se apagará.
7 Compruebe si el número de código funciona correctamente (consulte
“Descripción de los botones del control remoto”).
Si sigue sin poder operar el dispositivo, repita los pasos para buscar otro
código que funcione con la mayoría de las funciones de su dispositivo.
Comprobación del código del fabricante que
configuró
1 Presione y mantenga presionado el botón SET durante más de 3 segundos.
Se encenderá la luz indicadora SET.
Mientras tiene presionado el botón SET, presione el botón de selección de
dispositivo deseado y luego suelte ambos botones.
2 Ingrese 9 - 3 - 3 usando los botones con números.
El indicador SET parpadea tres veces.
3 Presione .
4 Cuando el indicador SET comience a parpadear, cuente el número de
parpadeos.
Los parpadeos cortos indican el dígito (primero, segundo, etc.), seguidos
de los parpadeos largos que indican el número del dígito (p. ej., 2
parpadeos largos representan el número 2). Los parpadeos rápidos
representan el “0”.
Determine de esta forma el número de código de 5 dígitos. Para chequear
nuevamente, presione .
5 Presione SET para finalizar.
Para anular el control de encendido automático
(solamente de los dispositivos Sony)
Los botones de selección del dispositivo están configurados para encender
un dispositivo en forma automática cuando se presionan.
Para cancelar la función:
1 Presione y mantenga presionado SET durante más de 3 segundos.
Se encenderá la luz indicadora SET.
Mientras mantiene presionado SET, presione , luego suelte ambos
botones.
2 Ingrese 9 - 7 - 7 usando los botones con números.
El indicador SET parpadea tres veces.
3 Presione el botón de selección de dispositivos que desea.
El indicador SET parpadeará tres veces y se apagará.
Para volver a establecer la función, siga el mismo procedimiento descrito
arriba.
Recuperación de la configuración de fábrica
Puede eliminar todas las configuraciones y restablecer la configuración de
fábrica del RM-VZ220.
1 Presione y mantenga presionado SET durante más de 3 segundos.
Se encenderá la luz indicadora SET.
Mientras mantiene presionado SET, presione , luego suelte ambos
botones.
2 Ingrese 9 - 0 - 0 usando los botones con números.
El indicador SET parpadea tres veces.
Para cancelar presione cualquier botón excepto .
3 Presione .
El indicador SET parpadeará tres veces y se apagará.
Decodificador de cable/IPTV
: Va a la ubicación anterior.
: Muestra otra vez brevemente
la escena (Flash –).
: Avanza brevemente la escena
(Flash +).
: Va a la siguiente ubicación.
: Rebobina rápidamente.
: Reproduce.
: Avanza rápidamente.
: Graba.
: Pausa.
: Detiene.
Botones A, B, C
D: (Live TV) Muestra la guía
maestra.
LIST: Muestra el título del
programa grabado.
MENU: Muestra el menú.
INPUT: Cambia el modo de
entrada.
1 – 9, 0, ENTER, (punto):
Cambia de canal. Por ejemplo, para
cambiar al canal 5, presione 0 y 5
(o presione 5 y ENTER).
PAGE +/–: Avanza/retrocede la
página.
FAVORITES: Habilita la función
Favorito.
INFO: Muestra información de
programación.
OPTIONS: Muestra el menú de
opciones.
RECALL: Cambia entre el canal
actual y el anterior.
CH +/–: Cambia el canal hacia
arriba/abajo.
Receptor de satélite
: Va a la ubicación anterior.
: Muestra otra vez brevemente
la escena (Flash –).
: Avanza brevemente la escena
(Flash +).
: Va a la siguiente ubicación.
: Rebobina rápidamente.
: Reproduce.
: Avanza rápidamente.
: Graba.
: Pausa.
: Detiene.
A: Botón rojo
B: Botón verde
C: Botón amarillo
D: Botón azul
LIST: Muestra el título del
programa grabado/el menú PVR.
MENU: Muestra el menú.
INPUT: (TV/SAT) Cambia la salida
entre SAT y TV (cuando está
conectado a un televisor).
1 – 9, 0, ENTER, (punto):
Cambia de canal. Por ejemplo, para
cambiar al canal 5, presione 0 y 5
(o presione 5 y ENTER).
PAGE +/–: Avanza/retrocede la
página
FAVORITES: Habilita la función
Favorito.
INFO: Muestra información de
programación.
OPTIONS: Muestra el menú del
satélite/índice de la estación.
RECALL: Sintoniza la última
estación sintonizada.
CH +/–: Cambia el canal hacia
arriba/abajo.
VCR
: Rebobina.
: Reproduce.
: Avanza rápidamente.
: Graba.
: Pausa.
: Detiene.
INPUT: Cambia el modo de
entrada.
1 – 9, 0: Botones numéricos
: Expulsa la cinta.
INFO: (MOSTRAR) Muestra la
información de reproducción.
OPTIONS: (ANT/SW) Cambia la
salida de la antena.
RECALL: (SELECCIONAR LA
UNIDAD) Selecciona la casetera.
CH +/–: Cambia el canal hacia
arriba/abajo.
ENTER: Accede al elemento
seleccionado.
Reproductor/grabador de DVD
: Va al capítulo/pista anterior.
: Muestra otra vez brevemente
la escena (Flash –).
: Avanza brevemente la escena
(Flash +).
: Va al siguiente capítulo/pista.
: Rebobina rápidamente.
: Reproduce.
: Avanza rápidamente.
: Graba (para la grabadora de
DVD).
: Pausa.
: Detiene.
A: (CONFIGURACIÓN) Muestra
el menú del sistema/
configuración.
B: (SUBTÍTULO) Cambia el
subtítulo.
C: (AUDIO) Cambia el sonido.
D: (BORRAR) Borra la
configuración.
LIST: Muestra la lista de títulos.
MENU: Muestra el menú del DVD.
INPUT: Cambia el modo de
entrada.
1 – 9, 0: Botones numéricos
(punto): (+10) Selecciona los
números a partir del 10.
: Abre/cierra la bandeja del disco.
PAGE +: (DVD) Selecciona la
unidad de DVD.
PAGE –: (HDD) Selecciona el disco
duro interno.
FAVORITES: (MENÚ PRINCIPAL)
Muestra el menú principal.
INFO: (MOSTRAR) Muestra la
información de reproducción.
OPTIONS: Muestra el menú de
opciones.
RECALL: (SELECCIÓN DE LA
UNIDAD) Cambia entre HDD y
DVD.
CH +/–: Cambia el canal hacia
arriba/abajo (para la grabadora de
DVD).
ENTER: Accede al elemento
seleccionado.
Descripción de los botones del control
remoto
General
SET: Presione para configurar el RM-VZ220. El indicador se enciende o
parpadea durante la configuración.
Botones de selección de dispositivo: Presione para seleccionar el
dispositivo para operar.
GUIDE: Muestra la guía de programación (EPG).
//// : Mueve el cursor para seleccionar un elemento del menú. Accede
al elemento seleccionado.
RETURN: Vuelve a la visualización anterior/sale del menú.
VOL +/–: Sube/baja el volumen.
POWER: Enciende y apaga el dispositivo seleccionado.
MUTING: Silencia el volumen. Presione nuevamente para silenciar el volumen.
SLEEP: Habilita la función Sleep (cuando está disponible).
El número 5, CH+ y el botón tienen un punto táctil cada uno para facilitar el uso.
Los botones GUIDE y RETURN no funcionan con un VCR.
Nota sobre los botones VOL+/– y MUTING
Cuando se selecciona un TV u otro dispositivo de video, se controla el volumen del TV.
Cuando se selecciona un DVD con cine en casa, se puede controlar el volumen.
TV
: Entrada de VIDEO 1
: Entrada de VIDEO 2
: Entrada de HDMI
: Entrada de RGB
: (ENTRADA PIP) Cambia la
entrada de la imagen de la
“ventana”.
: (PIP) Enciende y apaga la
“ventana”.
: (MOVER PIP) Mueve la
ubicación de la imagen de la
“ventana”.
: (PAUSAR PIP) Congela la
imagen de la “ventana”.
: (CAMBIAR PIP) Cambia entre
la imagen “principal” y la “ventana”.
A: Botón rojo
B: Botón verde
C: Botón amarillo
D: Botón azul
LIST: (SUBTÍTULO) Muestra los
subtítulos.
MENU: Muestra el menú.
INPUT: Cambia el modo de
entrada.
1 – 9, 0, ENTER, (punto):
Cambia de canal. Por ejemplo, para
cambiar al canal 5, presione 0 y 5
(o presione 5 y ENTER).
PAGE +/–: (CANAL DE PIP +/–)
PIP CH Cambia el canal hacia
arriba/abajo en la imagen de la
“ventana”.
FAVORITES: Habilita la función
Favorito.
INFO: Muestra información de
programación.
OPTIONS: Muestra el menú de
opciones.
RECALL: Selecciona el canal
seleccionado previamente.
CH +/–: Cambia el canal hacia
arriba/abajo.
Reproductor de Blu-ray Disc/HD-DVD
: Va al capítulo/pista anterior.
: Muestra otra vez brevemente
la escena (Flash –).
: Avanza brevemente la escena
(Flash +).
: Va al siguiente capítulo/pista.
: Rebobina rápidamente.
: Reproduce.
: Avanza rápidamente.
: Graba (para grabadora de BD).
: Pausa.
: Detiene.
A: (CONFIGURACIÓN) Muestra
el menú del sistema/
configuración.
B: (SUBTÍTULO) Cambia el
subtítulo.
C: (AUDIO) Cambia el sonido.
D: (BORRAR) Borra la
configuración.
MENU: Muestra el menú
emergente/menú del disco.
INPUT: Cambia el modo de
entrada.
1 – 9, 0: Botones numéricos
(punto): (+10) Selecciona los
números a partir del 10.
: Abre/cierra la bandeja del disco.
PAGE +: (BD) Selecciona la unidad
de BD.
PAGE –: (HDD) Selecciona el disco
duro interno.
FAVORITES: (MENÚ PRINCIPAL)
Muestra el menú principal.
INFO: (MOSTRAR) Muestra la
información de reproducción.
OPTIONS: Muestra el menú de
opciones.
ENTER: Accede al elemento
seleccionado.
DVR (videograbadora digital)/PVR (videograbadora personal)
: Va a la ubicación anterior.
: Muestra otra vez brevemente
la escena (Flash –).
: Avanza brevemente la escena
(Flash +).
: Va a la siguiente ubicación.
: Rebobina rápidamente.
: Reproduce.
: Avanza rápidamente.
: Graba.
: Pausa.
: Detiene.
A: (VOLVER A REPRODUCIR*)
Habilita la función para volver a
reproducir para DVR/Replay
TV.
B: (Live TV*) Muestra la guía
maestra.
LIST: Muestra el título del
programa grabado.
MENU: Muestra el menú.
INPUT: Cambia el modo de
entrada.
1 – 9, 0: Botones numéricos
(punto): (+10) Selecciona los
números a partir del 10.
: Abre/cierra la bandeja del disco.
PAGE +/–: Avanza/retrocede la
página, Buscar* arriba/abajo
INFO: (MOSTRAR) Muestra la
información de reproducción.
RECALL: Selecciona el canal
seleccionado previamente.
CH +/–: Cambia el canal hacia
arriba/abajo.
ENTER: Accede al elemento
seleccionado.
*
Estos botones corresponden al servicio
TiVo o al servicio Replay. Consulte su
manual de instrucciones para obtener
más detalles.
DVD con cine en casa
: Va al capítulo/pista anterior.
: Muestra otra vez brevemente
la escena (Flash –).
: Avanza brevemente la escena
(Flash +).
: Va al siguiente capítulo/pista.
: Rebobina rápidamente.
: Reproduce.
: Avanza rápidamente.
: Graba.
: Pausa.
: Detiene.
A: (CONFIGURACIÓN) Muestra
el menú del sistema/
configuración.
B: (SUBTÍTULO) Cambia el
subtítulo.
C: (AUDIO) Cambia el sonido.
D: (BORRAR) Borra la
configuración.
LIST: Habilita la función CAMPO
DE SONIDO.
MENU: Muestra el menú del DVD.
INPUT: Cambia el modo de
entrada.
1 – 9, 0: Botones numéricos
(punto): (+10) Selecciona los
números a partir del 10.
: Abre/cierra la bandeja del disco.
FAVORITES: (MENÚ PRINCIPAL)
Muestra el menú principal.
INFO: (MOSTRAR) Muestra la
información de reproducción.
OPTIONS: Muestra el menú del
amplificador.
RECALL: (BANDA) Selecciona
FM/AM.
CH +/–: Configura o sintoniza la
frecuencia hacia arriba/abajo.
ENTER: Accede al elemento
seleccionado.
Notas sobre el uso del RM-VZ220
El RM-VZ220 no puede realizar funciones que el dispositivo no está diseñado para
realizar. Por ejemplo, si su TV no tiene una función para silenciar el sonido, la función
MUTING en el RM-VZ220 no funcionará con su TV.
La función de los botones varía dependiendo de los modos de configuración/
operación. La tabla de “Descripción de los botones del control remoto” muestra cómo
el RM-VZ220 opera en general con cada dispositivo en el modo configurado.
Si el decodificador de cable puede controlar el volumen, asegúrese de establecerlo en
un nivel moderado. Si el volumen en el decodificador de cable se baja por completo,
no podrá ajustar el volumen de su TV con el RM-VZ220.
Cable set top box / Decodificador de cable
Brand
Code No.
ADB
51927
Bright House
51376, 51877
Cable One
51376, 51877
Cablevision
51376, 51877, 51006
Charter
51376, 51877, 52187
Cisco
51877, 50877, 51982
Comcast
51376, 51877, 51982, 52576
Cox
51376, 51877
Digeo
51187, 52187
Director
50476
General
Instrument
50476
Insight
51376, 51877
Jerrold
50476
Knology
51877
Mediacom
51376, 51877
Brand
Code No.
Motorola
51376, 50476, 51187, 51982
NET
50277
Pace
51877, 51982
Panasonic
51982
Philips
51305
Pioneer
51877, 50877
Rogers
51877
Scientific Atlanta
51877, 50877, 50277
Shaw
51376
Sony
51006
StarHub
51927
Suddenlink
51376, 51877
Time Warner
51376, 51877, 52187
Tivo
52576
US Electronics
50277
WideOpenWest
51877
IPTV / IPTV
Brand
Code No.
AT&T
50858
Azteca
52237
BesTV
52327
Cisco
52345
Motorola
51998, 50858, 52275, 52378
Reliance
52452
Brand
Code No.
Scientific Atlanta
50858, 52345
SingTel
51998, 52275
Thomson
52237
UTStarcom
52327
Verizon
52378
Satellite receiver / Receptor de satélite
Brand
Code No.
Airtel
42248
Astro
42600
Bell ExpressVu
40775
DirecTV
41377, 40566, 40749, 40099,
41442
Dish Network
40775
Dishpro
40775
Echostar
40775, 42527
Expressvu
40775
GE
40566
GOI
40775
Hisense
41535
HTS
40775
Hughes Network
Systems
40749, 41442
iLo
41535
Indovision
40856
JVC
40775
Magnavox
40722
Mitsubishi
40749
Brand
Code No.
Multichoice
42059, 42060
NET
41883
Net Brazil
41883
Pace
40887
Philips
40749, 40722, 40099, 41442
Proscan
40566
Proton
41535
RCA
40566
Samsung
41377, 41442
SKY
40856, 42619
SKY Brazil
40856, 40887, 41499
SKY Mexico
40856, 42619
Telefonica
42527
Tivo
41442
Toshiba
40749
Uniden
40722
US Digital
41535
USDTV
41535
Zenith
40856
DVR (digital video recorder)/PVR (personal video recorder)
DVR (videograbadora digital)/PVR (videograbadora personal)
Brand
Code No.
DirecTV
20739
Go Video
20614
Hughes Network
Systems
20739
Humax
20739
Panasonic
20614, 20616
Philips
20739, 20618
Brand
Code No.
ReplayTV
20614, 20616
Samsung
20739
Sonic Blue
20614, 20616
Sony
20636
Tivo
20739, 20618, 20636
Toshiba
21008
VCR / VCR
Brand
Code No.
Admiral
60048
Aiwa
60037
Allegro
61137
American High
60035
Audiovox
60037
Calix
60037
Canon
60035
Carver
60081
CineVision
61137
Citizen
60037
Craig
60037
Curtis Mathes
60060, 60035, 60162
Daewoo
61137
Denon
60042
DirecTV
60739
Durabrand
60038
Electrohome
60037
Electrophonic
60037
Emerex
60032
Emerson
60037, 60043
ESA
61137
Fuji
60035, 60033
GE
60060, 60035
Go Video
60614, 61137
GoldStar
60037, 60038, 61137
Gradiente
61137
Harman/Kardon
60081, 60038
Hitachi
60042
Hughes Network
Systems
60739, 60042
Humax
60739
Instant Replay
60035
JVC
60067
KEC
60037
Kenwood
60067, 60038
Kodak
60035, 60037
LG
61137
LXI
60037
Magnavox
60035, 60081
Marantz
60035, 60081
Marta
60037
Matsushita
60035, 60162
MEI
60035
Memorex
60035, 60162, 60037, 60048
MGA
60043
Minolta
60042
Mitsubishi
60067, 60043
Brand
Code No.
Motorola
60035, 60048
NEC
60067, 60038
Nikko
60037
Olympus
60035
Optimus
61062, 60162, 60037, 60048
Panasonic
61062, 60035, 60162, 60614,
60616, 61562
Penney
60035, 60037, 60042, 60038
Pentax
60042
Philco
60035
Philips
60739, 60035, 60081, 60618
Pilot
60037
Pioneer
60067
Polk Audio
60081
Proscan
60060
Quasar
60035, 60162
Radix
60037
Randex
60037
RCA
60060, 60042
Realistic
60035, 60037, 60048
ReplayTV
60614, 60616
Rio
61137
Samsung
60739
Sanky
60048
Sansui
60067
Scott
60043
Sears
60035, 60037, 60042
Sensory Science
61155
Sharp
60048
Sonic Blue
60614, 60616, 61137
Sony
60032, 60033, 60636
STS
60042
Sylvania
60035, 60081, 60043
Tashiko
60037
Technics
60035, 60162
Teknika
60035, 60037
Tivo
60739, 60618, 60636
Toshiba
60043, 61008
Totevision
60037
Vector Research
60038
Videomagic
60037
Wards
60060, 60035, 60048, 60081,
60042
XR-1000
60035
Yamaha
60038
Zenith
60033, 61137
DVD Home Theater / DVD con cine en casa
Brand
Code No.
Anam
31609
Bose
31229, 31629, 31933
Denon
32857
Harman/Kardon
31306
HitPlus
32483
Insignia
31751, 32175
Integra
31298
JBL
31306
JVC
31374, 32239, 32331
LG
31293, 32197, 32284
Magnavox
31514
NexxTech
31751
Norcent
31751
Brand
Code No.
Onida
32482
Onkyo
31298, 31531
Panasonic
31288, 31548, 31633, 31763,
31764, 32452, 32967
Philco
31838
Philips
31266, 32311, 32459
Pioneer
31935
RCA
31609, 32041, 32426
Samsung
31295, 31500, 31868
Sony
31622, 31558, 31658, 31758,
31822, 31858, 32522
Vtrek
32426, 32483
Zenith
31293