2 5m 3m, Std 640, Select the image size for use – Sony DSC-N1 User Manual
Page 2: Shoot images easily (auto adjustment mode), View/delete images
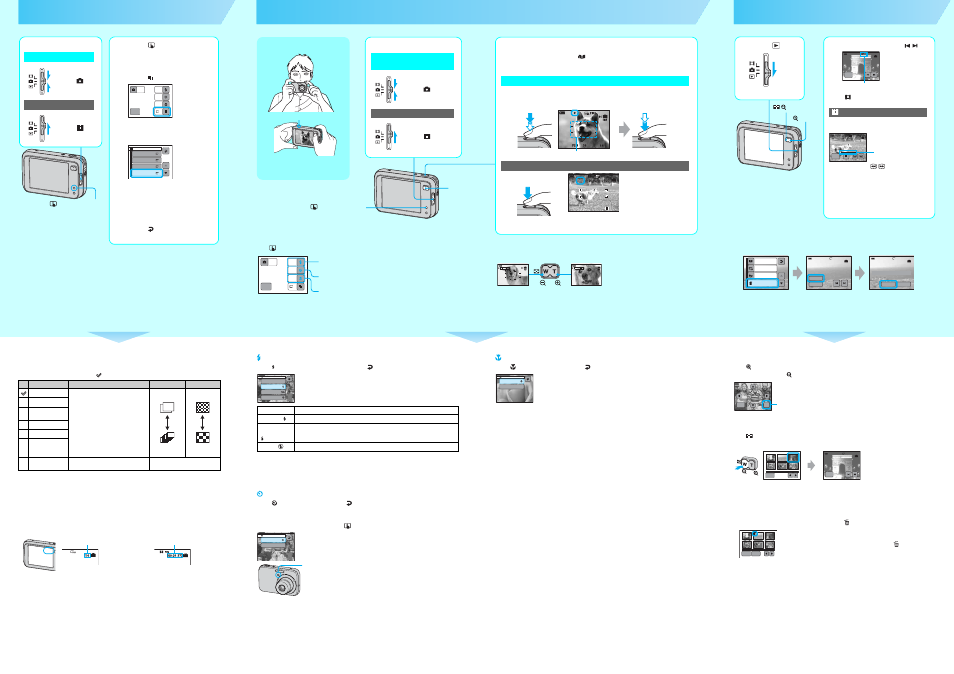
Zoom button
Select the image size for use
5
5
1
Select a mode.
Select .
Select .
Still image:
Movie:
2
Touch
(on-screen key) to
display the touch panel
buttons.
3
Touch
(Image Size).
4
Touch the desired image
size.
• The screen above is for still images.
• For movies, select [640(Fine)] (“Memory Stick PRO
Duo” only), [640(Standard)] or [160].
• The recordable number of still images or the
recordable time of movies is indicated at the right
side of [Image Size].
5
Touch
to complete the
setting.
1M
MENU
OFF
AUTO
AUTO
OFF
Image Size
16pic
8M
5M
3M
8M
3:2
3:2
5M
3M
(on-screen key) button
On still image sizes
For details on the image size
t “User’s Guide/Troubleshooting” (page 14)
The default settings are marked with
.
*
Images are recorded in the same 3:2 aspect ratio as photograph printing paper or postcards, etc.
** Both edges of the image may be cut off when printing
t “User’s Guide/Troubleshooting” (page 110)
*** You can view images in higher quality if the TV has the “Memory Stick” slot or is connected via USB.
On the recordable number of still images and recordable time of movies
Recordable number of still images and recordable time of movies vary depending on the image
size selected.
For details on recordable number or time
t “User’s Guide/Troubleshooting” (page 24)
• The number of recordable images and time can differ according to shooting conditions.
Image size
Guidelines
No. of images
Printing
8M (3264×2448)
For printing in A3 size or high density
images in A4 size
Less
More
Fine
Rough
3:2* (3264×2176)
5M (2592×1944)
For printing in A4 size or high density
images in A5 size
3M (2048×1536)
1M (1280×960)
For printing in postcard size
VGA(E-Mail)
(640×480)
For recording a larger number of images
For attaching images to e-mail or creating
web pages
16:9(HDTV)**
(1920×1080)
For viewing images on a wide TV or a
TV compatible with High-vision***
Still images
Movies
Maximum number of recordable images
Maximum recordable time
Shoot images easily (Auto adjustment mode)
6
6
Setting Flash mode/Self-timer/Macro recording
Press
(on-screen key) to display the touch panel buttons.
Holding the camera
Position the subject in the center of the focus
frame. Do not cover the microphone with
your finger.
Microphone
1M
MENU
OFF
AUTO
AUTO
OFF
Using the flash for still images
Shooting close-up (Macro)
Using the self-timer
Using the zoom
• When the zoom scale exceeds 3×, the camera uses the Digital Zoom function.
For details on the [Digital Zoom] settings and the image quality
t “User’s Guide/Troubleshooting”
(page 62)
• You cannot change the zoom scale while shooting a movie.
2
Shoot with the shutter button.
When shooting images during
displayed on the screen, those minimized copies
of the original images can be saved in the Album.
t “User’s Guide/
Troubleshooting” (page 37)
Still image:
Press and hold the
shutter button halfway
down to focus.
AE/AF lock indicator
Flashing indicator
t Indicator lit/beeps
Press the shutter button
fully down.
The shutter sounds.
Movie:
Press the shutter button
fully down.
To stop recording, press the shutter button fully down again.
AF range finder frame
REC
Zoom button
Selecting a flash mode for still images
Touch on the screen. Touch the desired item, then
.
• Shooting distance (when [ISO] is set to [Auto])
W side: Approx. 0.20 to 5.0 m (7 7/8 inches to 8 feet 6 3/8 inches)
T side: Approx. 0.34 to 2.6 m (1 feet 1 1/2 inches to 16 feet 4 7/8 inches)
• The flash strobes twice. The first time is to adjust the light quantity.
Using the self-timer
Touch
on the screen. Touch [On], then
.
Press the shutter button, the self-timer lamp flashes, and a beep sounds until the shutter operates
(approximately 10 seconds later).
To suspend the self-timer shooting, press
(on-screen key).
Auto
Strobes if it is dark or against light (default setting)
Forcedflash ( )
Always strobes.
Slow Synchro
(Forced flash)
(
)
The shutter speed is slow in a dark place to clearly shoot the background that is out of
flash light.
No Flash (
)
Does not strobe.
Flash
Auto
Forcedflash
Slow Synchro
No Flash
SL
Self-Timer
On
Off
Self-timer lamp
Shooting close-up (Macro)
Touch
on the screen. Touch [On], then
.
• Setting the zoom all the way to the W side is recommended.
• The in-focus range becomes narrow, and the complete subject may not entirely be in focus.
• The Auto Focus speed drops.
Shortest shooting distance from the lens surface
Setting all the way to the W side: Approx. 6 cm (2 3/8 inches)
Setting all the way to the T side: Approx. 34 cm (13 3/8 inches)
If you shoot a still image of a subject that is difficult to focus on
• If the subject is closer than approx. 50 cm (19 3/4 inches), use the Macro mode (above).
• When the camera cannot focus on the subject automatically, the AE/AF lock indicator changes to flashing
slowly and the beep does not sound. Recompose the shot and focus again.
Subjects difficult to focus on are:
To identify items on the screen
t “User’s Guide/Troubleshooting” (page 18)
Macro
On
Off
– Distant from the camera and dark
– The contrast between the subject and its
background is poor.
– Seen through glass
– Moving fast
– Reflective light or with a lustrous finish
– Flashing
– Backlit
View/delete images
To delete images
Display the image you want to delete, then touch [MENU]
t [Delete] t [Delete] t [OK].
To cancel the deletion
Touch [Exit] in 2, or [Cancel] in 3.
• Even when you delete an image, the minimized image recorded in the Album is still saved.
7
7
1
Select .
2
Select an image with / .
Still image: the image size is displayed
Movie:
is
displayed
Touch B.
Rewind/Fast forward:
/
(Return to normal playback: B)
Volume: Touch [MENU]
t [Volume] t +/– to adjust
t [Exit].
Stop playback: x
• Movies with the image size [160] are displayed a size
smaller.
Movie:
MENU
VGA
3/9
101-0003
2005 1 1
10:30
PM
10/10
00:00:02
MENU
STD
640
101-0010
2005 1 2
10:30
AM
Playback bar
/
button
button
Album
Slide Show
Paint
Delete
VGA
3/9
101-0012
2005 1 1
9:30AM
VGA
3/9
101-0012
2005 1 1
9:30AM
Exit
Delete
OK
Cancel
Delete
1
2
3
To view an enlarged image (playback zoom)
Press
while displaying a still image.
To undo the zoom, press
.
• To store enlarged images: [Trimming]
t “User’s Guide/Troubleshooting” (page 60)
Viewing an index screen
Press
(Index). Touch the image you want to view on the single-image screen.
To display the previous/next screen, touch b/B.
To delete images in index mode
1 While an index screen is displayed, touch [MENU]
t [Delete] t [Select].
2 Touch the image you want to delete to display the
(Delete) indicator.
To cancel a selection
Touch the image you want to cancel deleting to turn off the
indicator on the
image.
3 Touch [OK]
t [OK].
• To delete all the images in the folder, touch [All in This Folder] in step 1 instead of [Select].
MENU
x1.0
1.3
Cancel playback zoom
Adjust the portion: v/V/b/B
MENU
MENU
VGA
3/9
101-0012
2005 1 1
9:30
PM
If you press again, the 12-image
index screen appears.
OK
Exit
1
Select a mode.
Select .
Select .
Still image (auto adjustment
mode):
Movie:
(on-screen key) button