Operation (continued) – A.J. Antunes & Co ES-1200 9300586 User Manual
Page 8
EGG STATION (ES-600 & ES-1200)
8
P/N 1010871 Rev. G 08/08
OperatIOn (continued)
Cooking Meat Products
Follow this procedure to cook sliced Canadian bacon,
ham, or other meat products.
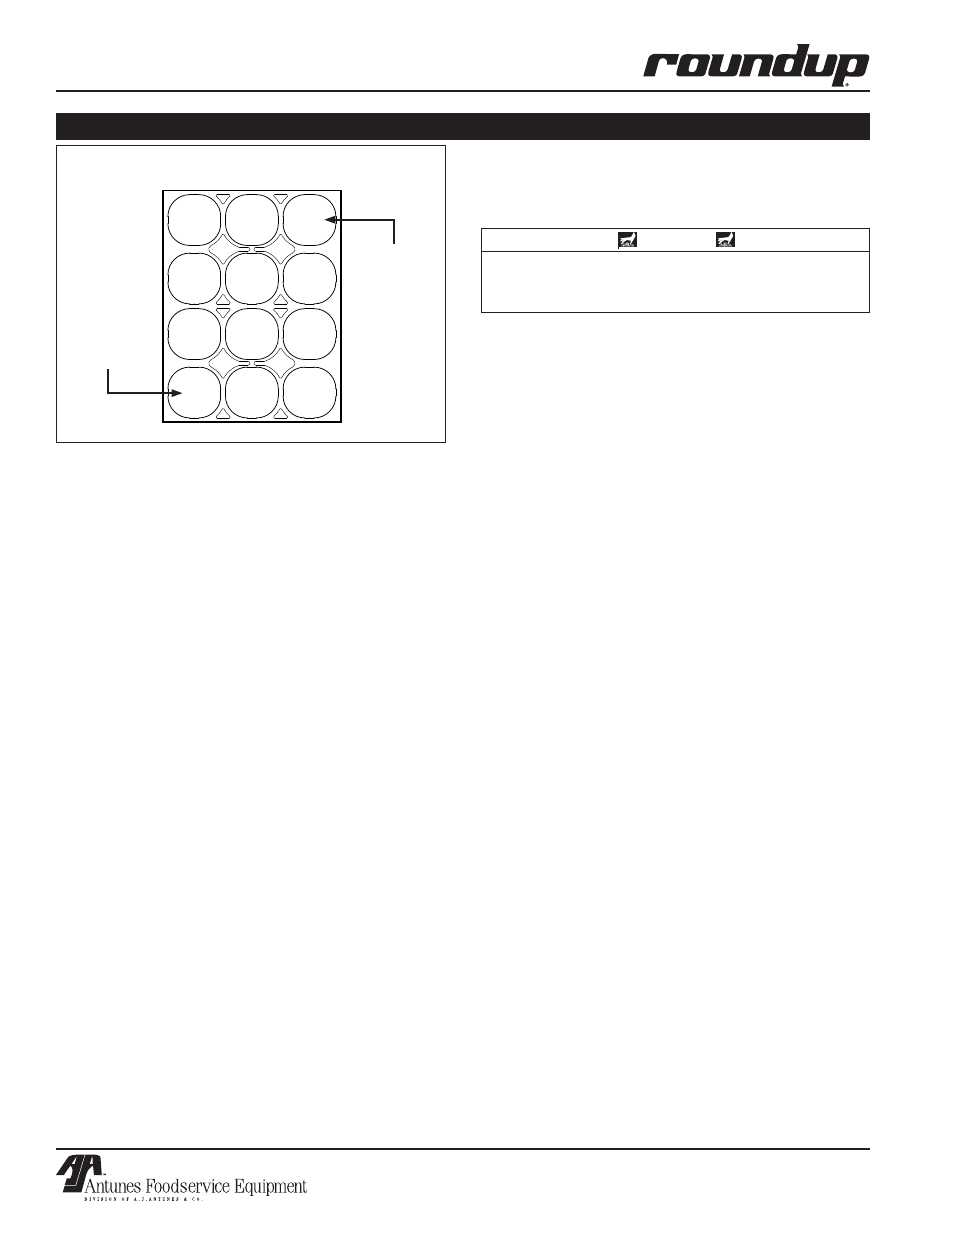
5. Crack the eggs into Egg Rings from right to left,
starting at the row closest to the front (Figure 3).
6. Continue to crack the eggs, placing them in order,
until all six Egg Rings (or 12 shown above)
contain an egg.
7. Break the eggs yolks with a flat spatula.
8. Close the Top Cover.
9. Fill the trough on the Top Cover with warm water
until it is
completely full. This is very important
to get a completely cooked egg with a jelled yolk.
Using less water results in undercooked eggs.
10. Press the
tIme 1 button for room temperature
eggs or the
tIme 2 button for refrigerated eggs.
11. Press the
START/STOP button to initiate the
cooking cycle.
NOTE: The Cooking Indicator Light will light when
the START/STOP button is pressed and
released.
12. Open the Top Cover and raise the Egg Rack
about 1 inch (26 mm), then drop the rack to loos-
en the eggs.
13. Raise the Egg Rack completely off the eggs and
remove the eggs starting with the
fIrst egg
added (far right of the first row of rings closest to
the front of the unit) (Figure 3).
14. Continue removing the eggs in the order they
were added until all eggs have been removed.
15. Use the scraper provided to clean the Grill
Surface and move waste into the Scrap Pans.
16. Lower the Egg Rack and Top Cover. The unit is
ready for further cooking.
1
2
3
4
5
6
7
8
9
1 0
1 1
1 2
fIfO (first in,
first out) The
first egg in
should always
be the first egg
out
lIlO (last in,
last out) The
last egg in
should always
be the last egg
out
front of unit
To ensure proper cooking, place eggs into rings in numerical
order from 1 to 12 as shown below.
Figure 3. Egg Cooking Procedure
1. Wearing heat-resistant gloves, remove the Egg
Rack and set it aside on a heat-resistant surface.
2. When the Bacon Indicator Light begins to flash
and the audio signal sounds, place the meat prod-
uct on the Grill Surface and close the Top Cover.
3. The Bacon Indicator Light continues to flash until
the end of the cooking cycle. WHen the Cooking
Indicator Light turns off and the audio signal
sounds, press the
START/STOP button to turn off
the audio signal.
4. Open the Top Cover and remove the meat
product from the Grill Surface.
bacon timer
If during the standby mode, the Bacon Light is not lit, it
means that the Bacon Timer is disabled. To enable the
Bacon Timer, with the unit turned on, press the
tIme 1
and
tIme 2 buttons simultaneously for 3 or more
seconds. The Bacon Light will turn on. The Bacon
Timer is now enabled.
To disable the Bacon Timer, press the
tIme 1 and
tIme 2 buttons simultaneously for 3 or more seconds.
The Bacon Light will turn off. The Bacon Timer is now
disabled.
If the Bacon Timer is enabled, an audio signal will
sound for a few seconds and the Bacon Light will begin
to flash 30 seconds before the end of the Cooking
cycle. During this time, the product should be placed
on the front part of the grill so that it will heat for 30
seconds. The Bacon Light will continue to flash until
the end of the cooking cycle.
ES-600 units are designed to operate with the Bacon
Timer enabled.
ES-1200 units are designed to operate with the Bacon
Timer disabled.
warnInG
Be sure to wear heat-resistant gloves when
removing the Egg Rack while the unit is on. use
extreme care to avoid personal injury.