Ajuste de la videocámara: ajuste de fecha y hora, Setting the cam : adjusting date/time, Setting date – Samsung VP-M110S User Manual
Page 90: Ajuste de la fecha
ENGLISH
ESPAÑOL
Ajuste de la VIDEOCÁMARA:
Ajuste de fecha y hora
2
3
4
5
Setting the CAM :
Adjusting Date/Time
89
89
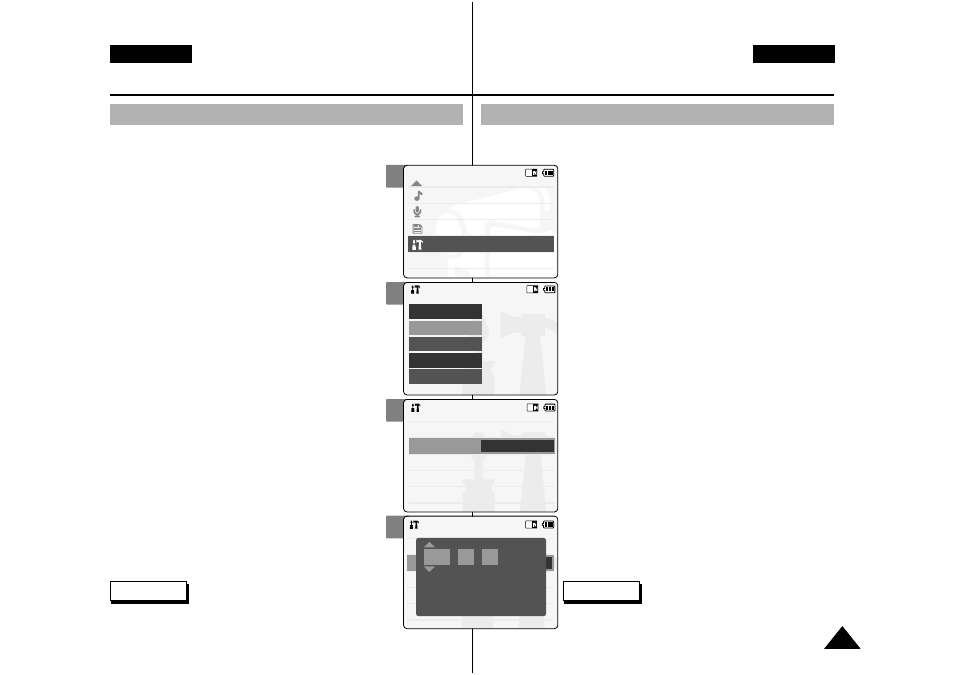
Setting Date
The built-in calendar creates the date stamp.
You can adjust the date you use.
1.
Move [Mode Selector] down to turn on
the CAM and move it down again.
◆
The Mode Selection screen appears.
2.
Move the [ ▲ /▼ ] switch to select
System Settings
and press the [OK]
button.
3.
Move the [ ▲ /▼ ] switch to select
4.
Move the [ ▲ /▼ ] switch to select
5.
Move the [ ▲ /▼ ] switch to set date and
press the [OK] button.
◆
Move the
[ ▲ /▼ ]
switch to change the setting
and press the [OK] button to confirm
selection and move to the next setting.
6.
Press the [Back] button to finish
setting.
Mode Selection
MP3
Voice Recorder
File Browser
System Settings
Back
System Settings
Date/Time
System
Display
Memory
Back
Settings: Date/Time
Time Format
Back
Date Format
YY/MM/DD
12 Hour
Set Date
Set Time
2004/01/01
08:30:01 AM
Settings: Date/Time
Back
Date Format
DD/MM/YY
24 Hour
Set Date
Set Time
Time Format
Press Up/Down to change and
OK to confirm selection
1 /
/
1
2004
Note
✤ If you select
appears.
Ajuste de la fecha
El calendario incorporado crea la marca de la hora.
Puede ajustar la fecha que utilice.
1.
Baje el [Selector de modalidad] para
encender la VIDEOCÁMARA y bájelo de
nuevo.
◆
parece la pantalla Mode Selection
2.
Mueva el interruptor [▲ /▼ ] hasta
seleccionar
System Settings
del sistema>
y pulse el botón [OK].
3.
Mueva el interruptor [▲ /▼ ] hasta
seleccionar Date/Time
y pulse el botón [OK].
4.
Mueva el interruptor [▲ /▼ ] hasta
seleccionar Set Time
pulse el botón [OK].
5.
Mueva el interruptor [▲ /▼ ] hasta fijar
la hora y pulse el botón [OK].
◆
Mueva el interruptor [
▲ /▼
] para cambiar el
ajuste y pulse el botón [OK] para confirmar la
selección y pasar al ajuste siguiente.
6.
Pulse el botón [Back] para finalizar el
ajuste.
Nota
✤ Si selecciona Back
anterior.