Troubleshooting chart – State SBV 65 10TS User Manual
Page 14
14
5. Clean the area where the gasket fits to the tank. If
you are replacing the bottom element, remove any
accumulated sediment on the bottom of the tank.
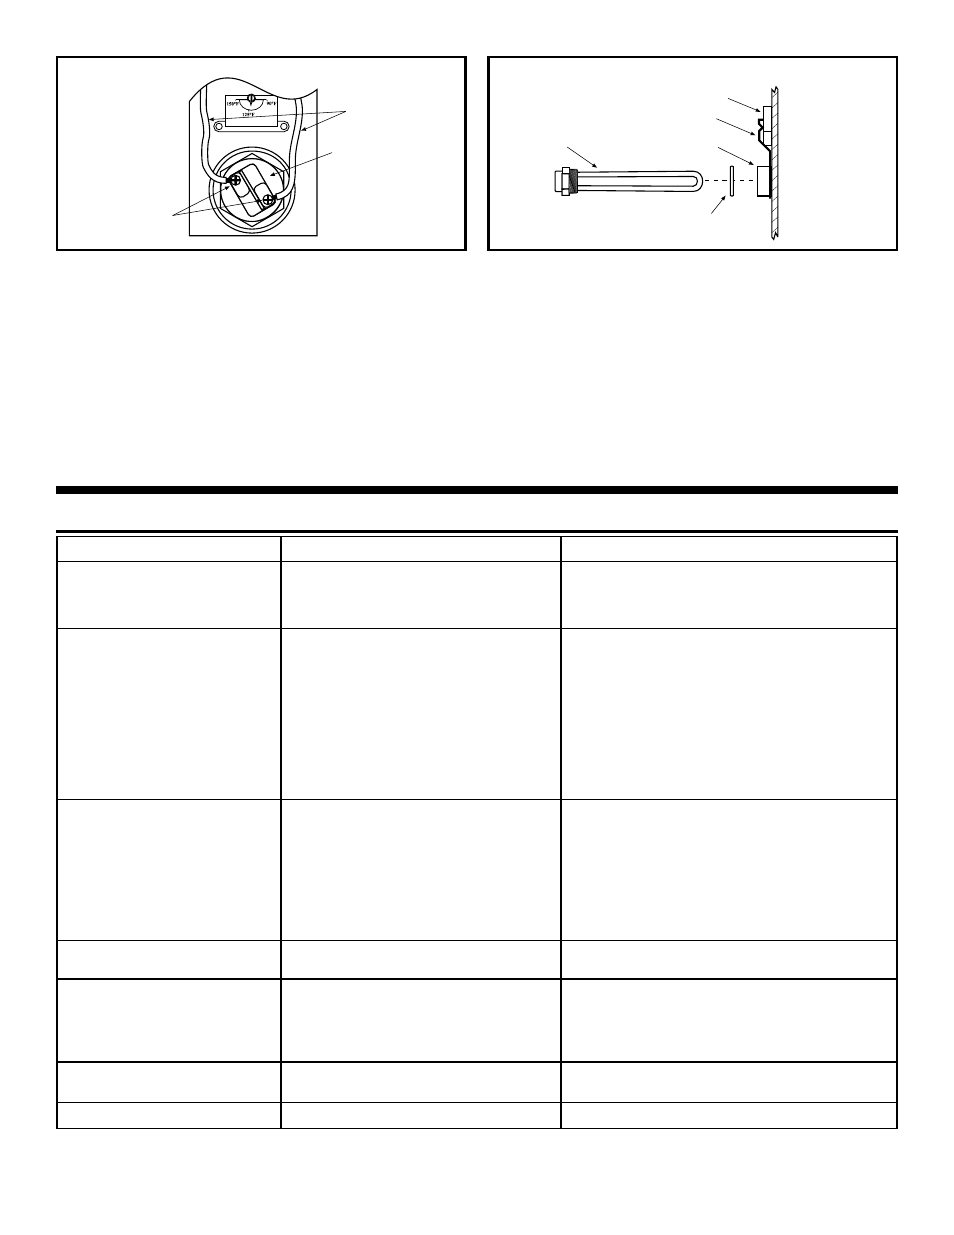
6. Make sure the replacement element has the correct
voltage and wattage rating by matching it to the rating
plate on the water heater. Position the new gasket on
the element and insert it into the water heater tank
(Figure 16). Tighten the element until it is secure by
turning it clockwise with a 1-1/2 inch socket wrench.
7. Close the drain valve. Open the nearest hot water
faucet and allow the tank to fill completely with water.
Spud
Screw-in
Element
Gasket
Thermostat
Holding Bracket
To purge the lines of any excess air and sediment,
keep the hot water faucet open for 3 minutes after a
constant flow of water is obtained.
8. Check for leaks around the element.
9. Reconnect the electrical wires to the element and
securely tighten the screws. Replace the plastic
thermostat cover making sure the attachment points
are engaged on the thermostat.
10. Replace the access cover.
11. Make certain the tank is filled with water. Applying
electric current to heater elements not submerged in
water will destroy them.
12. Reconnect electrical power to the water heater.
Figure 15
TROUBLESHOOTING CHART
PROBLEM
POSSIBLE CAUSE(S)
CORRECTIVE ACTION
NO HOT WATER
1. No power to heater
2. High Temperature Limit Switch open
3. Non-Functioning
thermostat
1. Turn on electrical switch. Check for blown fuses
or tripped breaker
2. Reset. Check for source of trouble and correct
3. Replace
thermostat
INSUFFICIENT HOT WATER
1. Non-Functioning
thermostat
2. Non-Functioning
element
3. Improper
calibration
4. Thermostats set too low
5. Sediment or lime in tank
6. Heater too small for job
7. Wrong piping connections
8. Leaking
faucets
9. Wasted hot water
10. Long runs of exposed pipe
11. Hot water piping on outside wall
1. Replace
thermostat
2. Replace
element
3. Replace
thermostat
4. Set thermostats to desired temperature
5. Drain/flush tank. Provide water treatment if needed
6. Install adequately-sized water heater
7. Correct
piping
8. Repair
faucets
9. Advise
customer
10. Insulate piping
11. Insulate piping
HIGH OPERATION COSTS
1. Improper
Calibration
2. Thermostats set too high
3. Sediment or lime in tank
4. Heater too small for job
5. Wrong piping connections
6. Leaking
faucets
7. Wasted hot water
8. Long runs of exposed piping
9. Hot water piping in exposed wall
1. Replace
thermostats
2. Set thermostat to desired setting
3. Drain/flush tank. Provide water treatment if needed
4. Install adequately-sized water heater
5. Correct
piping
6. Repair
faucets
7. Advise
customer
8. Insulate
piping
9. Insulate
piping
SLOW HOT WATER
RECOVERY
1. Non-Functioning
element
1. Replace
element
DRIP FROM RELIEF VALVE
1. Excessive water pressure
2. Closed
system
1. Check system water pressure. verify 50-60 psi.
Use appropriate pressure reducing valve to set
correct water pressure. Check Thermal
expansion tank.
2. See “Closed System/Thermal Expansion” section
THERMOSTAT DOES NOT
SHUT OFF
1. Non-Functioning
thermostat
2. Improper
calibration
1. Replace
thermostat
2. Replace
thermostat
WATER ODOR
1. Sulfides in the water
1. See “Anode Rod/Water Odor” section
Screws
Wires
Element
Figure 16
NOTE: The chart above only applies to the solar storage tank water heater. This storage tank is only one part of the total system. If the
problem does not originate with the storage tank, the chart above cannot isolate the problem. In such cases, a qualifi ed solar technician
should troubleshoot the system.