Troubleshooting chart, Diagnostic codes – State EPX 80 DHPT User Manual
Page 19
19
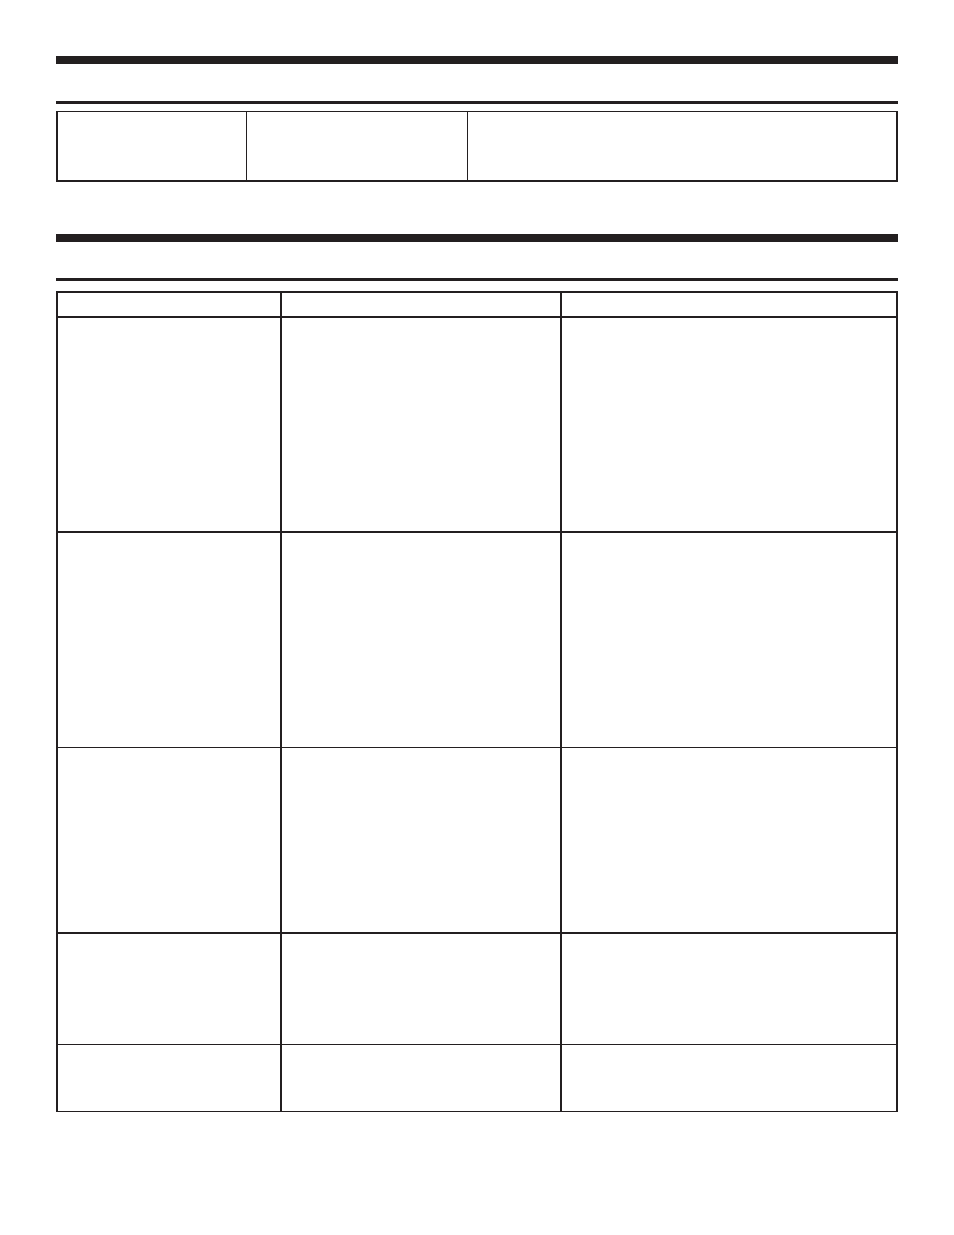
TROUBLESHOOTING CHART
PROBLEM
POSSIBLE CAUSE(S)
CORRECTIVE ACTION
NO HOT WATER
1. No power to the water heater (power
button not lit)
2. Unit in standby (power button RED)
3. Unit in Vacation mode
4. High temperature limit switch open
5. Hot water usage pattern exceeds the
capability of the water heater in
current mode
6. Non-functioning upper temperature
sensor
1. Check for blown fuse or tripped breaker.
Restore power to unit then press power button.
2. Press the power button to turn the unit on
(power button GREEN)
3. Press Vacation Mode Button to exit Vacation
mode and return to desired operating mode.
4. Reset the high temperature limit switch; see
“Safety shut-off” section for more information
5. Change to different mode or modify usage
patterns
6. Contact a qualified person for service
INSUFFICIENT HOT WATER/
SLOW HOT WATER
RECOVERY
1. Temperature set-point too low
2. Air filter dirty
3. Hot water usage pattern exceeds the
capability of the water heater in
current mode
4. Water connections to unit reversed
5. Heat lost through long run of exposed
pipe
6. Hot water leak at faucet or piping
7. Non-functioning heating element
8. Sediment or scale build up in tank
1. Increase set point temperature; see “Adjusting
the User Interface Module” section
2. Clean air filter
3. Change to different mode or modify usage
patterns (For example if in Efficiency Mode
switch to Hybrid Mode)
4. Ensure the cold connection is at the bottom
and that the hot connection is at the top
5. Insulate exposed piping
6. Repair hot water leaks
7. Call qualified person for service
8. Drain and flush tank. Water conditioning may
be necessary to minimize build up
HIGH OPERATION COSTS
1. Temperature set-point too high
2. Air filter dirty
3. Electric mode selected
4. Water connections to unit reversed
5. Heat lost thru long run of exposed
pipe
6. Hot water leak at faucet or piping
7. Sediment or scale build up in tank
1. Decrease set point temperature; see “Adjusting
the User Interface Module”
2. Clean air filter
3. Change to Efficiency or Hybrid mode for re-
duced energy costs
4. Ensure the cold connection is at the bottom
and that the hot connection is at the top
5. Insulate exposed piping
6. Repair hot water leaks
7. Drain and flush tank. Water conditioning may
be required to minimze build up
DRIP FROM TEMPERATURE &
PRESSURE RELIEF VALVE
(Warning: Do not plug or cap
T&P discharge pipe.)
1. Excessive water pressure
2. Add or service a thermal expansion
tank.
3. Non-functioning Temperature &
Pressure Relief Valve
1. Check water supply inlet pressure. If higher than
80 PSIG, install a pressure reducing valve (50-
60 PSIG is the recommended pressure.)
2. See “Closed System/Thermal Expansion” section
3. Replace the Temperature & PressureRelief
Valve
OTHER
1. The water heater does not
immediately start
2. The heat pump does not run in
Efficiency mode.
1. When first started the water heater takes about 8
minutes to complete a diagnostic routine
2. Contact a qualified person for service
NOTE: The diagnostic codes listed above are the most common. If a diagnostic code not listed above is displayed,
contact Residential Technical Assistance referencing the number on the front of this manual.
ELECTRONIC
POWER ANODE
ERROR #0-9
(# CAN BE 0-9)
1. Indicates the power anode is
not operating properly
1. Contact a qualified person to service the unit.
DIAGNOSTIC CODES