Maxsa Innovations Solar-Powered 30 Watt Motion-Activated Outdoor Security Floodlight User Manual
Page 4
4
5
BEFORE FIRST TIME USE OF YOUR SOLAR SECURITY LIGHT
1. Ensure the power switch on the main body of your Security Light is in the OFF
position. In this position, the solar cell will charge the battery without activating the
unit.
2. Leave the switch in this position for up to 3 days and make sure the solar cell charge
panel is placed in direct sunlight. This will ensure that the battery in your Solar
Security Light has a full charge prior to motion sensor adjustment and normal
operation.
OPERATING YOUR SOLAR SECURITY LIGHT
After the initial 3 day charge of your Solar Security Light, move the switch on the main
body to the AUTO position. Your Solar Security Light is now ready for use.
Underneath the motion sensor, there are 3 adjustment dials: TIME/SENS/LUX. All 3 of
these adjustment dials have been preset to the following conditions:
TIME - Set at 30 seconds
SENS - Set at 20 feet (When the surrounding temperature is 75˚ F).
LUX - Set for your Security Light to activate at dusk when motion is detected.
If the above settings are not suitable for your application, then these may be adjusted
using the steps below.
●
Time Period Adjustment (TIME)
The time period control sets the duration that the Solar Security Light will be illuminated,
when activated. The time period is adjustable over a range of 10 seconds to 1 mnute.
The shortest time period is with the TIME control set fully clockwise(-).
To adjust the time period, set the TIME control at a random position, trigger the sensor
unit and measure the time period the light illuminates. Increase or decrease the time
period by adjusting the TIME dial and re-trigger the sensor unit. Continue with this
process until the desired time period is obtained.
●
Motion Sensor Adjustment (SENS)
The sensitivity of the motion sensor on this Solar Security Light will be affected by
temperature. The cooler the temperature the more sensitive the motion sensor will
become. Use the SENS dial to adjust the sensitivity of the motion sensor to compensate
for environmental temperature changes. The motion sensor is most sensitive when the
SENS dial is turned fully counter-clockwise (+).
●
Light Level Adjustment (LUX)
The LUX dial controls the natural light level that initiates operation and prevents the
security light from operating during daylight hours.
Your solar security light comes preset and will be activated when motion is detected at
dusk. To adjust the light level control, turn the LUX control fully clockwise (
d). Wait until
the natural light falls to the required level that you wish to activate your solar security
light. Rotate the LUX control slowly counter-clockwise until the Solar Security Light
illuminates.
IF YOU WANT TO TEST THE COVERAGE
Point the motion sensor in the direction you want to detect motion and set the TIME dial
to minimum (-) position and the LUX dial to "light" ( ) position.
Test the coverage of the area by walking slowly around the area of detection and adjust
sensitivity if needed. If the Solar Security Light does not come on, you may need to
adjust the angle of the sensor unit. Readjust the TIME and LUX dials when finished.
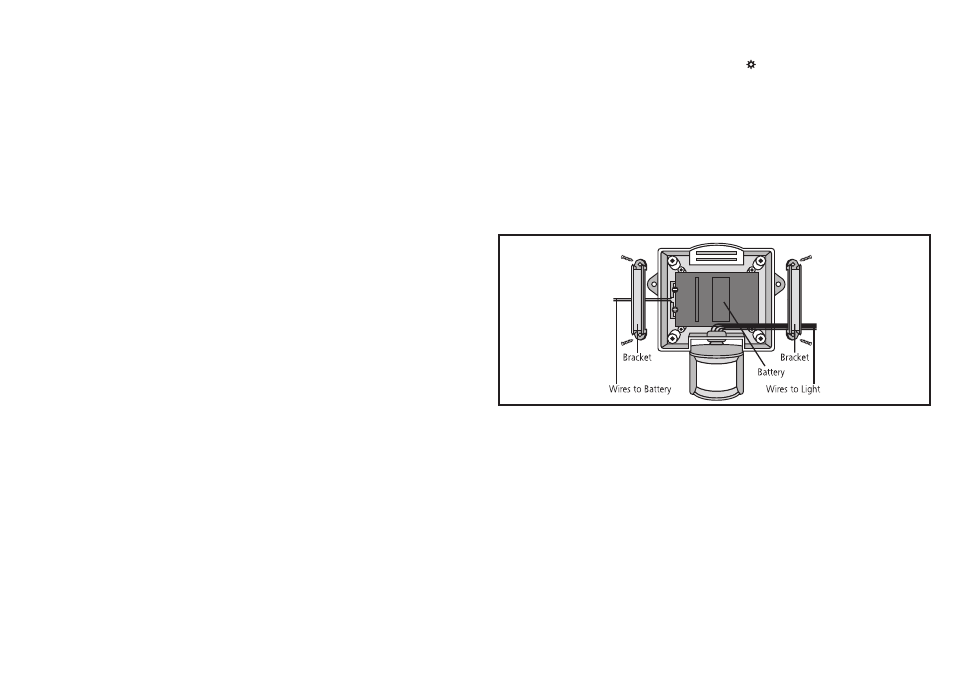
REPLACING THE LEAD ACID RECHARGEABLE BATTERY
When the charging ability of the battery decreases, you can replace the battery with a
new 6V, 4Ah lead acid battery. Follow the steps below when replacing the battery.
1. First remove the main unit from its mounted surface.
2. Move the power switch on the main body to the OFF position.
3. Remove the four (4) screws on the back of the main unit that hold the halves
together.
4. Once the unit is open, carefully remove the two (2) brackets holding the battery in
place by unscrewing the four (4) screws as indicated in the diagram above.
5. Carefully unplug the positive and negative cords.
6. Carefully remove the battery from its compartment and replace with a new 6V, 4Ah
rechargeable lead acid battery. Ensure that the red cord is re-attached to the red-
colored battery terminal. (WARNING: Connecting these in the opposite direction
could damage the unit.)
7. Replace the two (2) brackets to hold the battery in place by using the four (4) screws
removed in step 4, taking care not to damage any cables.
8. Re-assemble the main unit by screwing the two (2) halves of the main body
together, using the four (4) screws removed in step 3, ensuring the two halves click
together securely.
9. Once assembled, mount your Solar Security Light to its original surface location.
10. Repeat the steps in the "Before first time use of your Solar Security Light" section on
page 4 to ensure your new battery is fully charged.