Stent positioning system – Merit Medical Ostial PRO Stent Positioning System User Manual
Page 2
warnInG: If extended procedure is required (greater than 30 minutes), it is recommended to not
load the Ostial PRO Stent Positioning System into the guiding catheter until it is needed to aid in the
placement of the stent. For these procedures, utilize the “Front Loading” steps for the Ostial PRO Stent
Positioning System introduction into the guiding catheter.
b. Front Loading
i. Remove the blue introducer tube from the plastic shipping hoop.
ii. Load the Ostial PRO Stent Positioning System into the introducer tube by inserting the
proximal (yellow) end of the Ostial PRO Stent Positioning System wire into the blue
introducer.
iii. Pull the Ostial PRO wire through the introducer until the Ostial PRO Stent Positioning
System body is positioned inside the diameter of the blue introducer.
iv. If a guide wire is engaged in the guiding catheter, slide the blue introducer tube over the
proximal end of the guide wire.
v. Insert the introducer tube and Ostial PRO Stent Positioning System together into the
proximal end of the Tuohy-Borst adaptor.
vi. Slide the blue introducer tube through the Tuohy-Borst until it contacts the proximal end
of the hub on the guiding catheter. Blue introducer will stop.
vii. At this time, push the Ostial PRO Stent Positioning System forward until it passes out the
distal end of the blue introducer tube. The Ostial PRO Stent Positioning System will now be
in the guiding catheter.
viii. The Ostial PRO Stent Positioning System can now be slid distally until it is proximal to the
primary curve of the guiding catheter.
5. Advance a 0.014”-0.025” (.35 mm - .64 mm) guide wire into the Tuohy-Borst through the guiding
catheter crossing the ostial lesion and positioned in the distal portion of the target vessel.
6. Advance the stent catheter system through the Tuohy-Borst over the guide wire until the stent
catheter system is distal to the diseased area to be treated.
7. Disengage the guiding catheter from the ostium of the vessel, pulling the guide tip back
approximately 3-5 mm and confirm that the guiding catheter is in the aorta using a small test
injection of contrast.
8. While holding the stent catheter system and guide wire in a stable position, gently push the
Ostial PRO Stent Positioning System forward until the gold plated distal feet expand into an open
position, using fluoroscopic guidance.
9. Push the guiding catheter and Ostial PRO Stent Positioning System, together as one single unit,
forward until the gold-plated feet are clearly in contact with the aortic wall. Inject contrast
medium to confirm the guiding catheter, Ostial PRO Stent Positioning System, and lesion
positions (“Power Position”).
warnInG: If the Ostial PRO Stent Positioning System feet and cylinder is advanced out of the distal
end of the guiding catheter, gently pull on the proximal end of the Ostial PRO Stent Positioning
System until the cylinder has retracted into the distal end of the guiding catheter, leaving only the
gold-plated feet exposed or retract both components in the distal end of the guiding catheter. Never
pull back the Ostial PRO Stent Positioning System with great force.
warnInG: In the event the cylinder and feet of the Ostial PRO Stent Positioning System are advanced
too far distally from the tip of the guide to cause the Ostial PRO Stent Positioning System to become
“derailed” from the stent delivery system do the following:
• Retract stent delivery system into guiding catheter. Never retract Ostial PRO Stent Positioning
System into guiding catheter before stent delivery system has been withdrawn.
• Retract Ostial PRO Stent Positioning System into guiding catheter until feet collapse
withdrawing equipment.
• Re-cross ostial lesion with interventional equipment advancing the stent delivery system
distal to the lesion.
• Advance Ostial PRO Stent Positioning System until feet “pop out.”
10. Pull back on the stent catheter system until the proximal marker on the stent balloon catheter is
just proximal to the gold plated feet of the Ostial PRO Stent Positioning System. Inject contrast
medium to confirm the stent position. The proximal stent delivery system marker band should
typically be just distal to the distal tip of the guiding catheter and in the plane of at least two of
the Ostial PRO Stent Positioning System feet.
11. Inflate the stent balloon system.
12. Deflate the stent balloon system.
13. Using the proximal end of the Ostial PRO Stent Positioning System wire (yellow handle), retract
the Ostial PRO Stent Positioning System into the distal end of the guiding catheter collapsing
the feet into the guiding catheter. Retract the Ostial PRO Stent Positioning System proximally to
the primary curve, approximately 4-20 cm.
14. Reinflate the balloon several mm proximal to the original inflation to “flare” the proximal end of
the stent and then remove the stent delivery catheter.
15. Perform angiography to confirm an adequate angiographic result in treating the target lesion(s).
16. Remove the guide wire.
17. Remove the guiding catheter.
adverse reactIons:
Adverse reactions include but are not limited to: emboli, hemorrhage, ischemia, vasospasm, vessel
damage, and neurological defects including stroke and death.
Sterilized using Ethylene Oxide
STENT POSITIONING SYSTEM
descrIptIon:
The Ostial PRO Stent Positioning System is a medical grade, disposable guide wire system
designed to provide consistent and precise stent implantation in aorto-ostial lesions during
coronary or peripheral interventional procedures. It consists of a flexible guide wire shaft
that can be easily and accurately placed in the targeted aorto-ostial location. Low profile,
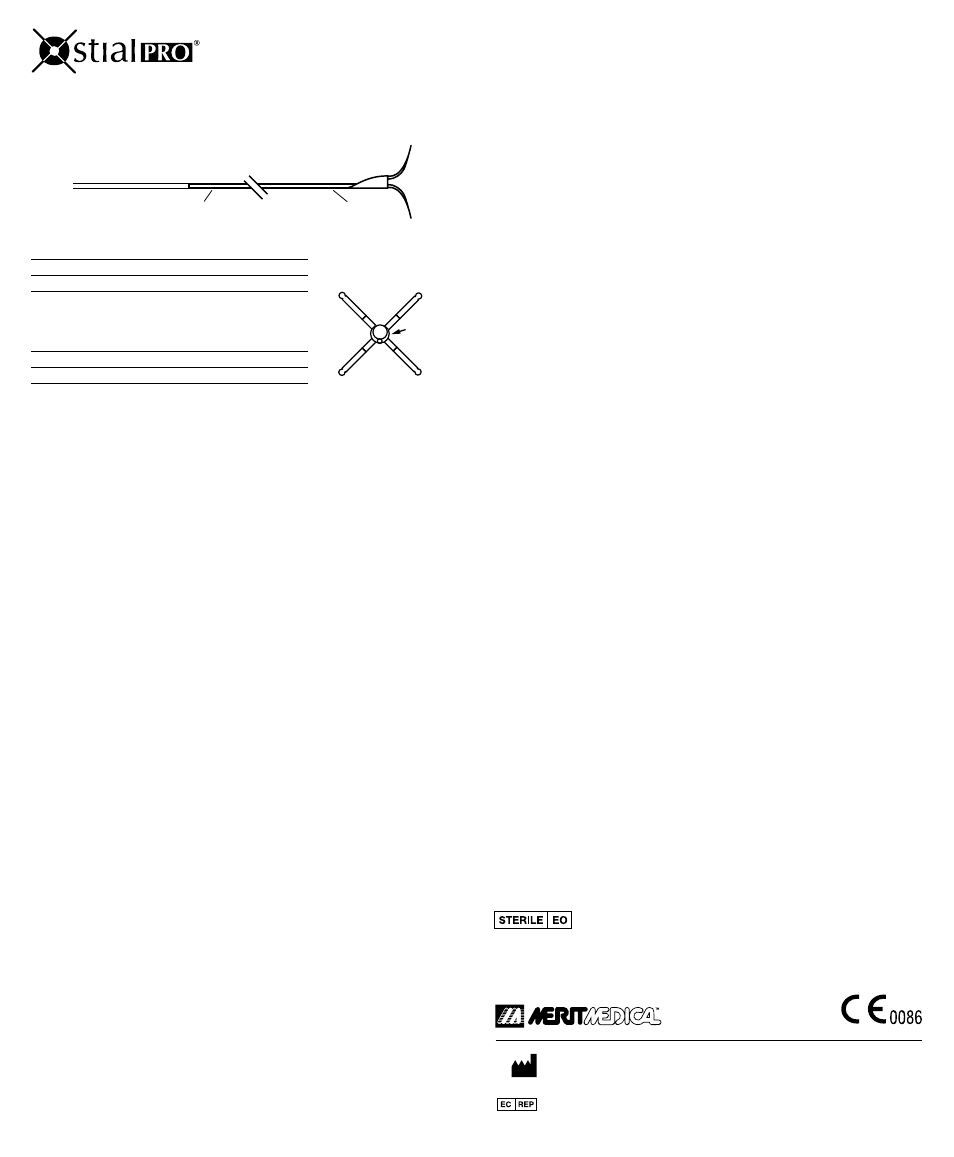
atraumatic, radiopaque expandable “feet” at the distal tip of the guide wire system
facilitate precise stent placement in the aorto-ostial lesion.
wire diameters and lengths:
Wire Section
Wire Diameter
Section Length
Overall
-
127 cm
Distal Section
.014” (.35 mm)
4 cm
Proximal Section
.018” (.46 mm)
123 cm
effective Inside diameter (Id) within Guiding catheters:
Catheter Size
Estimated Catheter ID
Effective ID
6 French
.070” (1.8 mm)
.050” (1.3 mm)
7 French
.078” (2.0 mm)
.058” (1.5 mm)
8 French
.088” (2.2 mm)
.068” (1.7 mm)
warnInG: Stent crossing profile must be less than Ostial PRO Stent Positioning System effective ID to
prevent stent or Ostial PRO Stent Positioning System damage.
contents:
One (1) Ostial PRO Stent Positioning Device One (1) Introducer Tube
IndIcatIons for use:
The Ostial PRO Stent Positioning System is intended for use in aorto-ostial procedures to
introduce and position stents and other interventional devices within the coronary and
peripheral vasculature. In addition, the Ostial PRO Stent Positioning System is intended to
facilitate the alignment of interventional devices and function as an alignment tool.
contraIndIcatIons:
If other interventional devices are used in conjunction with the Ostial PRO Stent Positioning
System, refer to specific manufacturer’s product labeling for intended use, contraindications
and potential complications associated with that device.
precautIons:
• For single use only. Do not resterilize. Reuse, reprocessing or resterilization may compromise the
structural integrity of the device and/or lead to device failure, which, in turn, may result in
patient injury, illness or death. Reuse, reprocessing or resterilization may also create a risk of
contamination of the device and/or cause patient infection or cross-infection, including, but not
limited to, the transmission of infectious disease(s) from one patient to another. Contamination of
the device may lead to injury, illness or death of the patient.
• Federal law (U.S.A.) restricts this device to sale by or on the order of a physician.
• Device is sterile if the package is dry, unopened and undamaged. Do not use if sterile
barrier is damaged.
• The device must be used prior to the expiration date.
• Discard device if mishandling has caused possible damage or contamination.
• This device should be stored in a clean, dry location at room temperature.
• This device has been sterilized with ethylene oxide gas.
• Inspect the Ostial PRO Stent Positioning System prior to use for any bends or kinks. Any Ostial PRO
Stent Positioning System damage may decrease the desired performance characteristics.
• These Instructions For Use are designed to serve only as a general guideline. They are not
intended to supersede institutional protocols or professional clinical judgment concerning
patient care.
InstructIons for use:
warnInG: It is recommended that the patient must have received therapeutic dosage of Heparin to
achieve ACT >200.
1. Select an appropriate guiding catheter shape and size to engage the target vessel (6F, 7F, or 8F).
2. Attach a Tuohy-Borst adapter to the proximal hub of the guiding catheter.
3. Remove the Ostial PRO Stent Positioning System from the plastic support hoop.
4. Load the Ostial PRO Stent Positioning System into the guiding catheter by either of
the following ways:
a. Back Loading (Guide still outside of body):
i. Back load the Ostial PRO Stent Positioning System by inserting the proximal wire,
identified by a yellow handle, into the distal end (tip) of the guiding catheter until the
proximal yellow end of the wire is advanced through the Tuohy-Borst allowing the feet of
the Ostial PRO Stent Positioning System to collapse inside the guiding catheter, just below
the curve on the guide.
ii. Pull back on the proximal Ostial PRO Stent Positioning System wire protruding from the
Tuohy-Borst until the feet of the Ostial PRO Stent Positioning System are located proximal
to the primary curve of the guiding catheter approximately 4-10 cm proximal to the distal
end of the guiding catheter.
iii. Insert a 0.035-0.038” (0.89 mm - 0.96 mm) “J” wire into the guiding catheter and through
the Ostial PRO Stent Positioning System device, and advance the guiding catheter to the
arch of the aorta in a conventional fashion. Then, remove the “J” guide wire.
iv. Position and engage the distal tip of the guiding catheter at the ostium of the target
vessel and inject contrast medium to confirm guiding catheter positioning and to define
the lesion(s) in the ostial portion of the vessel.
Merit Medical Systems, Inc.
1600 West Merit Parkway, 1600 West Merit Parkway, South Jordan, Utah 84095
U.S.A. 1-801-253-1600 U.S.A. Customer Service 1-800-356-3748
Merit Medical Ireland Ltd, Parkmore Business Park West, Galway, Ireland
www.merit.com
Proximal Section Distal Section
Effective ID
English