Installation instructions, Alcove or closet installation, Leveling and stabilizing your dryer – GE GTDL210EDWW User Manual
Page 5
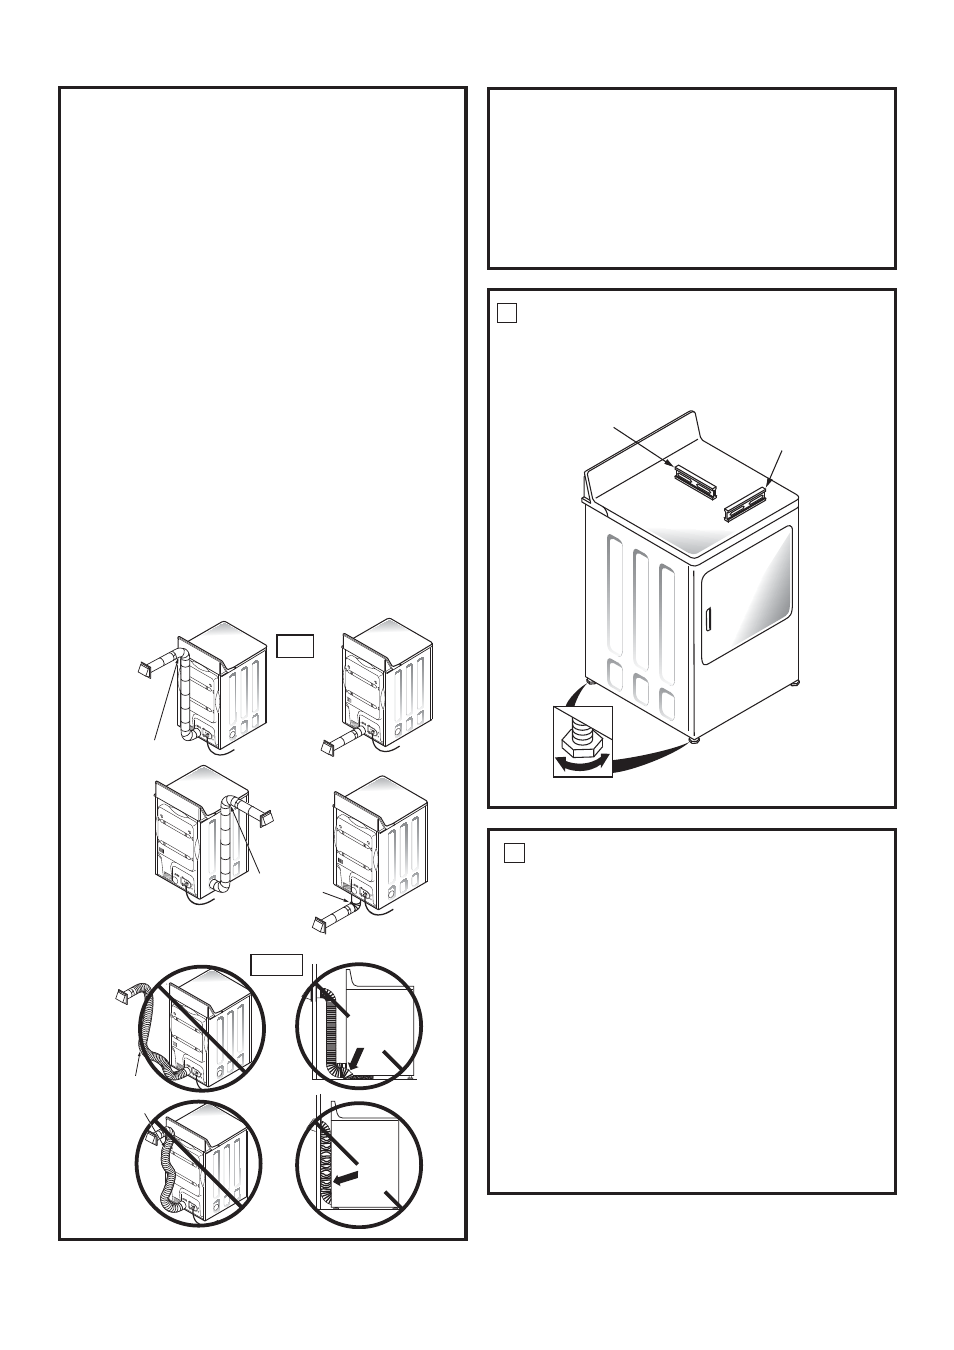
LEVELING AND STABILIZING YOUR DRYER
6WDQGWKHGU\HUXSULJKWQHDUWKH¿QDOORFDWLRQDQGDG
just the 4 leveling legs, at the corners, to ensure that the
dryer is level from side to side and front to rear.
6
ALCOVE OR CLOSET INSTALLATION
• If your dryer is approved for installation in an alcove or
closet, it will be stated on a label on the dryer back.
• The dryer MUST be vented to the outdoors. See the
EXHAUST INFORMATIONVHFWLRQV
•
Minimum clearance between dryer cabinet and
DGMDFHQWZDOOVRURWKHUVXUIDFHVLV
LQHLWKHUVLGH
LQIURQW
LQUHDU
0LQLPXP YHUWLFDO VSDFH IURP ÀRRU WR RYHUKHDG
FDELQHWVFHLOLQJHWFLVLQ
• Closet doors must be louvered or otherwise ventilated
DQGPXVWFRQWDLQDPLQLPXPRIVTLQRIRSHQDUHD
equally distributed. If the closet contains both a washer
DQGDGU\HUGRRUVPXVWFRQWDLQDPLQLPXPRIVT
in. of open area equally distributed.
DO
ELBOW HIGHLY
RECOMMENDED
ELBOWS HIGHLY
RECOMMENDED
5
LEVEL
SIDE-TO-SIDE.
4 LEVELING LEGS
LEVEL
FRONT-TO-BACK.
1HYHULQVWDOOÀH[LEOHPHWDOGXFWLQZDOOVFHLOLQJVÀRRUV
or other enclosed spaces.
7RWDOOHQJWKRIÀH[LEOHPHWDOGXFWVKRXOGQRWH[FHHG
IHHWP
• For many applications, installing elbows at both the dryer
DQG WKH ZDOO LV KLJKO\ UHFRPPHQGHG VHH LOOXVWUDWLRQV
EHORZ (OERZV DOORZ WKH GU\HU WR VLW FORVH WR WKH ZDOO
without kinking and or crushing the transition duct,
PD[LPL]LQJGU\LQJSHUIRUPDQFH
• Avoid resting the duct on sharp objects.
UL-LISTED FLEXIBLE METAL (FOIL-TYPE) TRANSITION DUCT
• In special installations, it may be necessary to connect
WKHGU\HUWRWKHKRXVHYHQWXVLQJDÀH[LEOHPHWDOIRLO
W\SHGXFW$8/OLVWHGÀH[LEOHPHWDOIRLOW\SHGXFWPD\
EHXVHG21/
4” diameter can be maintained throughout the entire
length of the transition duct.
,Q&DQDGDDQGWKH8QLWHG6WDWHVRQO\WKHÀH[LEOHPHWDO
IRLOW\SHGXFWVWKDWFRPSO\ZLWKWKH´2XWOLQHIRU&ORWKHV
'U\HU7UDQVLWLRQ'XFW6XEMHFW$µVKDOOEHXVHG
1HYHULQVWDOOÀH[LEOHPHWDOGXFWLQZDOOVFHLOLQJVÀRRUV
or other enclosed spaces.
7RWDOOHQJWKRIÀH[LEOHPHWDOGXFWVKRXOGQRWH[FHHG
IHHWP
• Avoid resting the duct on sharp objects.
For best drying performance
6OLGHRQHHQGRIWKHGXFWRYHUWKHFORWKHVGU\HURXWOHW
pipe.
2. Secure the duct with a clamp.
:LWKWKHGU\HULQLWVSHUPDQHQWSRVLWLRQH[WHQGWKHGXFW
to its full length. Allow 2” of duct to overlap the exhaust
SLSH&XWRȺDQGUHPRYHH[FHVVGXFW.HHSWKHGXFWDV
VWUDLJKWDVSRVVLEOHIRUPD[LPXPDLUÀRZ
4. Secure the duct to the exhaust pipe with the other
clamp.
DON’T
DO NOT USE
EXCESSIVE
EXHAUST
LENGTH
DO NOT
CRUSH
FLEXIBLE
EXHAUST
AGAINST
WALL
DO NOT
SIT DRYER
ON FLEXIBLE
EXHAUST
Installation Instructions