Warning, Make electrical connections, Three-conductor branch circuit connection – GE 30 Electric Built-In Wall Ovens User Manual
Page 6: Four-conductor branch circuit connection, Slide oven into opening
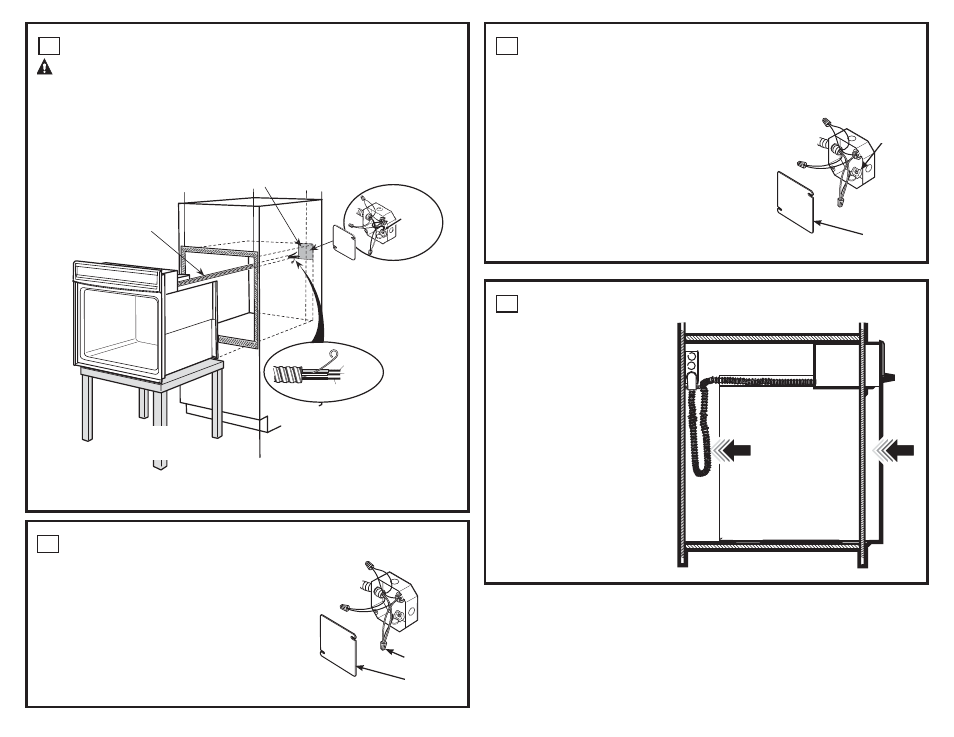
6
MAKE ELECTRICAL CONNECTIONS
WARNING:
Switch power off at the service panel and lock the service disconnecting
means to prevent power from being switched on accidentally. When the service disconnecting means
cannot be locked, securely fasten a prominent warning device, such as a tag,
to the service panel.
Place oven on table or platform even with the cutout opening. For a single oven, the platform must support
200 lbs. (91 kg); and for a double oven, the platform must support 375 lbs. (170 kg). Connect the flexible
conduit to the electrical junction box as shown below*. Position the conduit in such a manner that it will lie
behind the unit in a natural loop when the oven is installed. You will need to purchase an appropriate strain
relief clamp to complete the connection of the conduit to the junction box.
* Ovens come equipped with a 40” long conduit. If a longer conduit is desired, there may be one available for
your model. To check availability or order parts, call 1.800.GE.CARES.
7
THREE-CONDUCTOR BRANCH CIRCUIT CONNECTION
NOTE: If residence leads are aluminum conductors, see WARNING
in Section 5, Electrical Requirements.
When connecting to a three-conductor branch circuit, if local codes
permit:
A. Connect the bare oven ground conductor with the crimped
neutral (white) lead to the branch circuit neutral (white or gray in
color), using a wire nut.
B. Connect the oven red lead to the branch circuit red lead
and the oven black lead to the branch circuit black lead
in accordance with local codes, using wire nuts.
C. Install junction box cover.
Junction Box
Conduit
Bare
Ground
Red
White
Black
Strain Relief Clamp
(not included) Must Be
Used at Junction Box
Place Oven on a
Support to Assist in
Connecting Conduit
Ground
and Neutral
Wires
Junction Box
Cover
Ground
Wire
8
FOUR-CONDUCTOR BRANCH CIRCUIT CONNECTION
NOTE: If residence leads are aluminum conductors, see WARNING in Section 5, Electrical Requirements.
A. Cut the neutral (white) lead from the crimp. Re-strip the neutral (white) lead to expose
the proper length of conductor.
B. Attach the appliance grounding lead (green or bare copper)
in accordance with local codes. If the residence grounding
conductor is aluminum, see WARNING in Section 5.
C. Connect the oven neutral (white) lead to the branch circuit
neutral (white or gray) in accordance with local codes, using
a wire nut.
D. Connect the oven red lead to the branch circuit red lead
and the oven black lead to the branch circuit black lead
in accordance with local codes, using wire nuts.
NOTE: If the residence red, black or white leads are aluminum
conductors, see WARNING in Section 5.
E. Install junction box cover.
9
SLIDE OVEN INTO OPENING
• Lift oven into cabinet cutout using the
oven opening as a grip. Carefully push
against oven front frame. Do not push
against outside edges.
Ground
Wire
Junction Box
Cover