Bri f instruction of control e, Front panel – Acesonic SURROUND-SOUND UPCONVERSION DVD KARAOKE RECEIVER WITH HDMI SWITCHING User Manual
Page 4
INPUT
PLAY/PAUSE
#
b
BLUETOOTH
OPEN/CLOSE
MUSIC.MENU
SD/MMC/MS
USB
1
2
3
4
5
6
7
8
9
10+
0
PREV
NEXT
DELAY
REPEAT
ECHO
PHONE
MIC2
MIC1
KEY CONTROL
-
MULTIPLEX
MIC1 / MIC2 VOL
MIC VOL / ADJUST
MASTER VOLUME
5.1CH
CH MODE
MIC MENU
MIC
MIC
MIC
STOP
AM/FM
MIC BASS
MIC TREBLE
VIDEO
AUDIO
L
R
IPod Dock
5.1 SURROUND-SOUND UPCONVERSION DVD KARAOKE RECEIVER
DKR-510
-
FRONT AUX
BLUETOOTH
CD+G
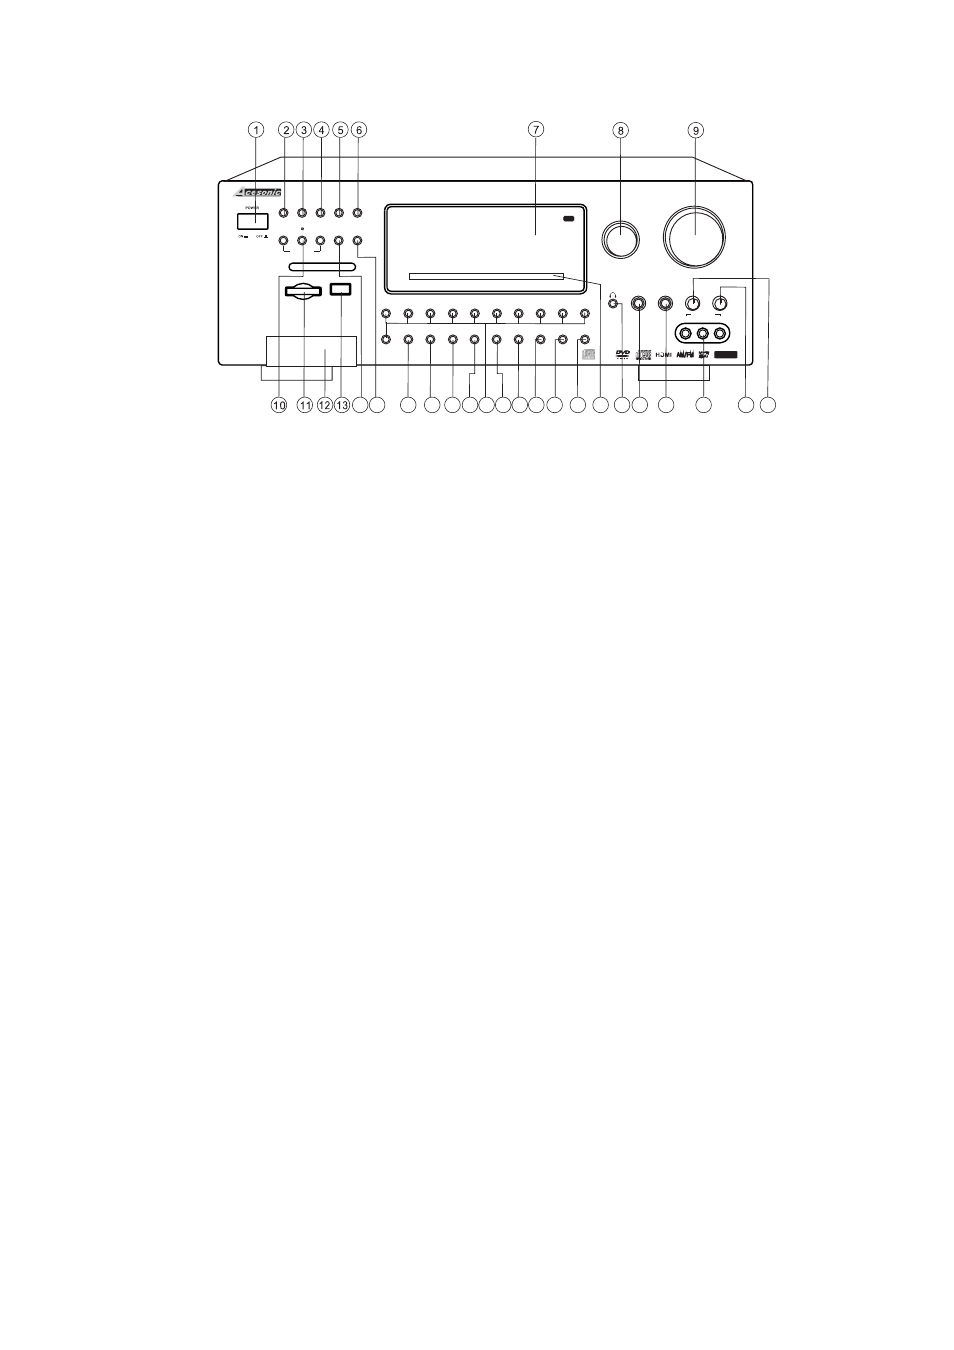
2.Bri f instruction of control
e
FRONT PANEL
14 15
16
17 18 19 20 21 22 23 24
25 26
28
29
30
31 32
27
1. POWER SWITCH: Turns the power on and off(Have to manually switch between AC110V and 220V).
5. PLAY/PAUSE: In DVD mode, begins the playback of media inside the disc tray or resume paused
playback.
6. OPEN/CLOSE: In DVD mode, to open or close the tray. This button also uses to switch to DVD mode
from other input sources.
7. DISPLAY SCREEN: Displays various operating information.(e.g. Main Volume, DSP, source, etc.)
16. PREV: In DVD mode, use this button to skip to go to the beginning of the previous track.
17. NEXT: In DVD mode, use this button to skip to go to the beginning of the next track.
18. AM/FM : Press the key to switch between AM and FM, then use the MICVOL/ADJUST knob to adjust
the tuning.
20. NUMBER BUTTON: Use to input selections for track selection in DVD mode,or programing purpose.
23. MIC DELAY: Press this button and use
to adjust microphone vocal delay level.
MIC VOL/MULTI knob
22. MIC1/MIC2 VOL: Press it to switch between MIC1 and MIC2 then use MIC VOL/ADJUST knob to adjust
MIC1 or MIC2 volume.
21. MIC MENU: To set up 8 different Microphone settings(see P.19 for detail), press this button and use
MIC VOL/ADJUST knob to change the volume.
.
This function works only when Microphone input is found
24. MIC REPEAT: Press this button and use MIC VOL/MULTI knob to adjust microphone vocal repeat level.
25. MIC ECHO: Press this button and use MIC VOL/MULTI knob to adjust microphone vocal echo level.
12. IPod Docking: Support Ipod playback, stop, fast forward, back forward. Not IPhone compatible.
9. MASTER VOLUME: Controls the music volume. Trun clockwise to raise the music volume and counter-
clockwise to lower the music volume.
8. MIC VOL/MULTI: In Karaoke mode, used to adjust the MIC volume. Or use it after pressing INPUT(#2)
button to cycles through the available input channels. This button also can be use to adjust the
parameters for various settings including surround-sound settings, microphone effect settings etc.
4. STOP: In DVD mode,Stop/ends playback.
19. CHANNEL MODE: To switch cycles through the 2.1, 5.1 or bypass audio channel mode.
28. MIC INPUT 1: Connect to a microphone by using 1/4" microphone cable .
11. SD/MMC/MS CARD READER: Compatible formats: SD,Mini SD and MMC. You can play MP3,VCD format.
*All the CARD device need to be FAT32 file format.
10. KEY CONTROL: Transposes the music key while playing Karaoke disc.
13. USB INTERFACE: Use this interface to connect USB devices such as Mp3 players, external hard drive,
or flash drives. You can play MP3,VCD or DVD Audio/Video files form this interface.
*All USB device need to be FAT32 file format.
15. MUSIC MENU: Press this button to switch between BASS, TREBLE, SUB WOOFER and sound channel
(2.1 Ch, 5.1 Ch or Bypass)setting, then use the MICVOL/ADJUST knob(#8) to adjust the volume.
14. MULTIPLEX: Switch between the left mono, the right mono or stereo sounds. Use to turn ON/OFF on
multiplex CD+G or VCD karaoke discs.
2. INPUT SELECTOR: Press this button , then use #8 MIC VOL/ADJUST knob to select the desired
input source.
3. BLUETOOTH ON/OFF: To turn on or off the BLUETOOTH function(See P.20 for detail).
26. DVD tray: Press OPEN/CLOSE(#6) button to open or close the DVD Tray.
27. HEADPHONE INPUT JACK: Connect headphones to this jack using a mini-jack headphone cable.
The speakers are turned off while the headphones plug is connected to the headphone jack.
with HDMI switching, Bluetooth, IPod Dock
29. MIC INPUT 2: Connect to a microphone by using 1/4" microphone cable .
30. AUX INPUT: Connect to the AUX audio and video inputs.
31. MIC TREBLE: This knob is used to adjust microphone treble level.
32. MIC BASS: This knob is used to adjust microphone bass level.
2